# Asset Management User Manual
| Document Version | Content Revision | Revised By | Revision Date |
|---|---|---|---|
| V1.0 | Initial Draft | Guochenghao, Tang Xinxin | 2022-11-01 |
# Table of Contents
# I. Categories
# 1. Add New Category
In the asset category menu, click the 【Add Device Type】 button. A pop-up window will appear where you can enter the name, type, model, and manufacturer, then click OK to create a new device type.
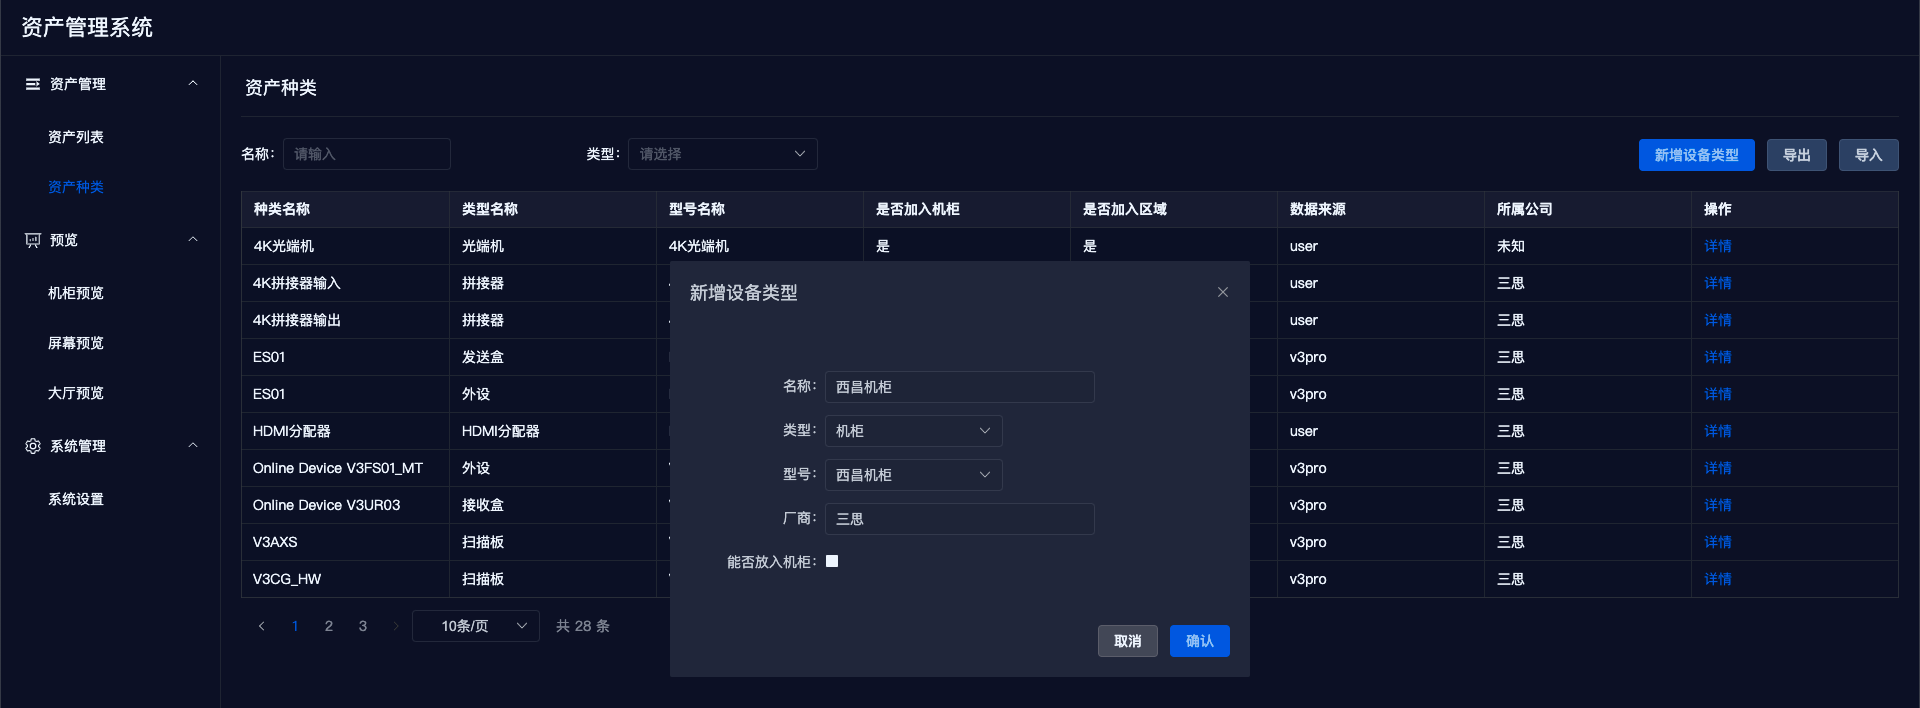
Notes
- Entering a non-existent type creates a new type.
- Entering a non-existent model creates a new model under a specific type.
- Types and models of regions cannot be created.
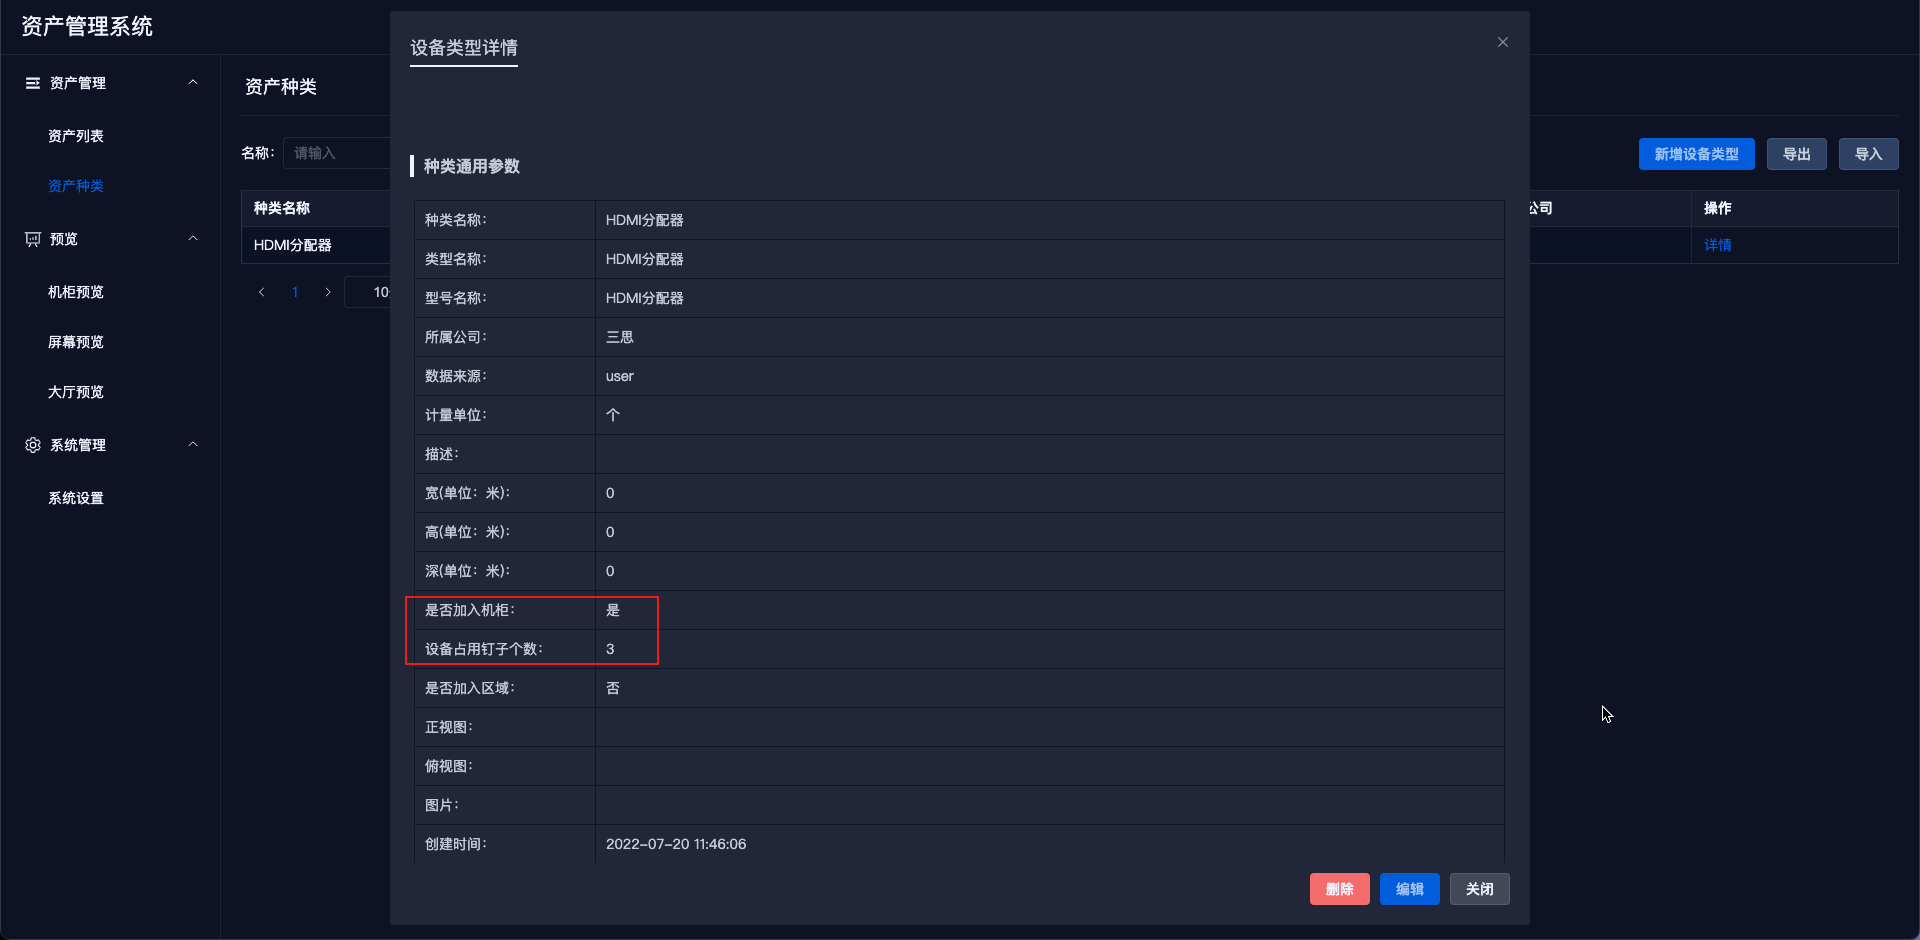
- Checking the option to include in rack requires inputting the number of rack units occupied by the device (default is 3 units).
- In addition to 【Join Rack】, there’s also 【Join Region】【Join Group】; the latter two are selectable by default and can be modified in the category details.
- Users can modify the information for manually added types regarding whether they can be placed in a rack; types added by scanning services can by default be placed in racks and can be modified in the category details.
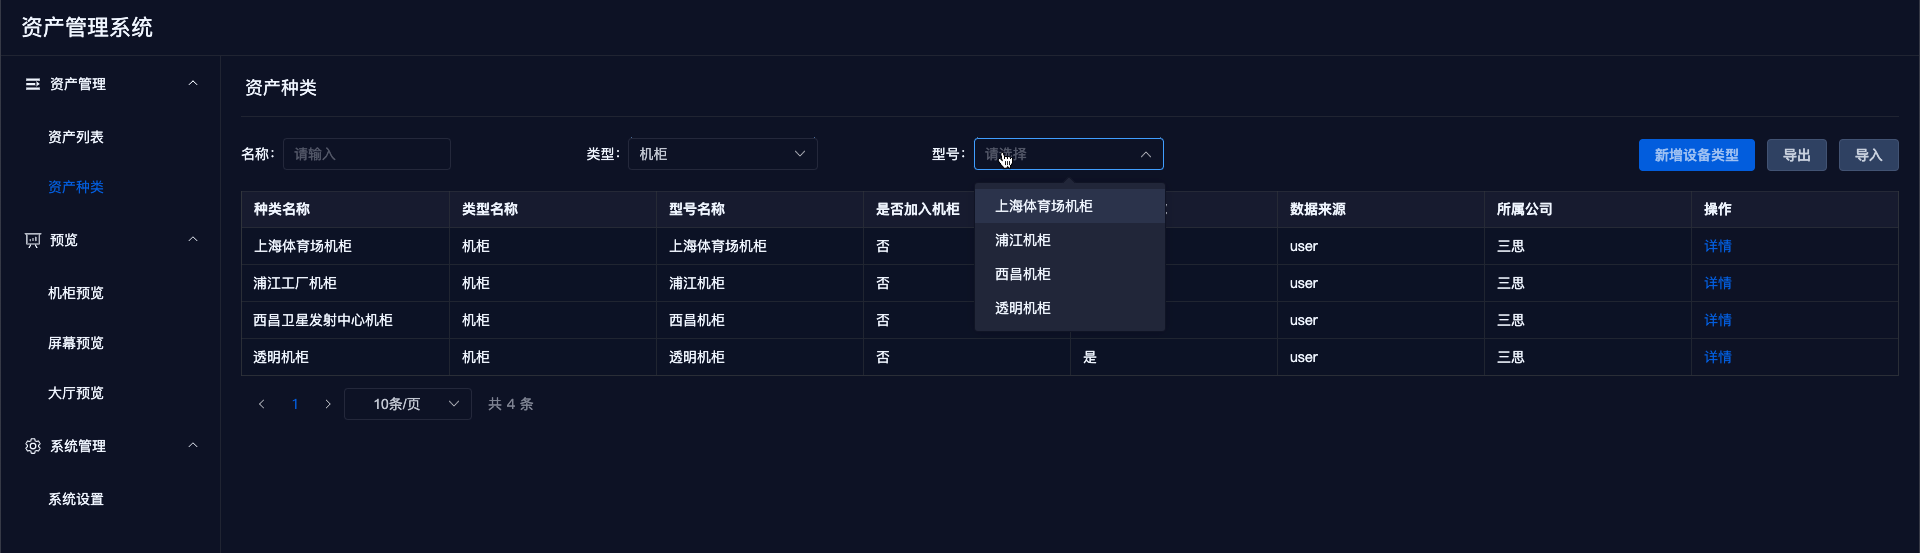
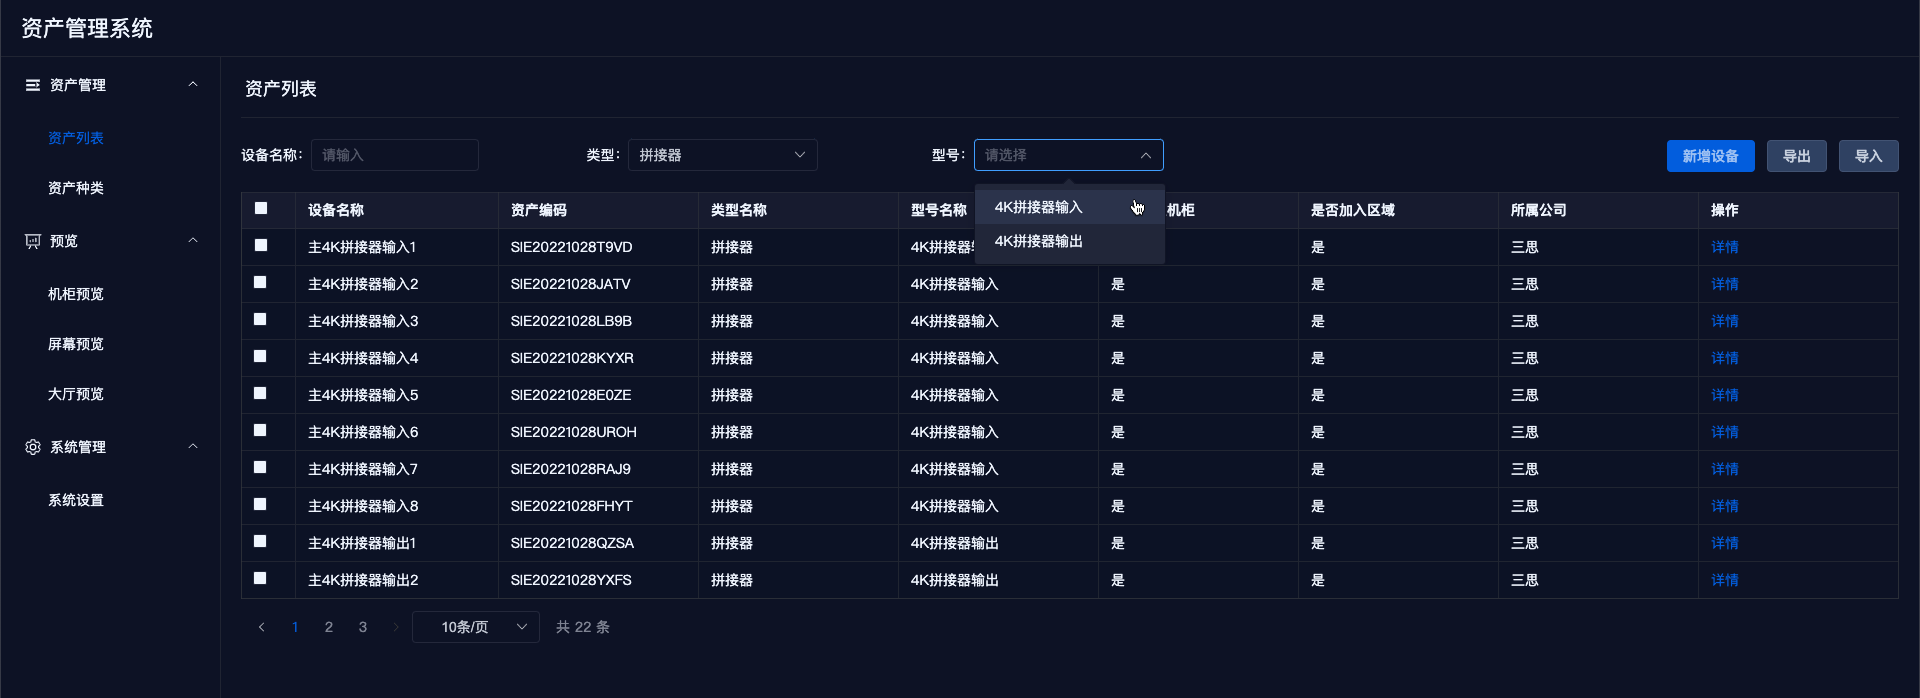
# 2. Category Search
- Conduct fuzzy searches based on name, type, or model.
- Precise searches can be performed using dropdown boxes for type and model.
# 3. Import and Export
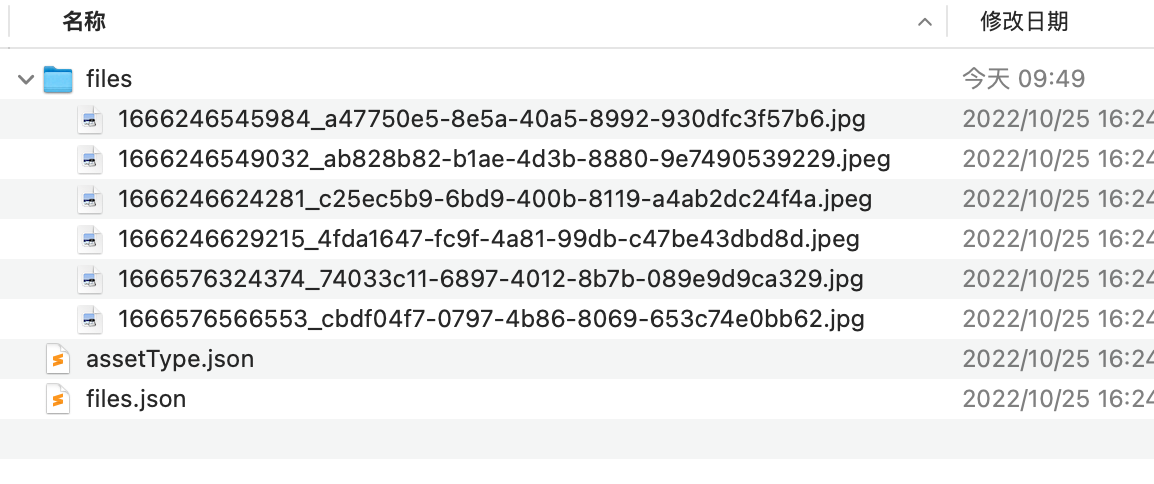
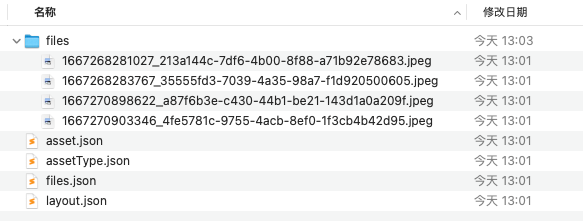
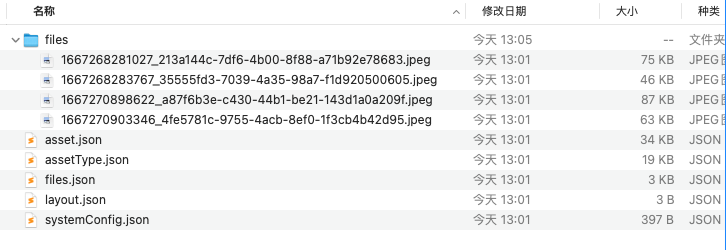
- Exporting will package all category data along with their corresponding image files, naming the exported file as
export.assetType.timestamp.zip. The extracted files are as follows:
Importing allows you to re-upload the exported zip package. Do not modify the zip file.
Import Logic: If there is data, it will update the existing data; if there's no data, it will create new data. Importing an empty file will not update anything.
# 4. Edit Category Details
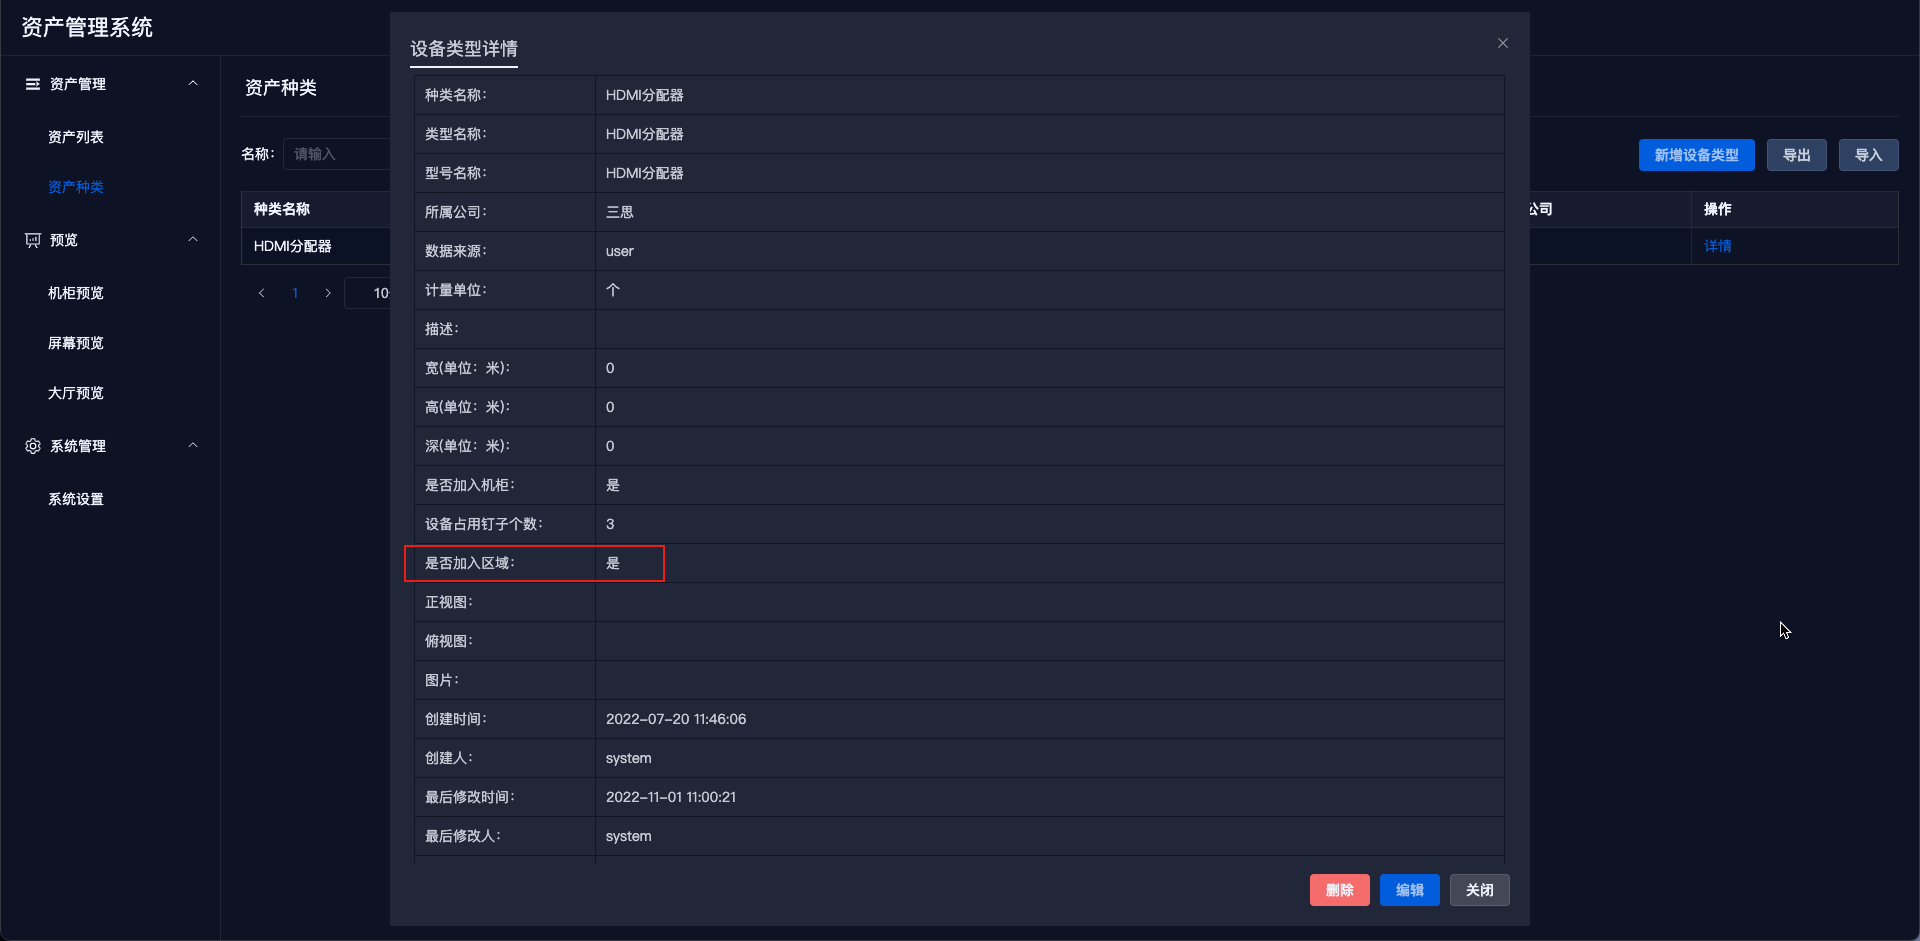
In the category list, click the detail button next to the target type to enter the type detail page.
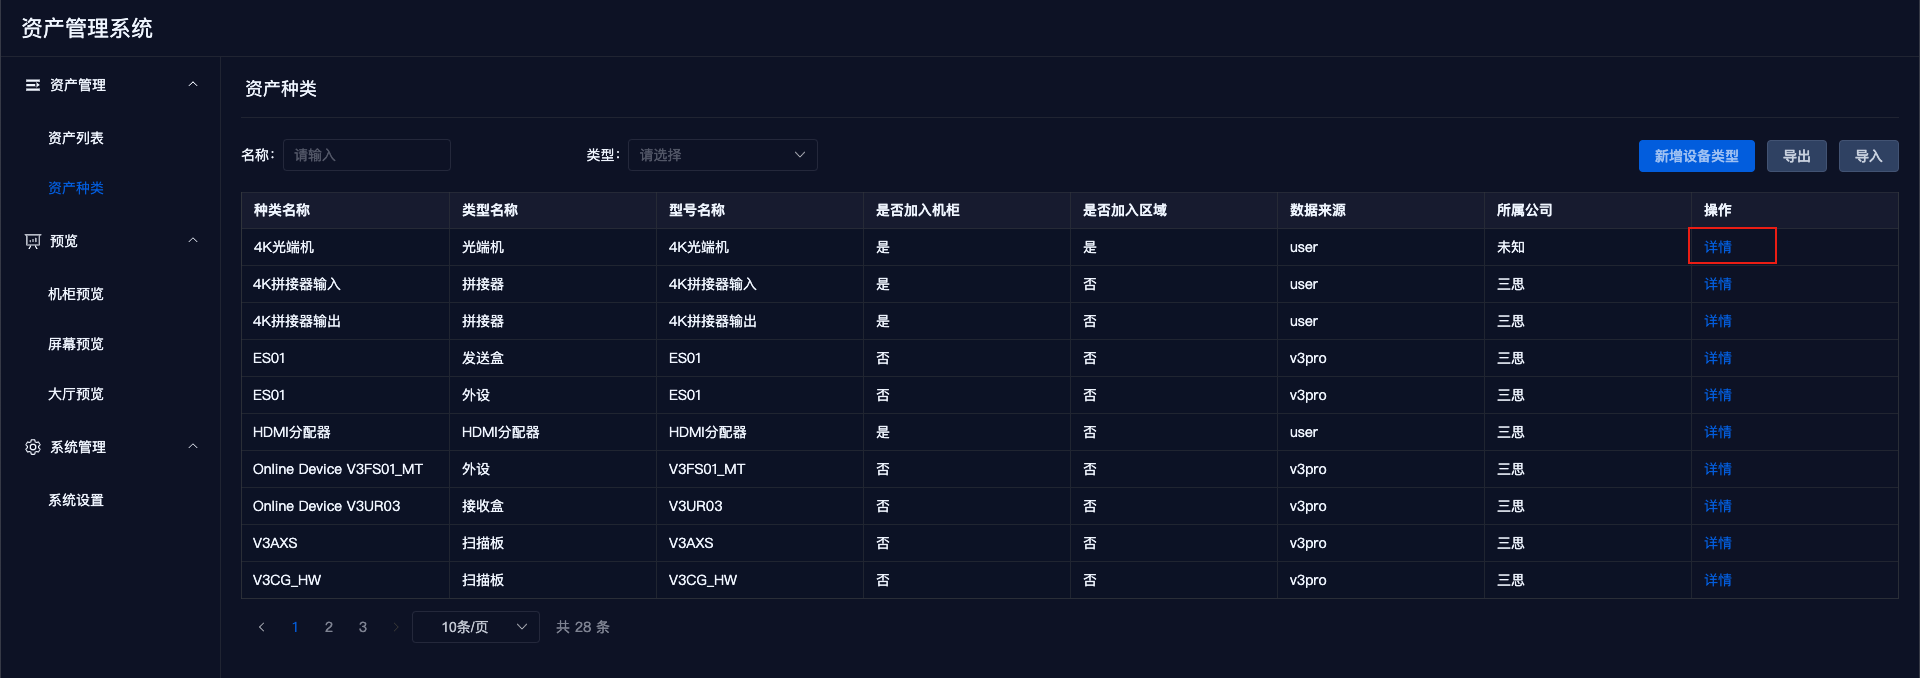
The detail page is displayed in a pop-up format.
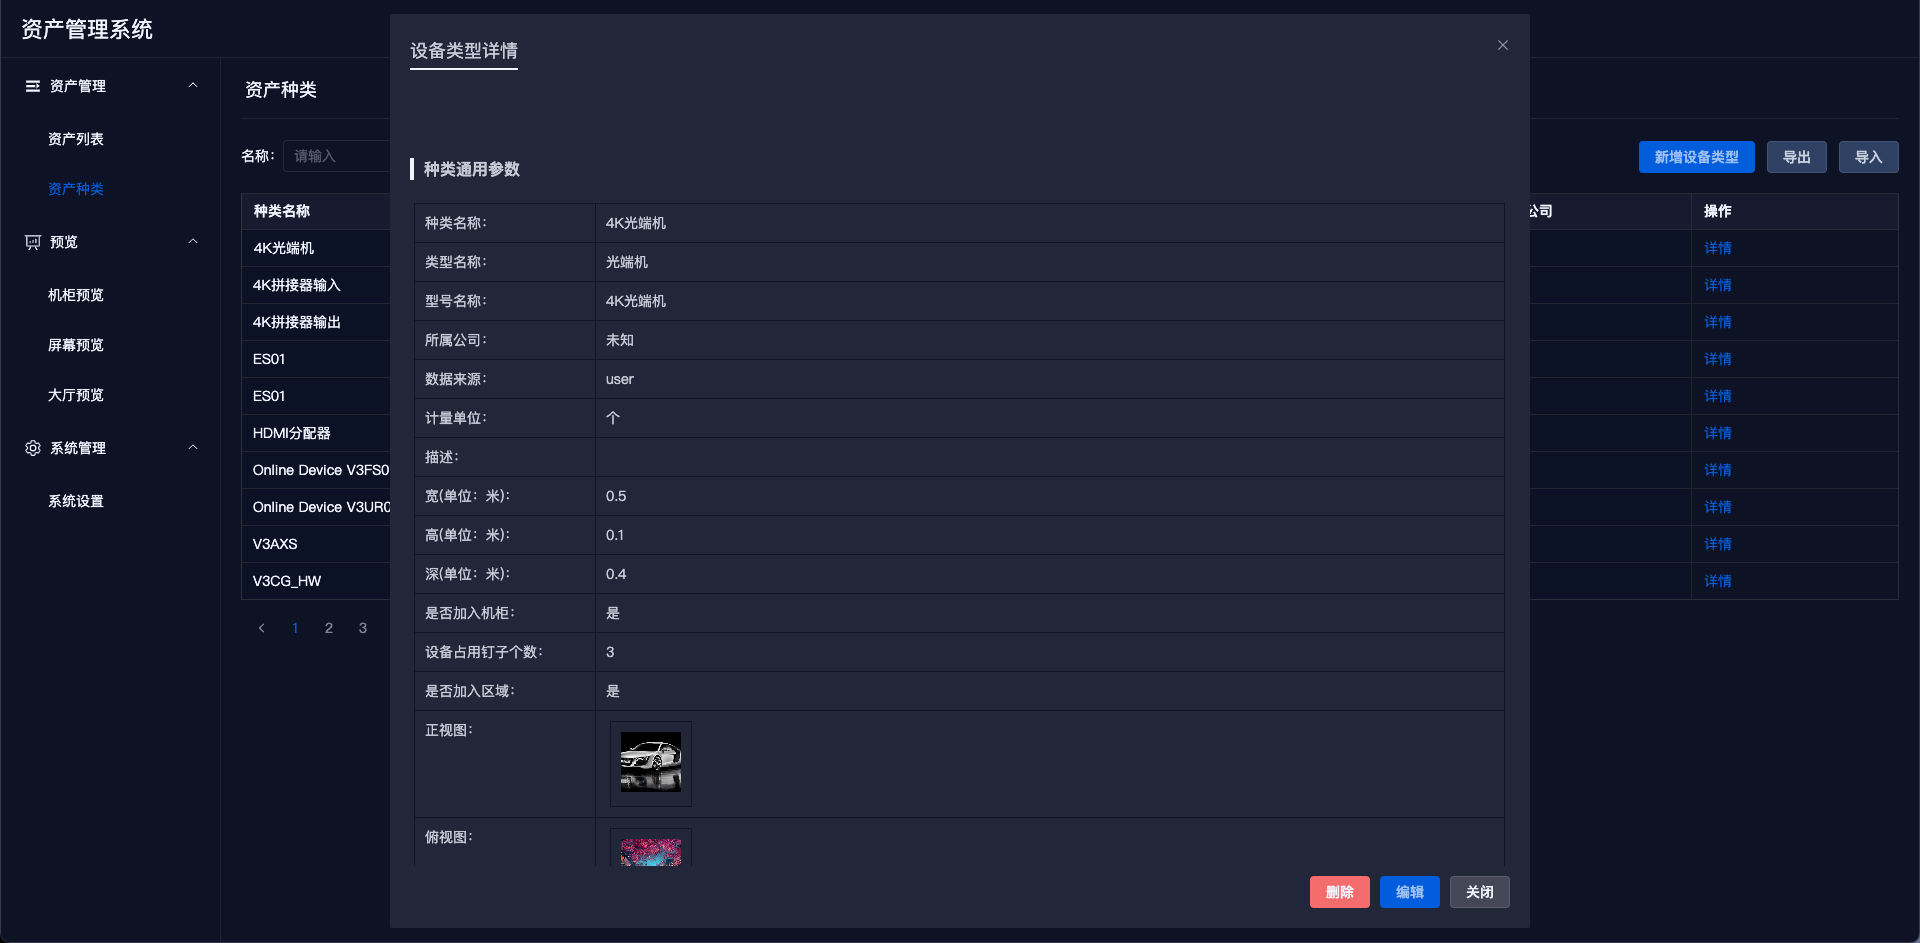
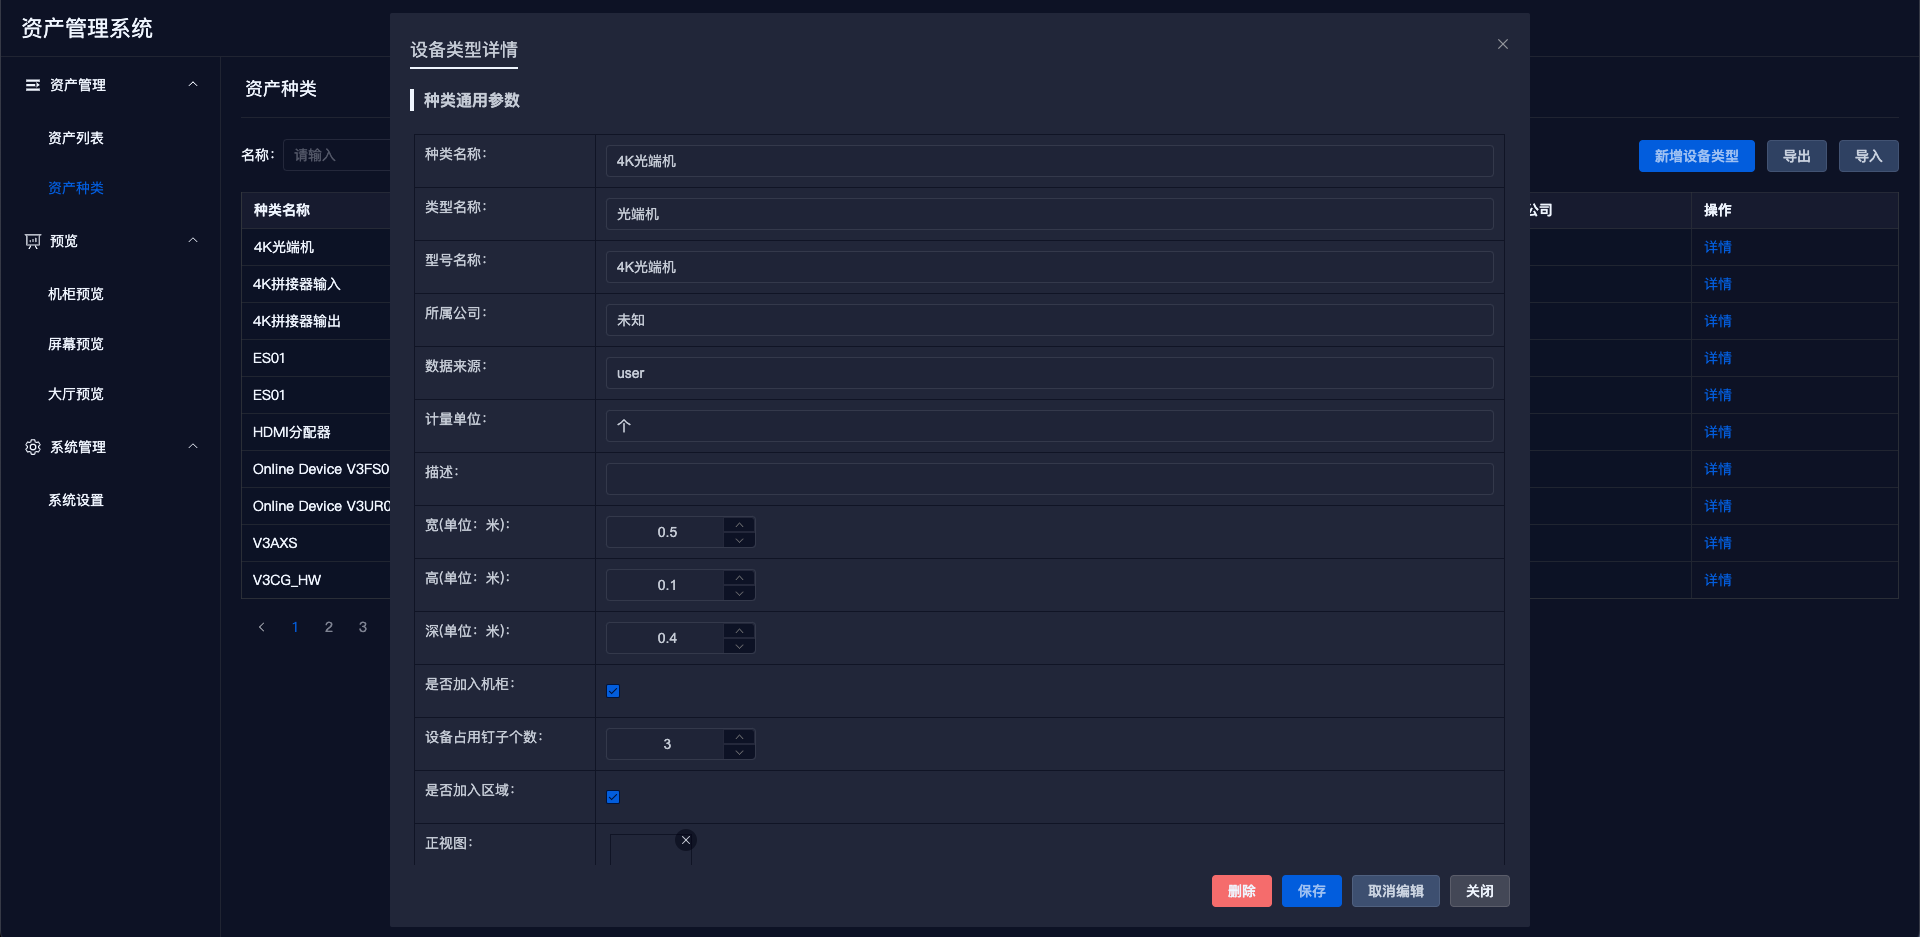
Click the blue edit button to modify the data; the edit button in the bottom right corner will change to 【Save】【Cancel Edit】.
Notes:
- Width, height, depth: Regular devices are edited in the type detail page; regions and screens are edited in the device detail page.
# 5. Upload Images
When editing type information, you can upload front view, top view, and other images. Only one image each for front view and top view can be uploaded, with multiple uploads keeping only the last one.
Regions and screens cannot have images uploaded in the category.
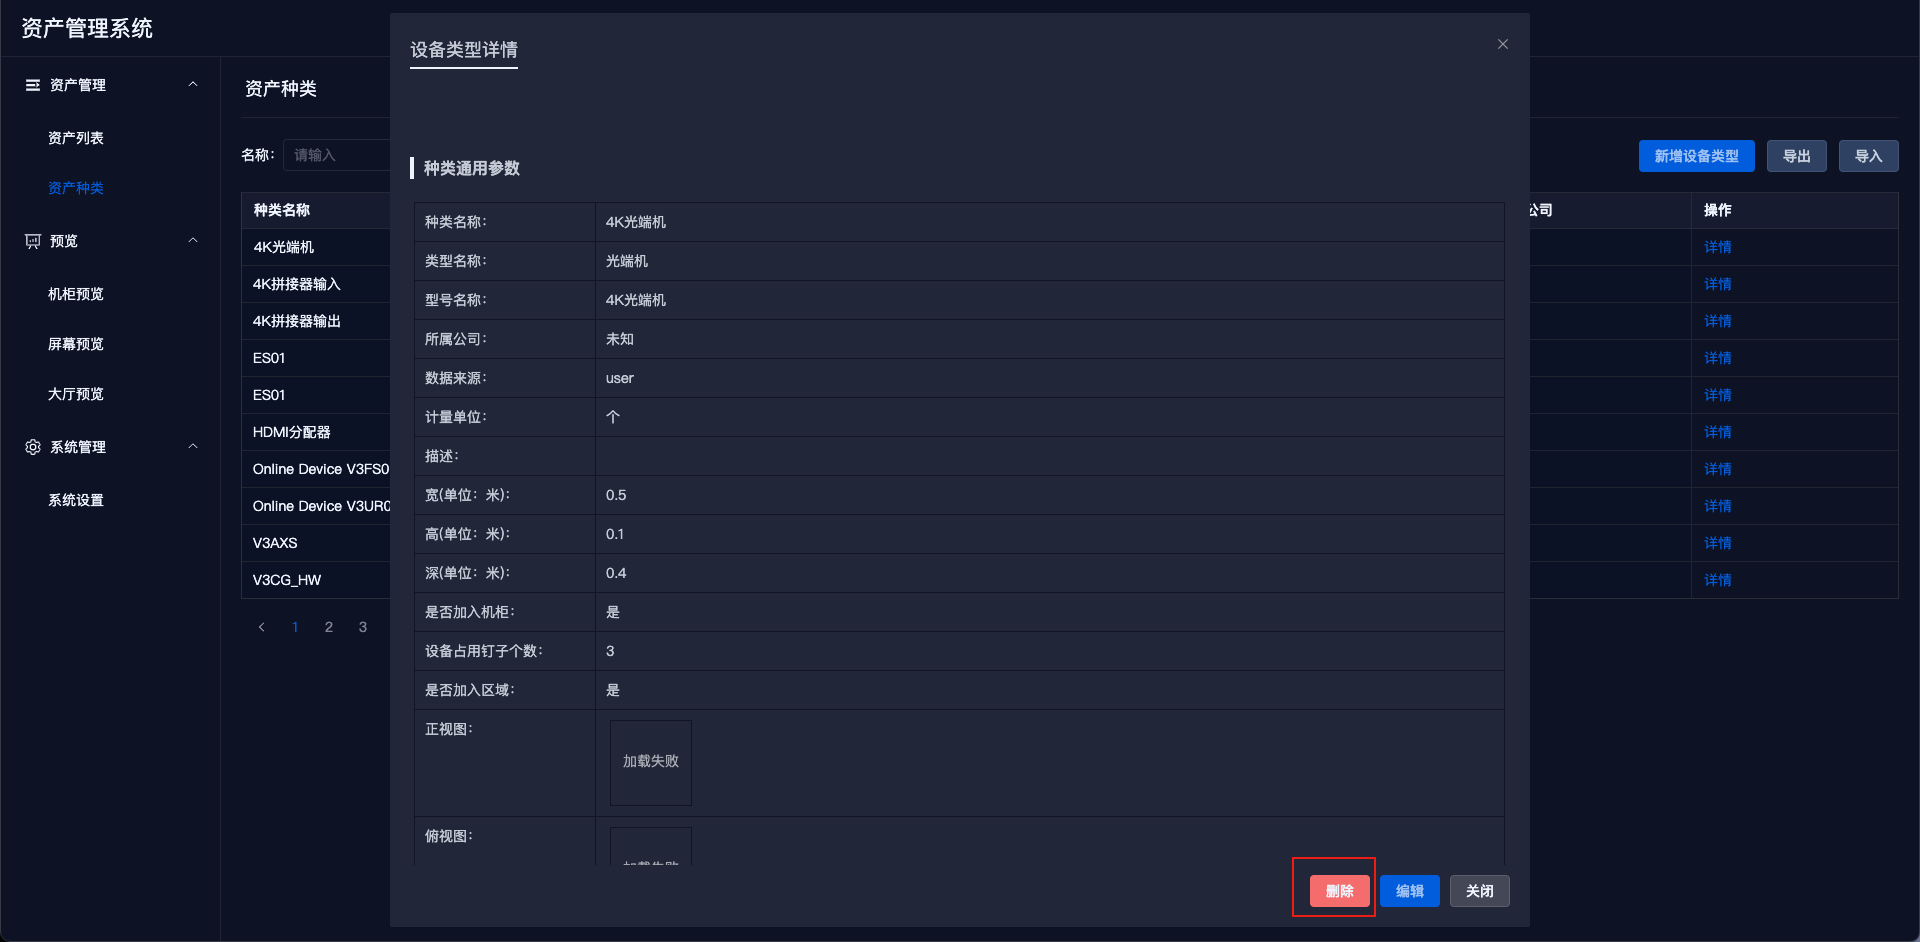
# 6. Delete Category
In the type details, click the delete button at the bottom to remove the type.
Deletion conditions: Only types that have not been used (i.e., no actual devices of this type exist) can be deleted.
# II. Devices
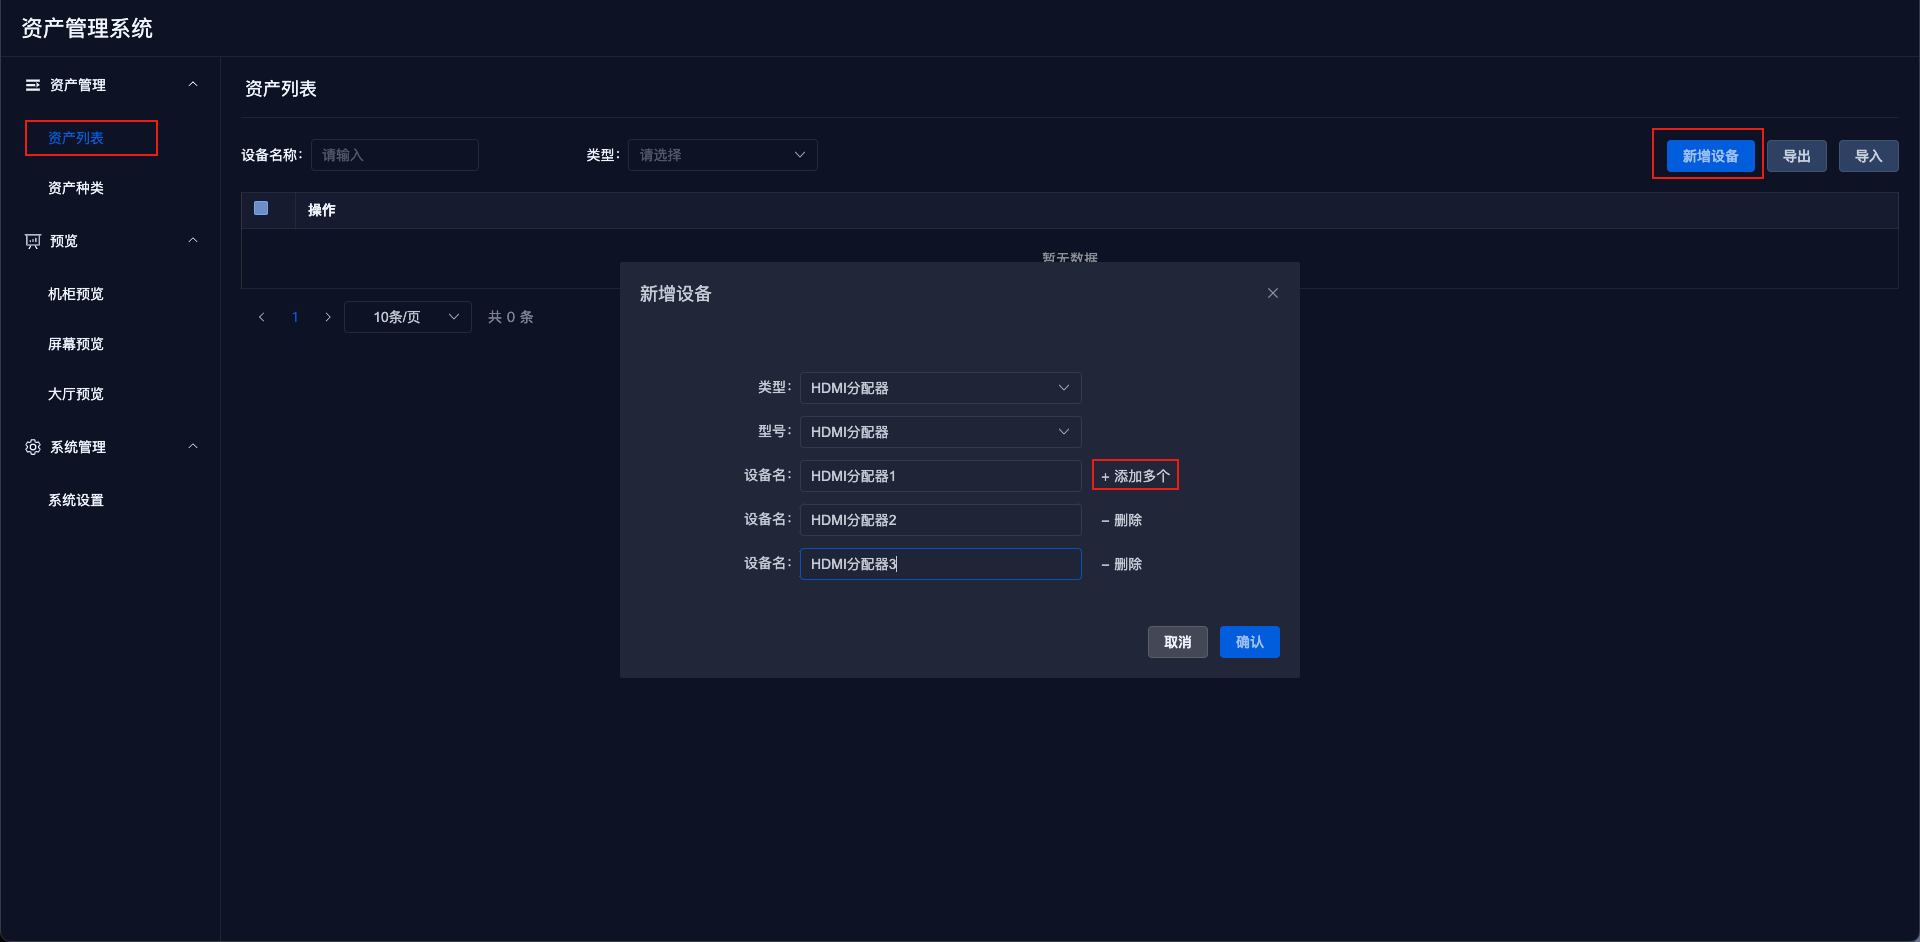
# 1. Add New Device
In the asset list, click the 【Add Device】 button. In the pop-up window, select the device type and model, and then enter the device name to add the device.
Click 【Add Multiple】 for batch addition.
# 2. Device Search
Search methods are the same as category search.
- Conduct fuzzy searches based on name, type, or model.
- Precise searches can be performed using dropdown boxes for type and model.
# 3. Import and Export
- Exporting will package all device data, type data, and their corresponding image files, naming the exported file as
export.asset.timestamp.zip. The extracted files are as follows:
Importing allows you to re-upload the exported zip package. Do not modify the zip file.
Import Logic: If there is data, it will update the existing data; if there's no data, it will create new data. Importing an empty file will not update anything.
# 4. Edit Device Details
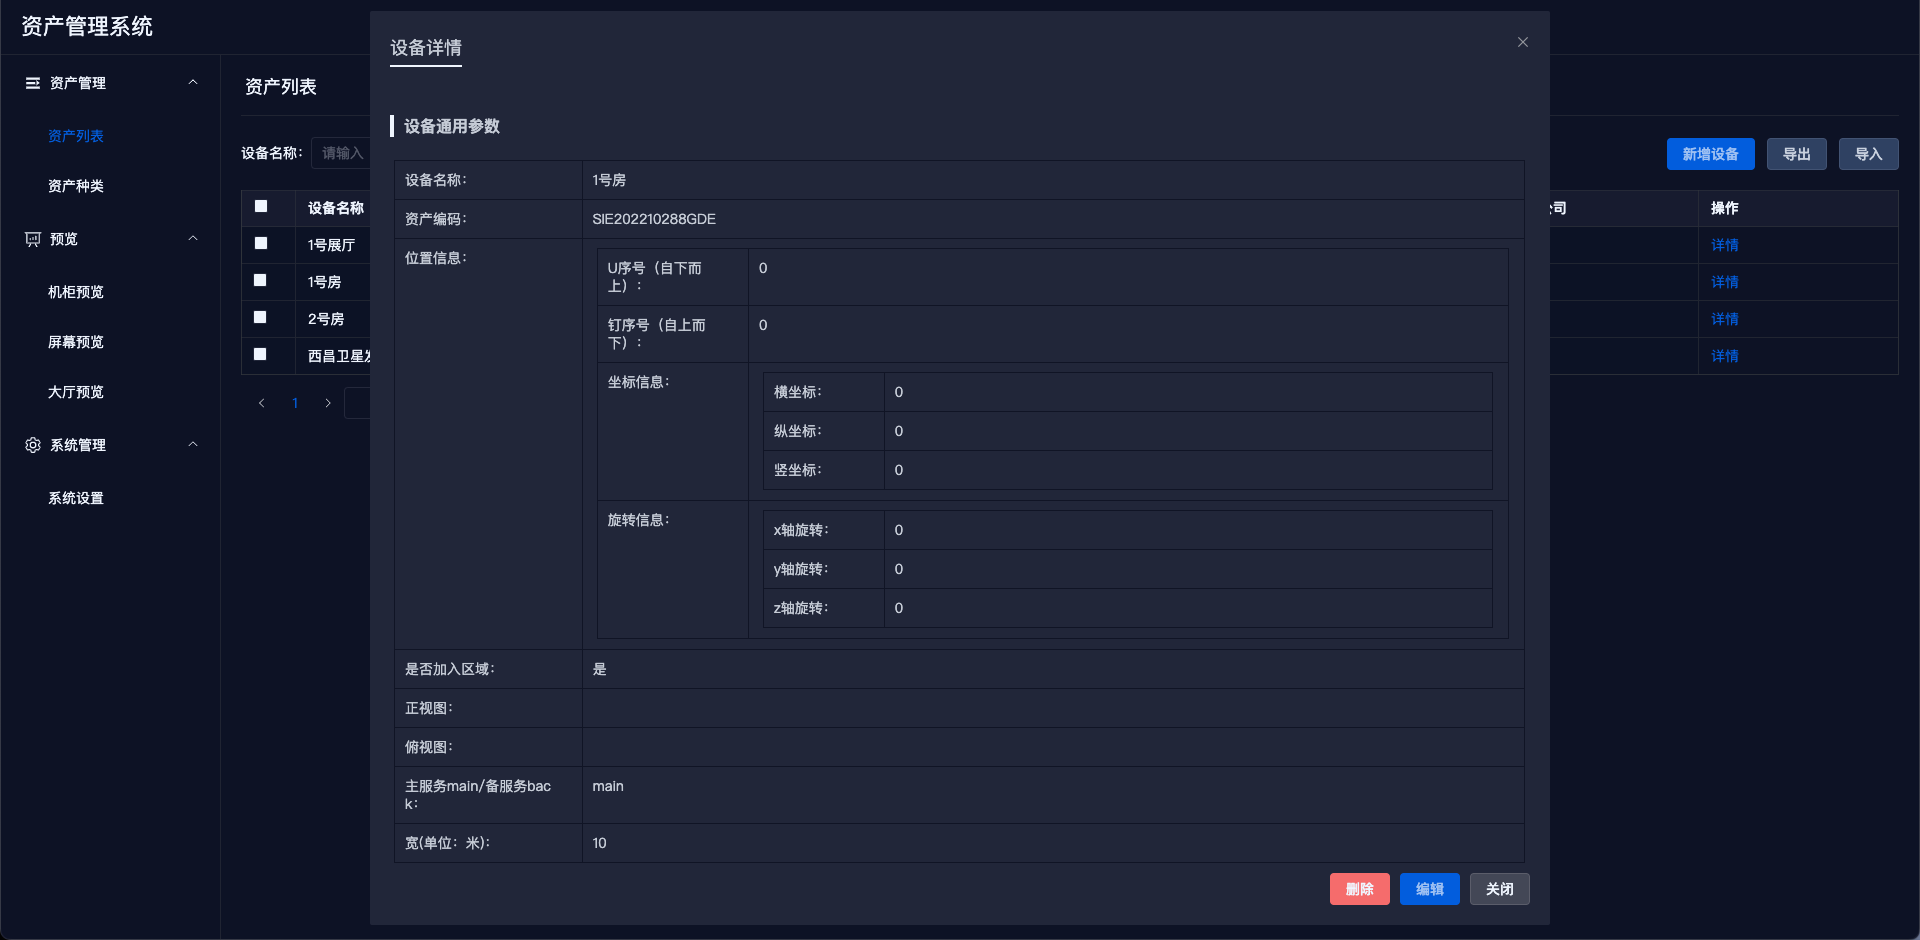
In the asset list, click the detail button next to the target type to enter the device detail page.
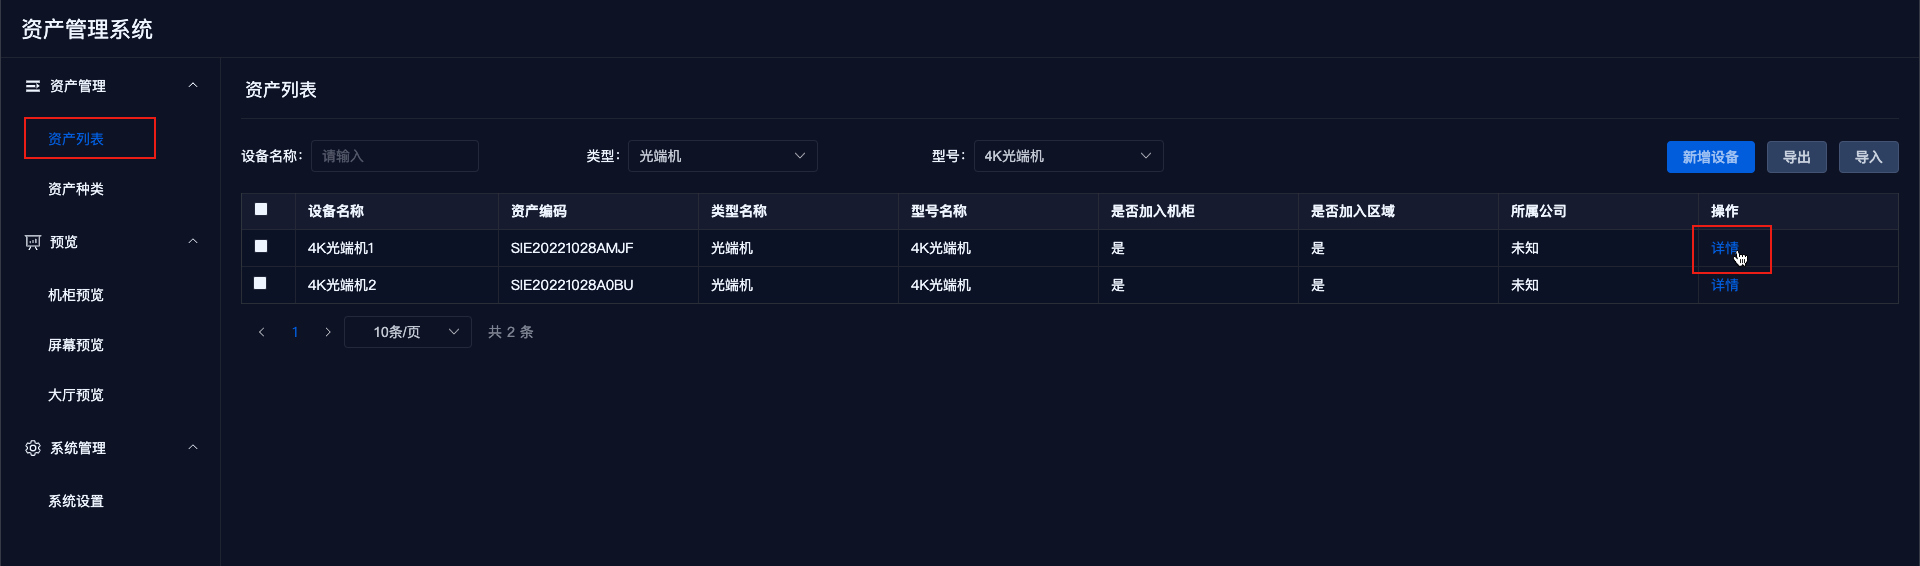
The detail page is displayed in a pop-up format.
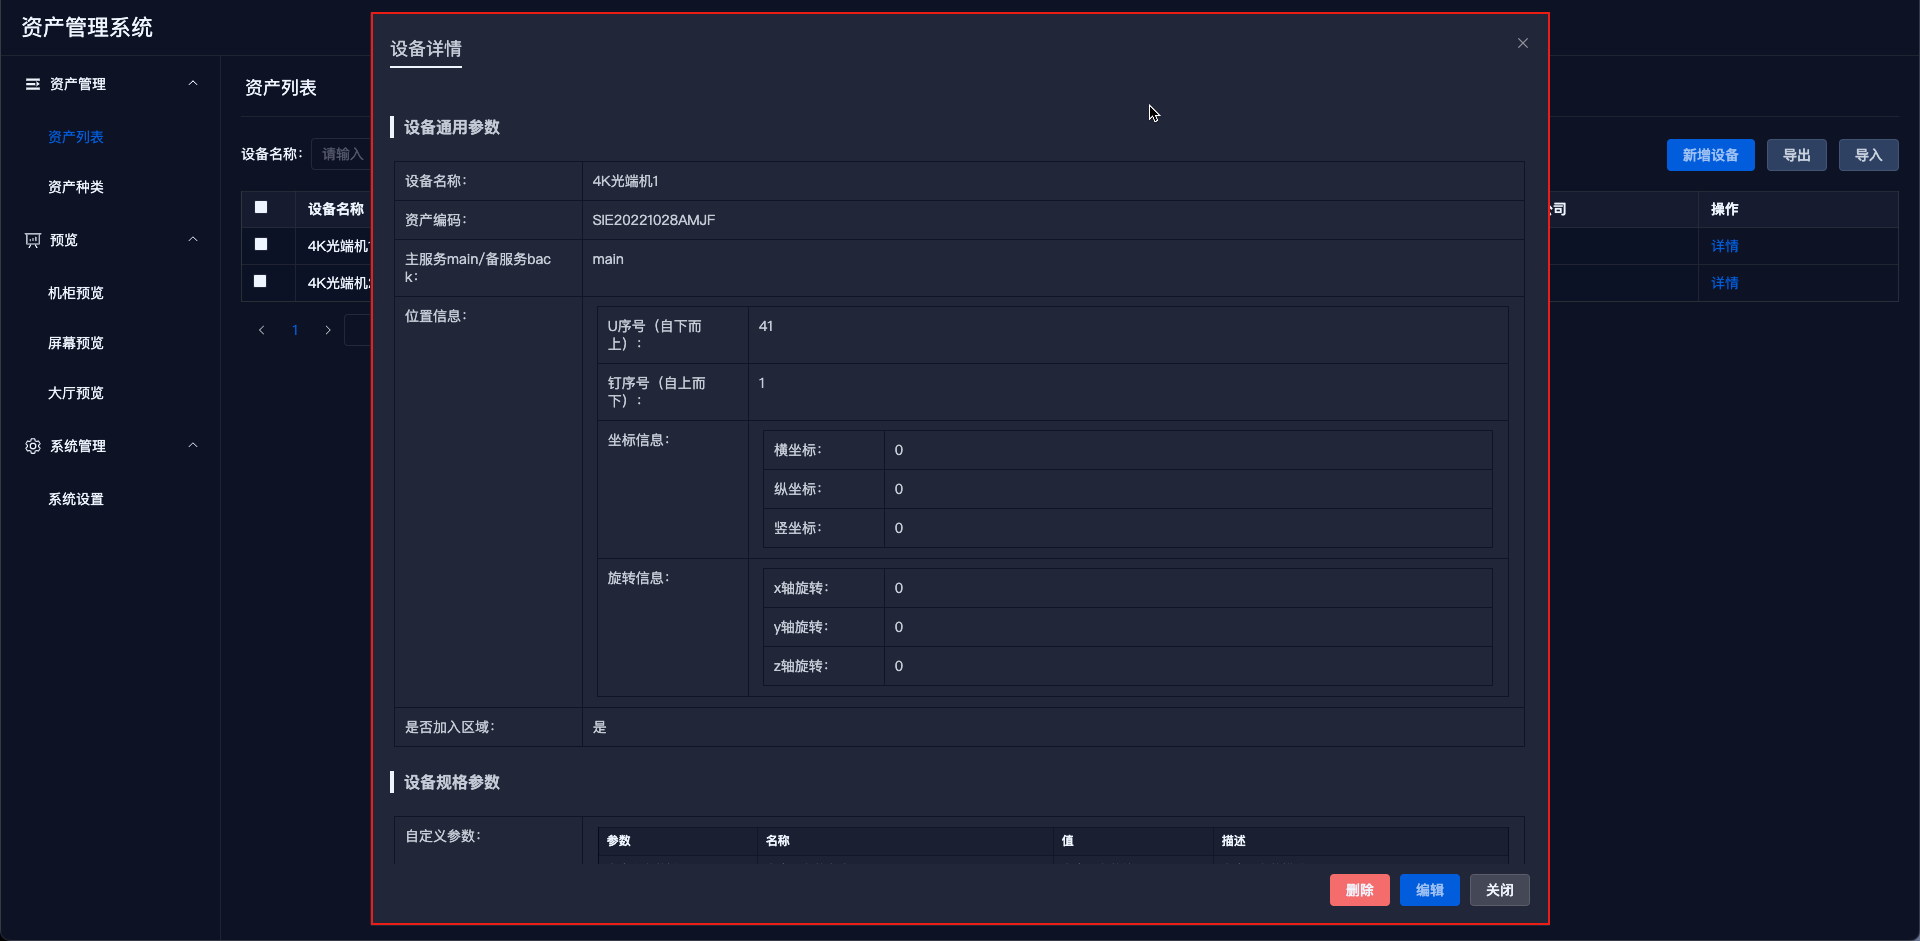
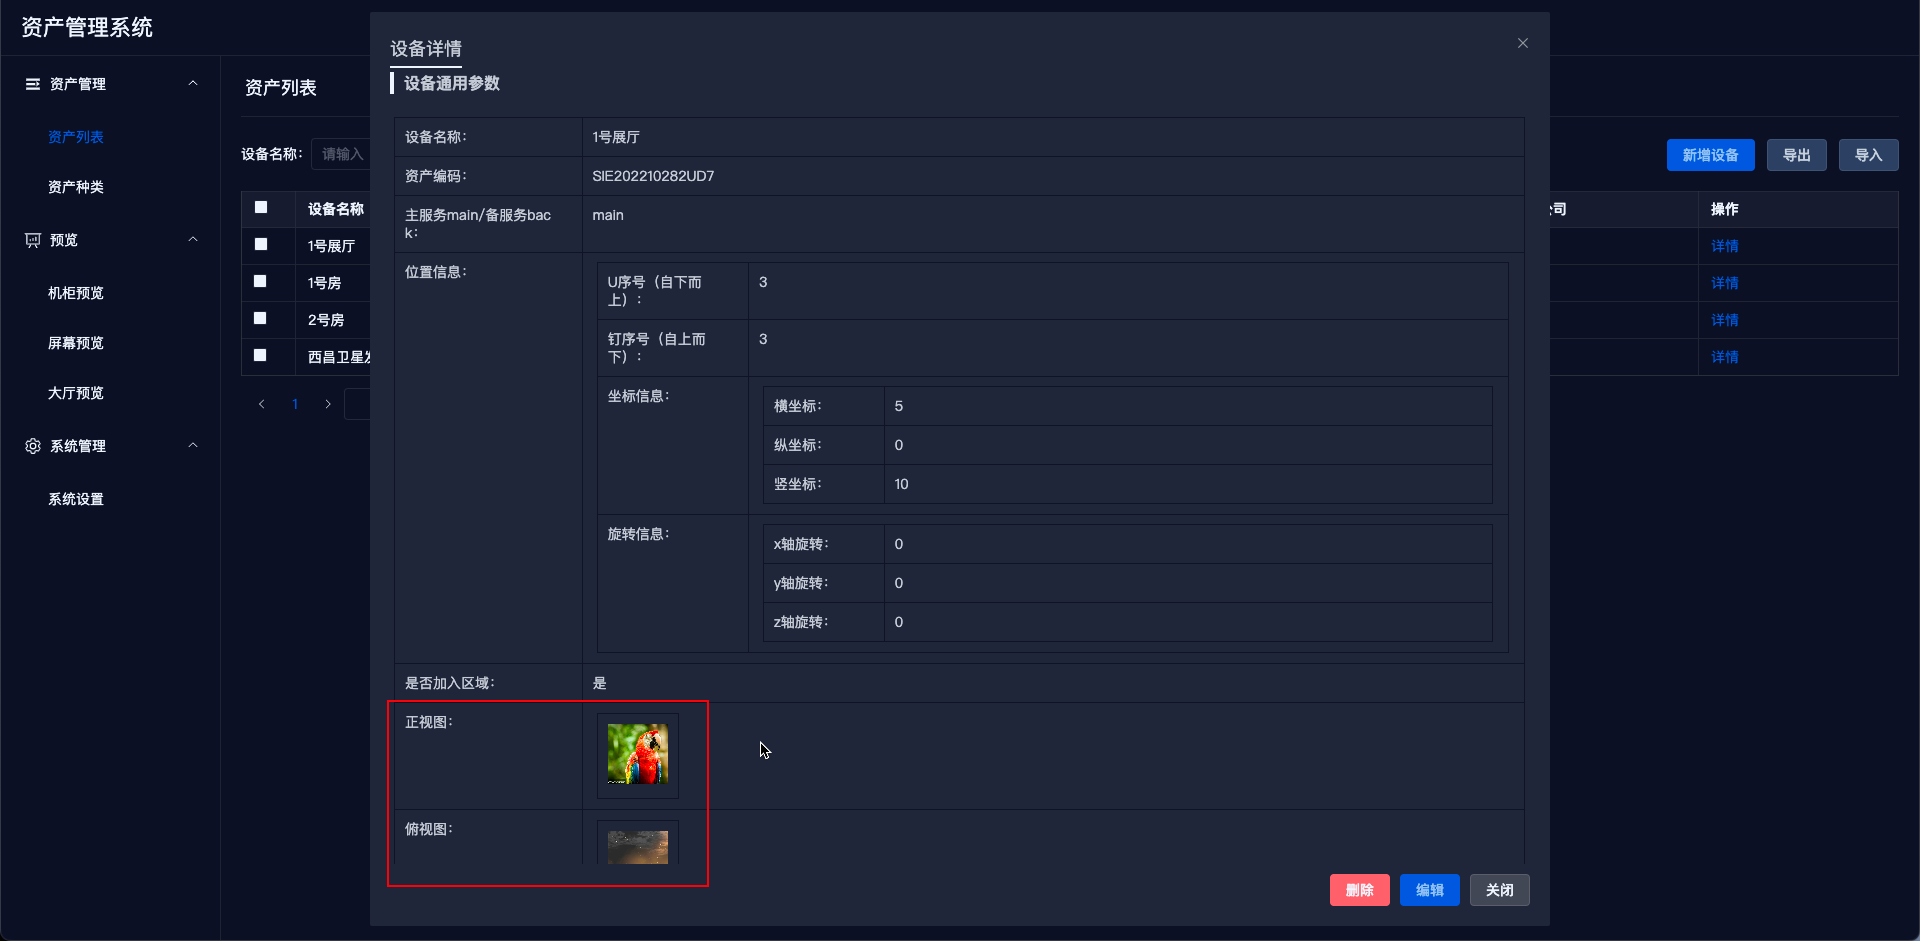
Device details will show the device's location information and environmental configuration parameters, as well as corresponding category information.
Click the blue 【Edit】 button to modify the data; the edit button in the bottom right corner will change to 【Save】【Cancel Edit】.
Editing is limited to device environment parameters; device category information cannot be edited.

Notes:
- Width, height, depth: Regions and screens are edited in the device detail page; regular devices are edited in the category detail page, and can only be viewed in the device detail page.
- Regions only have coordinate information and rotation information, without U serial numbers or pin serial numbers.
# 5. Upload Images
Regions and screens can only have images uploaded in the device details.
# 6. Delete Device
In the device details, click the delete button at the bottom to remove the device.
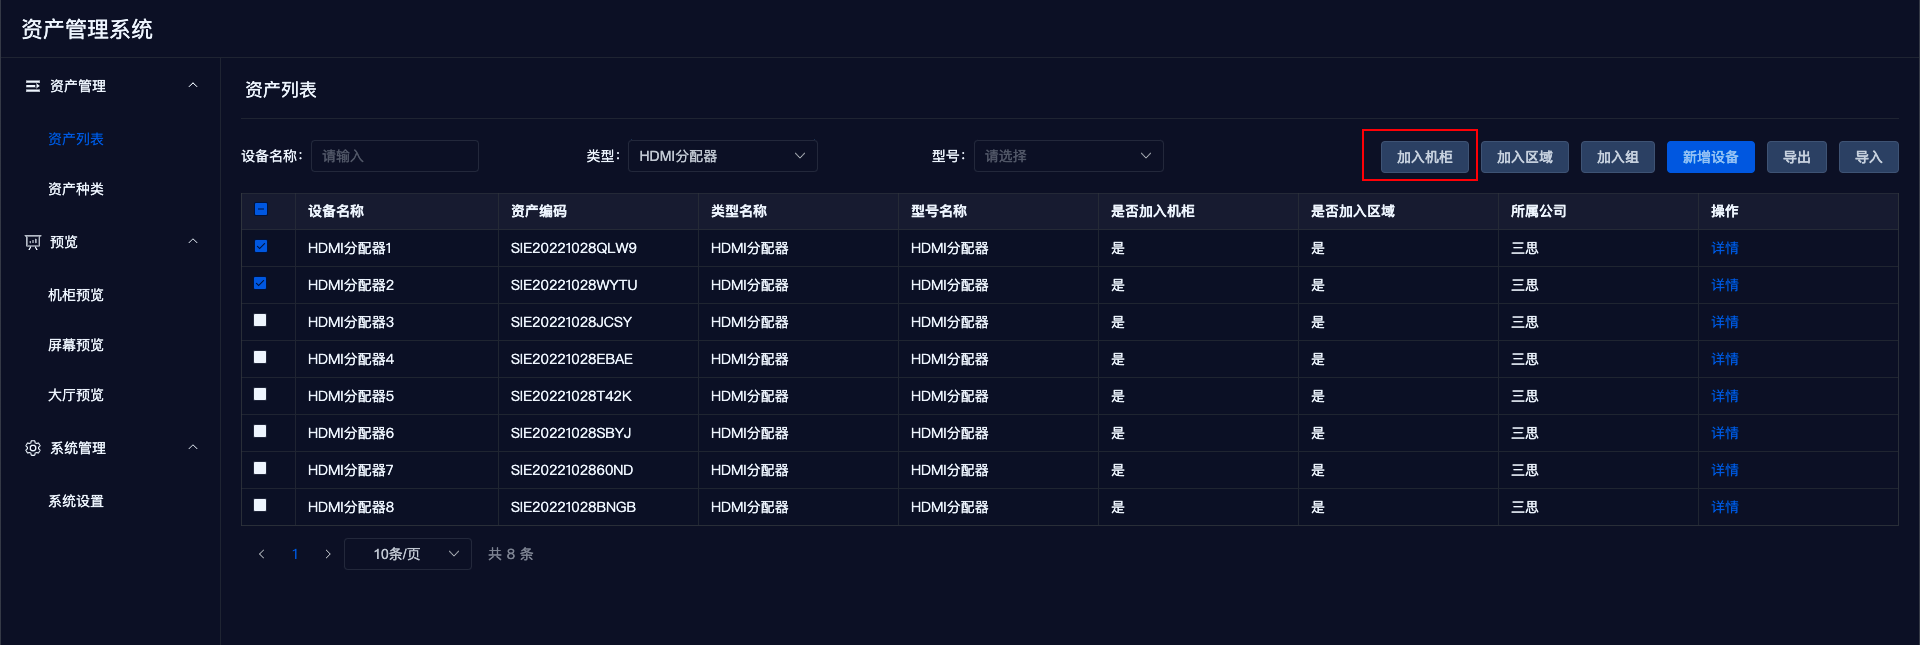
# 7. Add to Rack
If a device can be added to a rack, select the device, and a 【Join Rack】 button will appear in the upper right corner of the page. Click the button to open the join rack pop-up.
The pop-up defaults to show the selected device, marked with a red [New] in the device name.
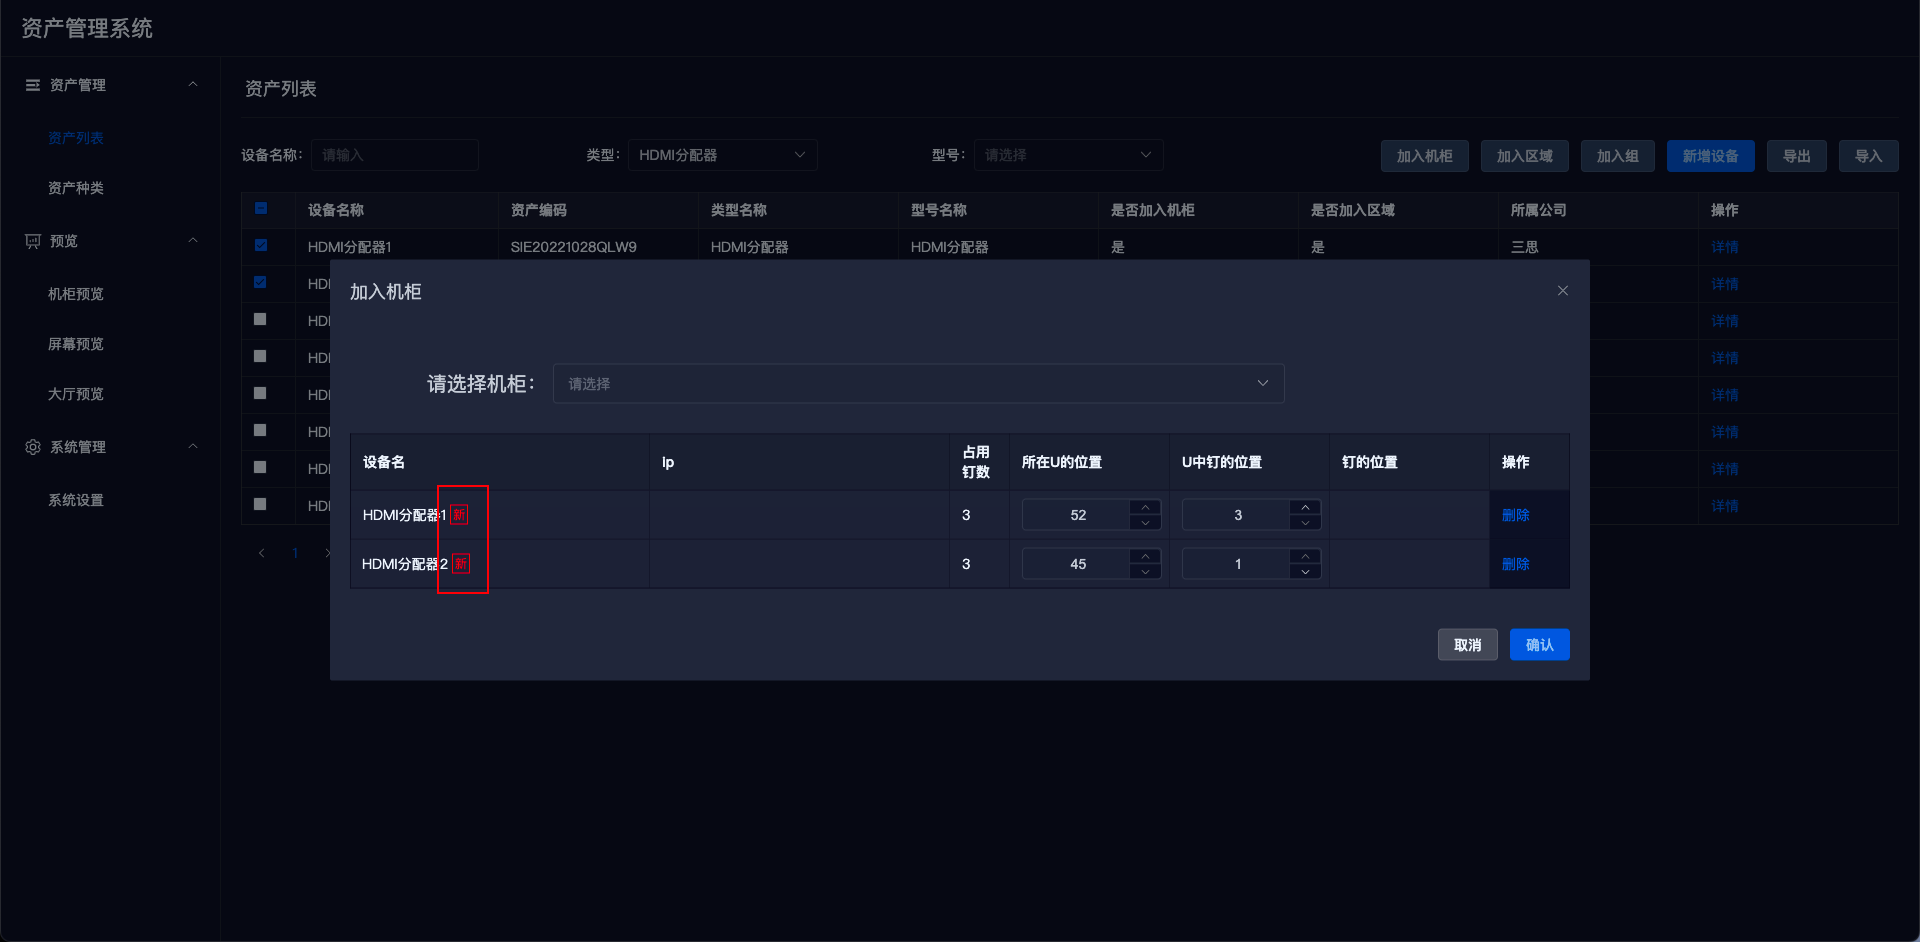
Select the desired rack from the 【Select Rack】 dropdown.
- The right side of the dropdown will display the current U count of the rack.
- The device list will show which devices are already in the rack and display the corresponding U position (bottom to top) and pin position (top to bottom), calculating the pin position (total position from the top to bottom).
- The rack information can be previewed in real-time on the right side of the list.
- The rack preview will show the front view of the device.
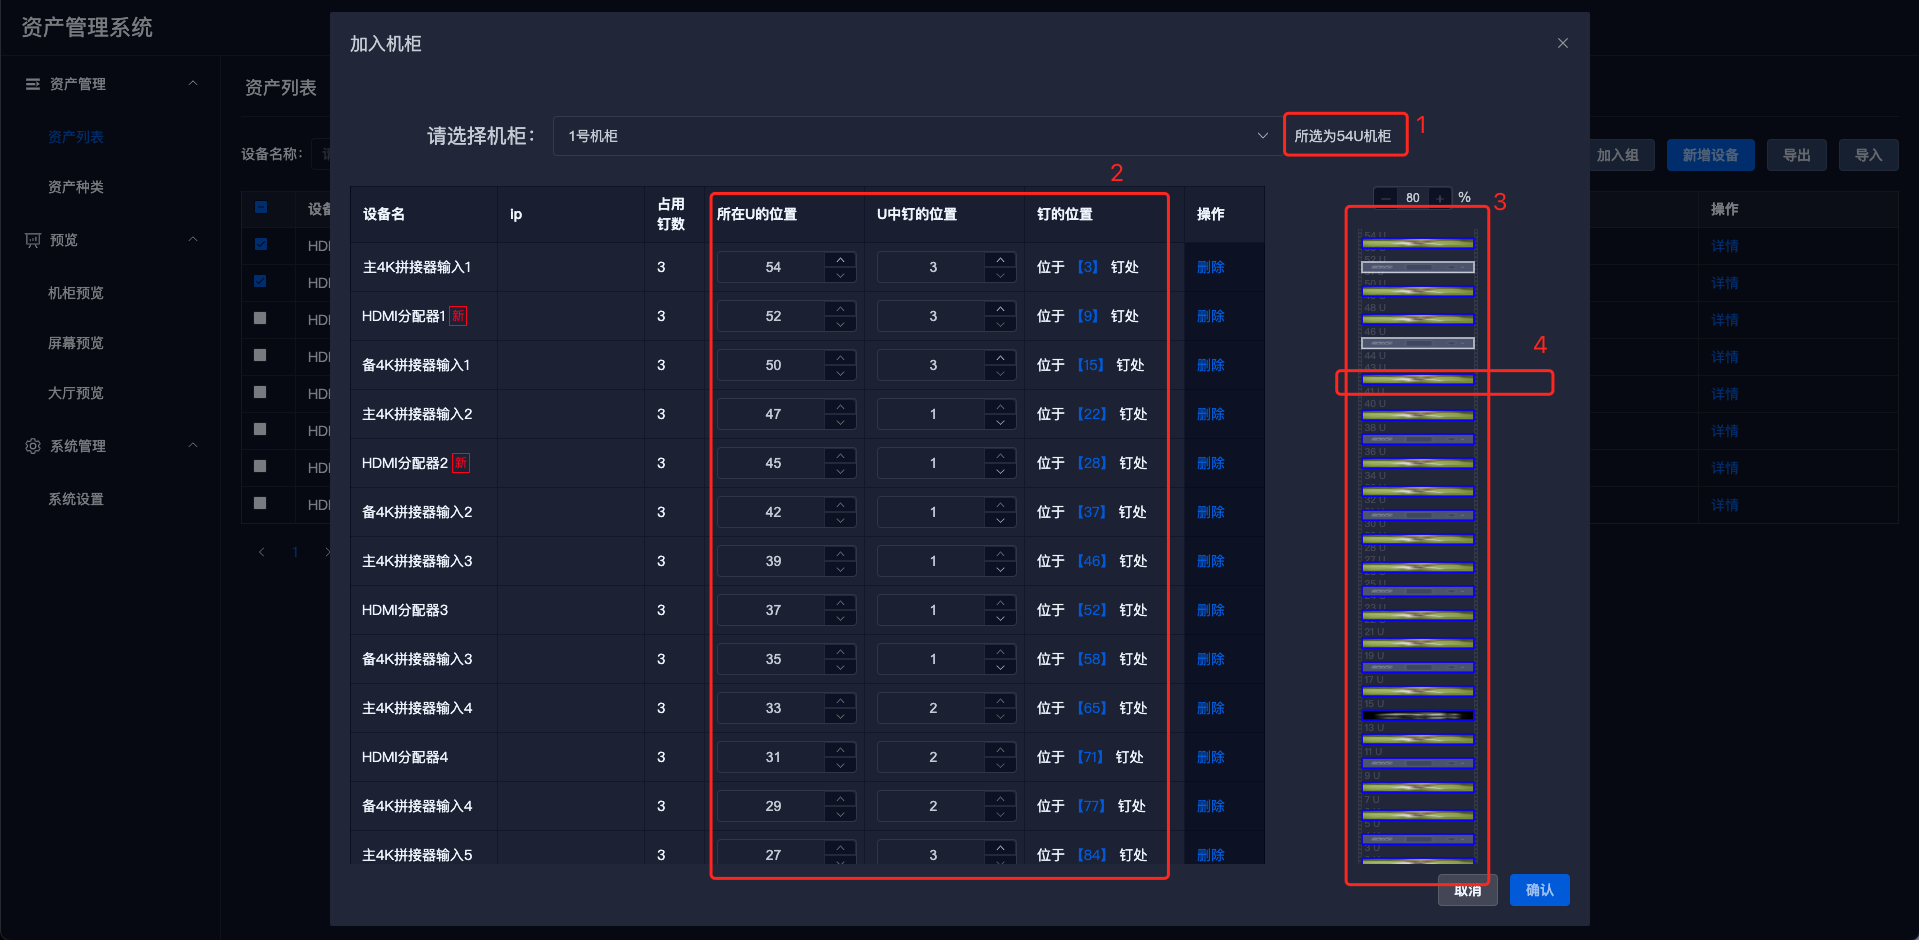
Editing Rack Position
- Modifying U and pin positions will cause the device position on the right to change accordingly.
- Clicking on the device on the right and dragging it will cause the U and pin positions in the list to change accordingly.
After editing is complete, click the 【Confirm】 button in the bottom right corner to save the data.
Notes
- The criteria for determining whether a device can join a rack can be modified in the device category information where you can edit the "Can Join Rack" information.
- Racks cannot join other racks.
- Regions cannot join racks.
- Groups cannot join racks.
- Devices can join multiple groups.
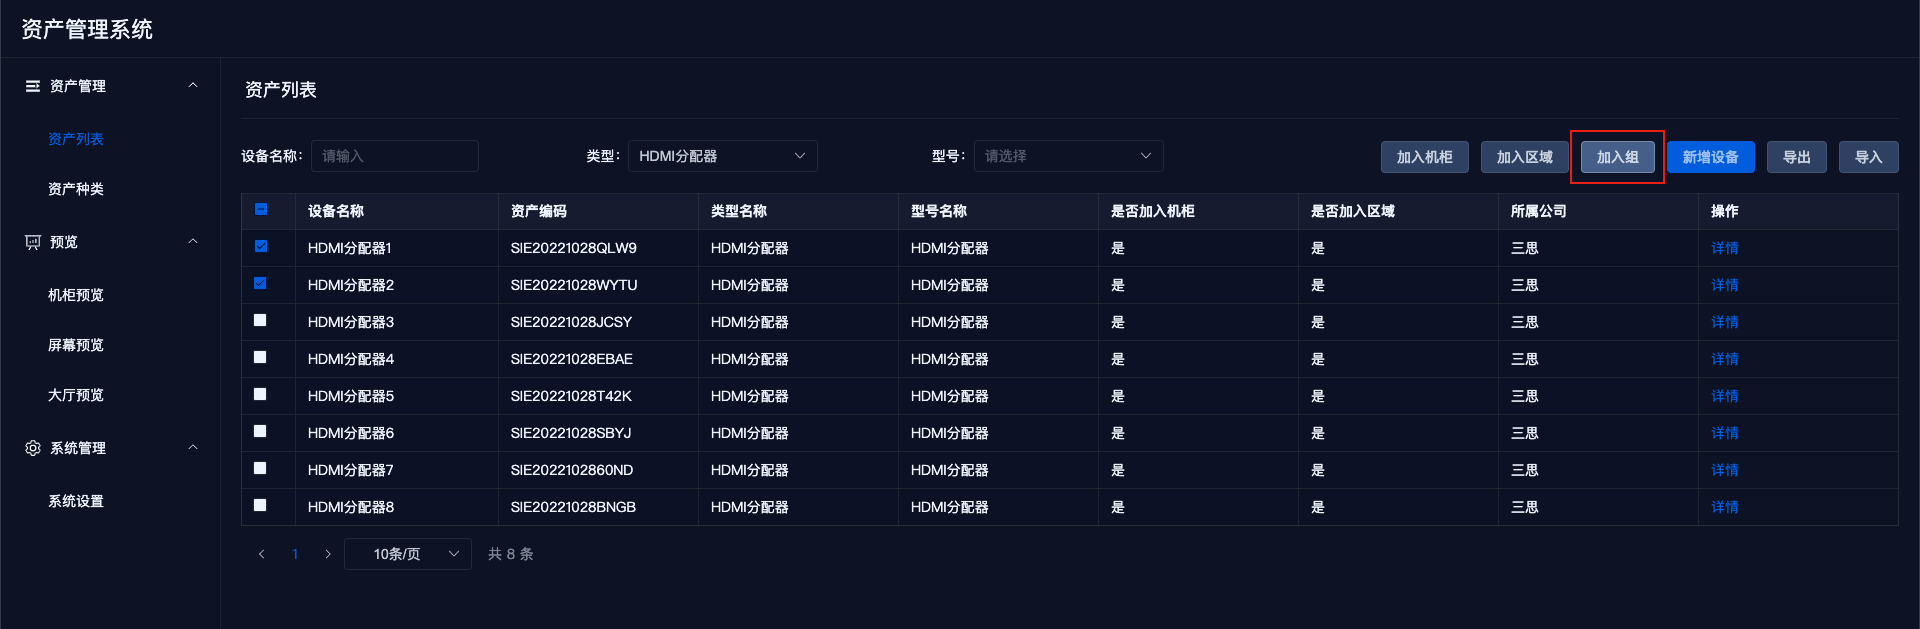
# 8. Add to Region
If a device can join a region, select the device, and a 【Join Region】 button will appear in the upper right corner of the page. Click the button to open the join region pop-up.
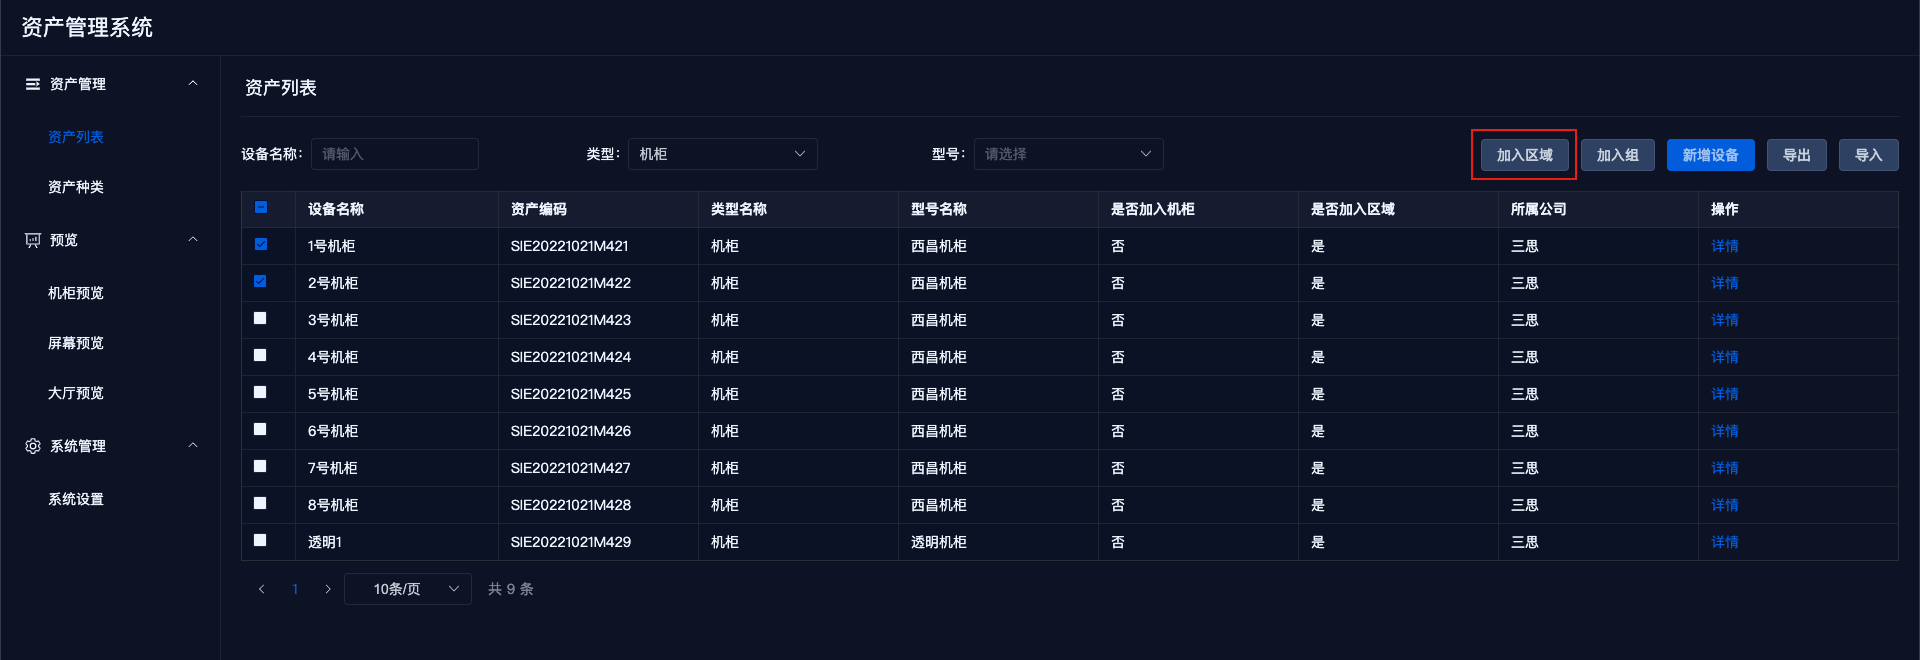
The pop-up defaults to show the selected device, marked with a red [New] in the device name.
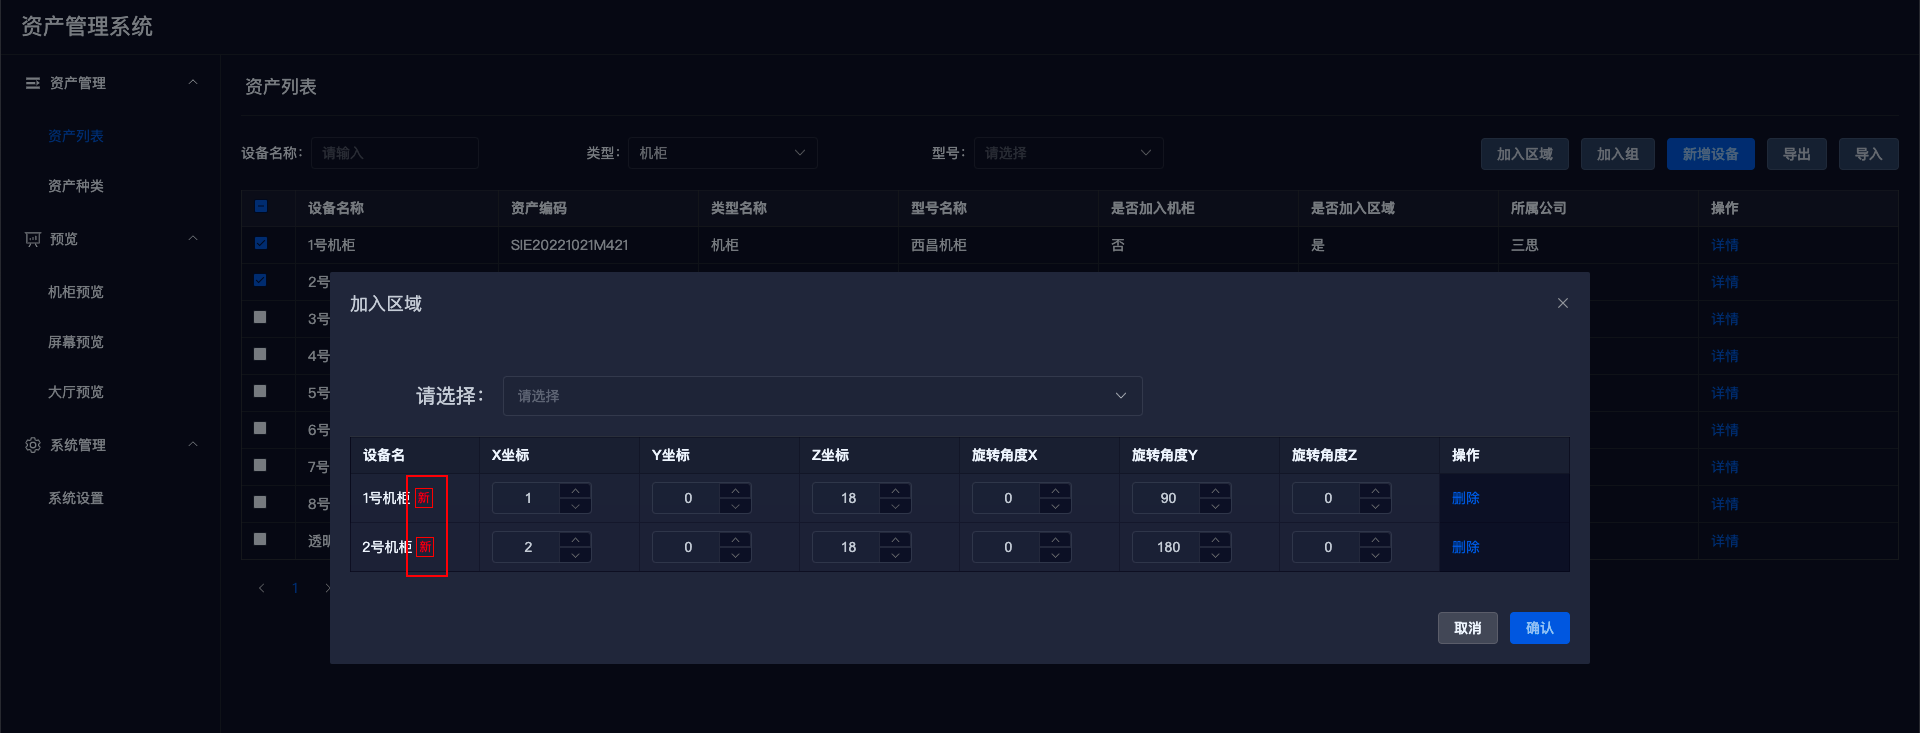
Coordinate Diagram
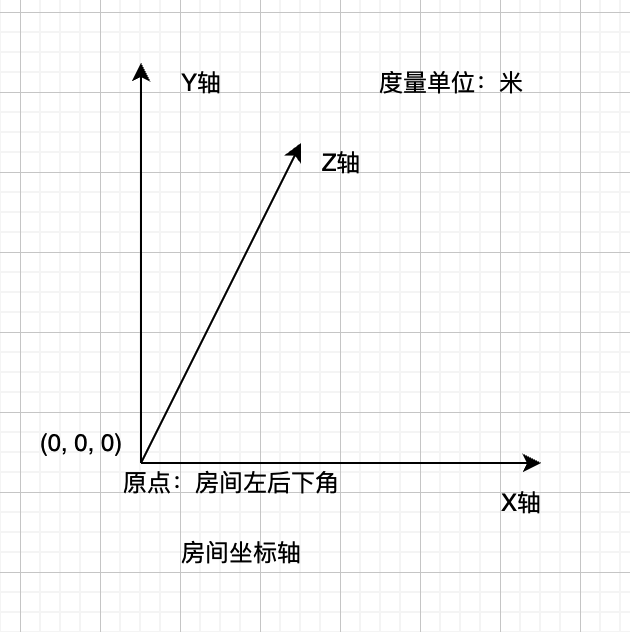
Select the desired region from the 【Select Region】 dropdown; since the room's width, height, and depth cannot be fixed, room layout preview is not available.
- The right side of the dropdown will display the current region's width, height, and depth (in meters).
- The device list will show which devices are already in the region and display their corresponding X, Y, and Z coordinates, as well as the rotational angles on each axis.
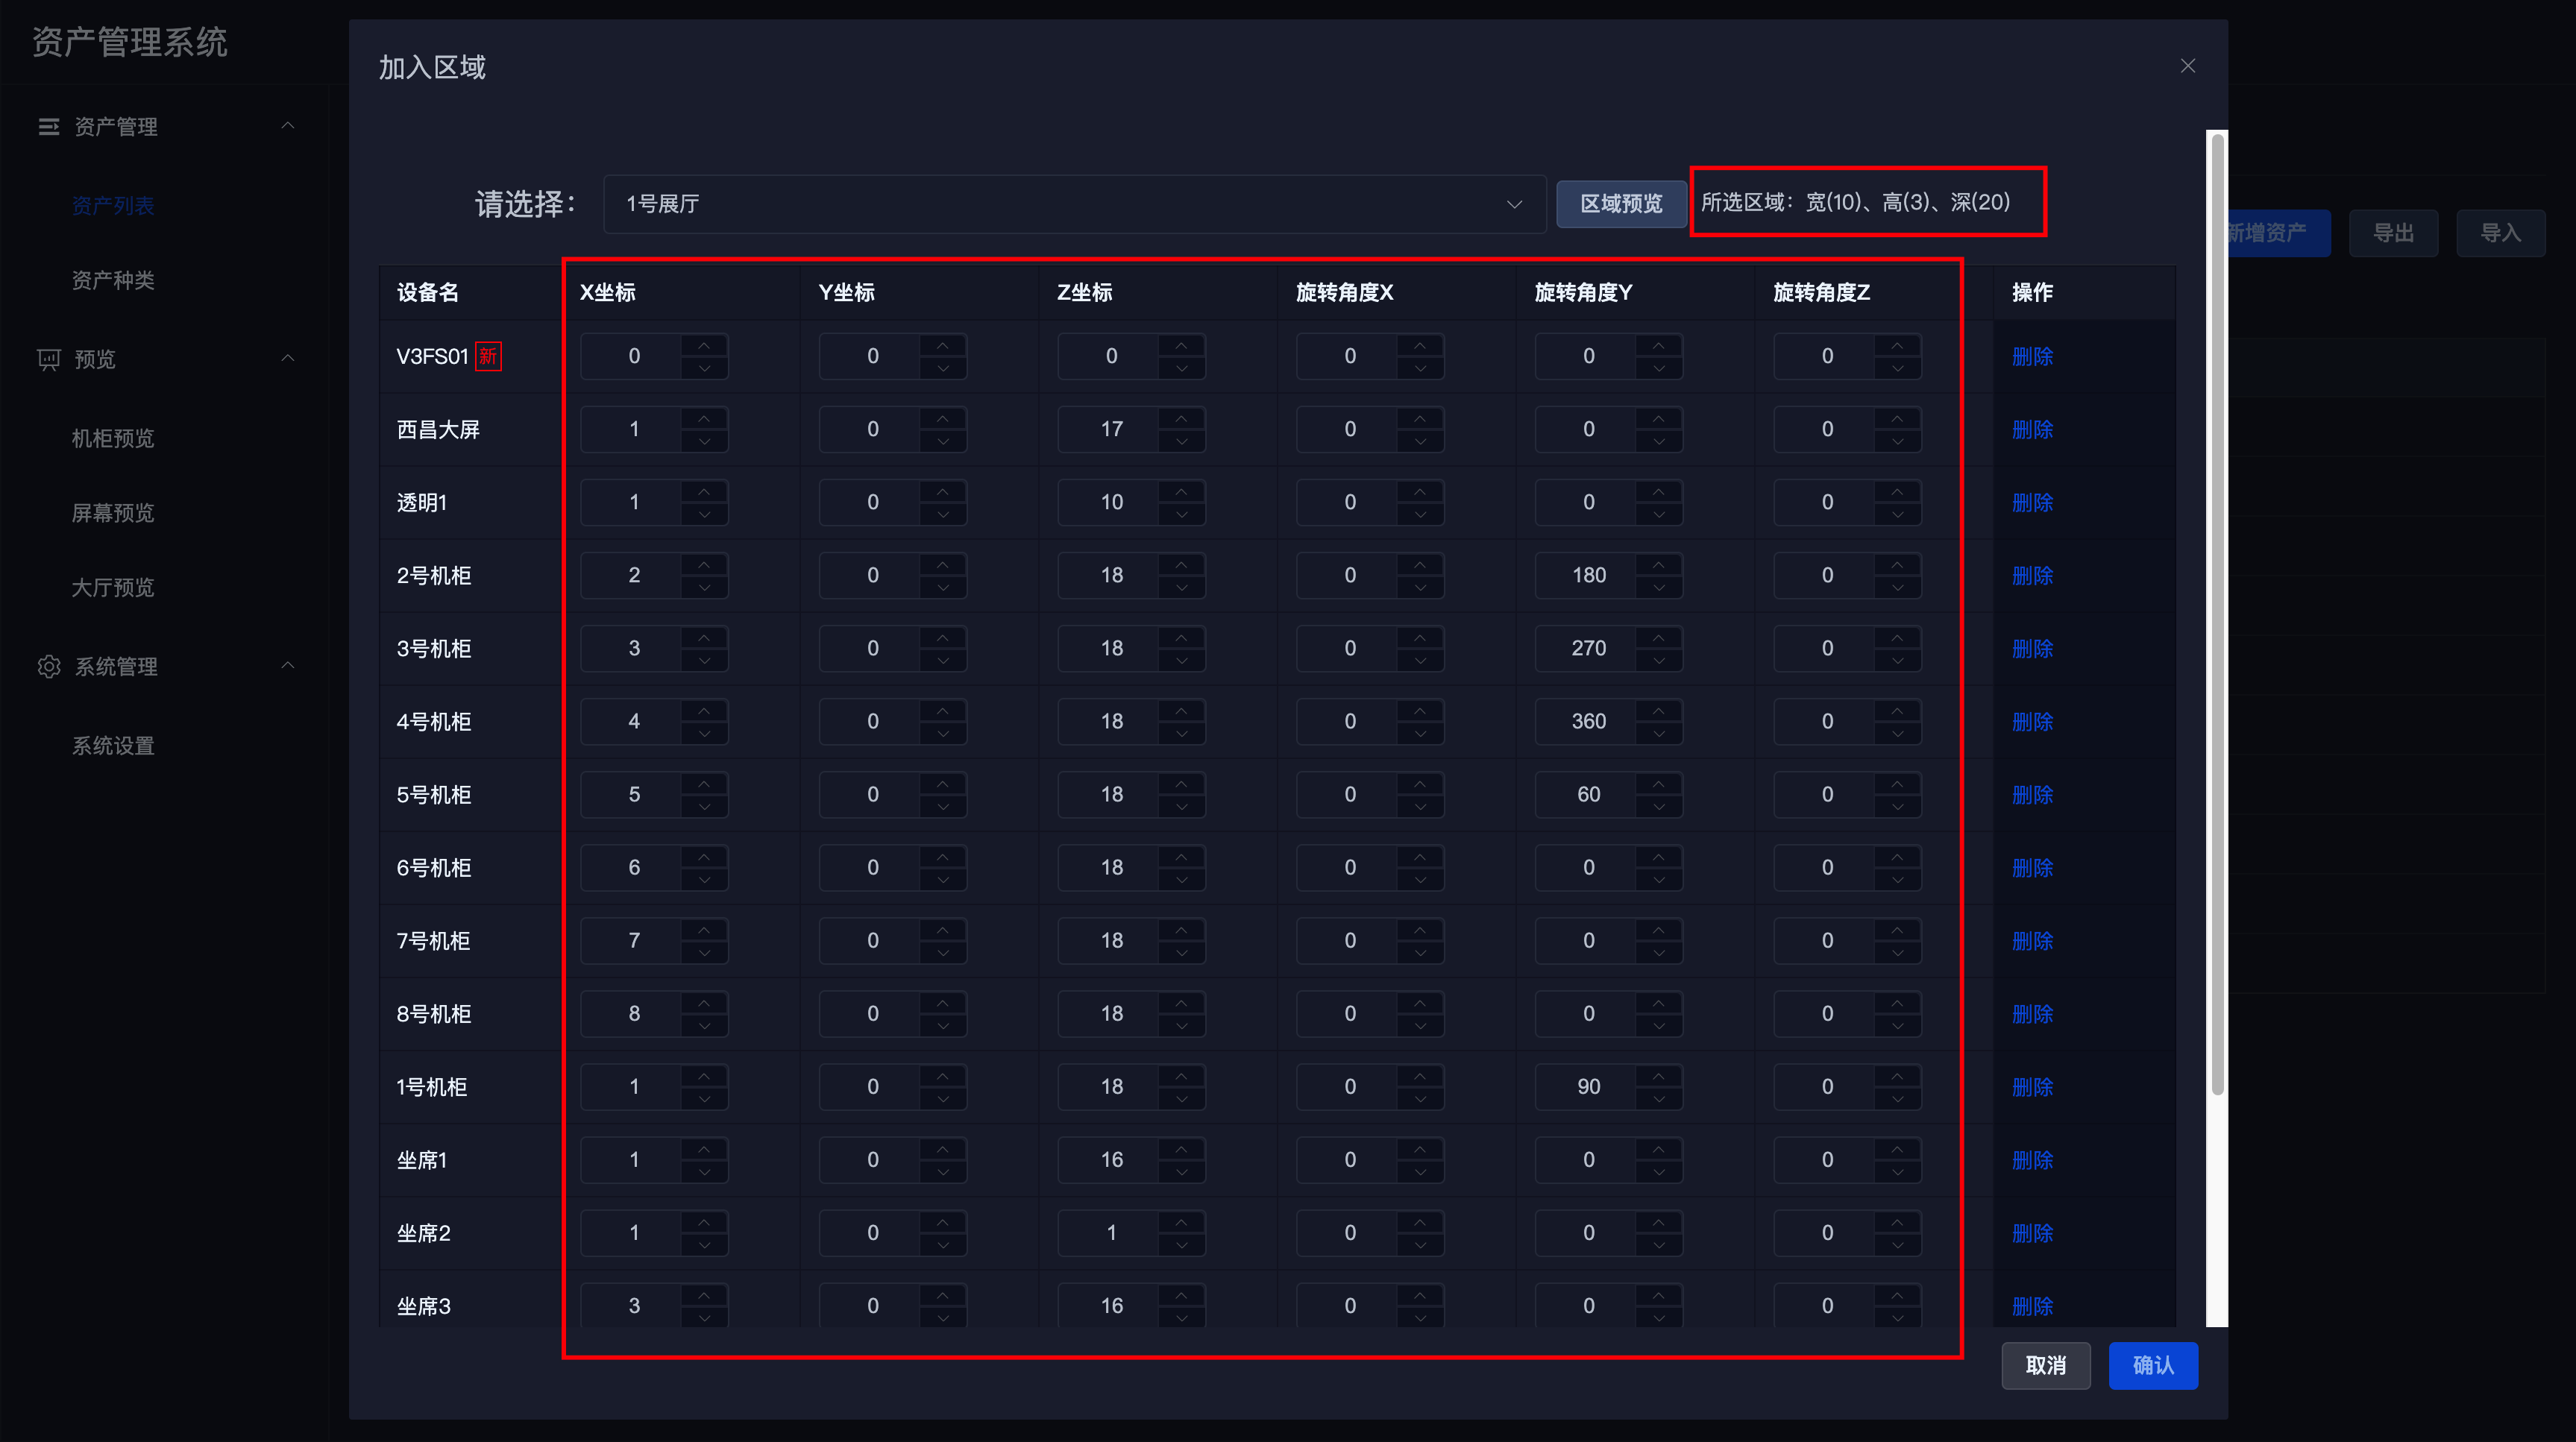
After editing is complete, click the 【Confirm】 button in the bottom right corner to save the data.
Clicking on the region preview allows you to preview the current effect.

Notes
- By default, all devices can join regions, but this can be changed in the device category.
- Regions can have nested regions.
# 9. Add to Group
If a device can join a group, select the device, and a 【Join Group】 button will appear in the upper right corner of the page. Click the button to open the join group pop-up.
The pop-up defaults to show the selected device, marked with a red [New] in the device name.
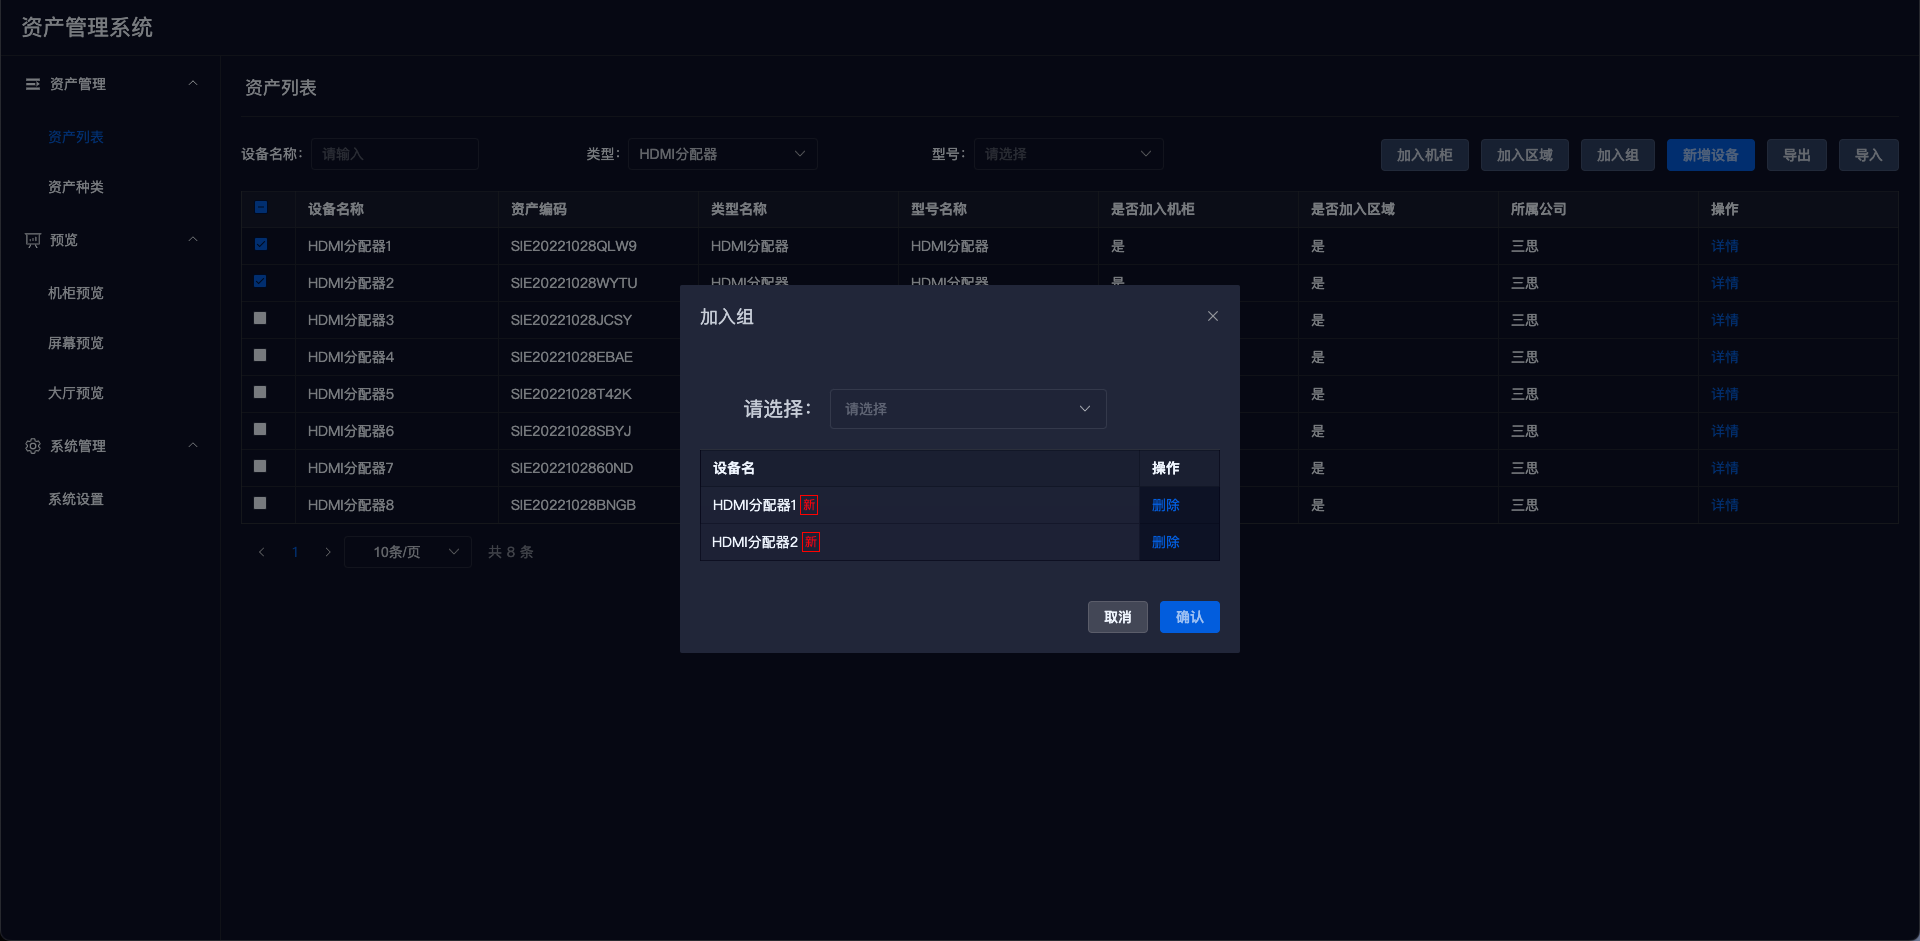
Select the desired group from the 【Select Group】 dropdown.
- The device list will show which devices are already in this group.
After editing is complete, click the 【Confirm】 button in the bottom right corner to save the data.
Notes
- Whether a device can join a region can be modified in the category details.
- Regions cannot join groups.
- Groups cannot join groups.
- Groups are provided for health management use and do not have a preview interface.
- Devices can be added to multiple groups.
# III. Preview
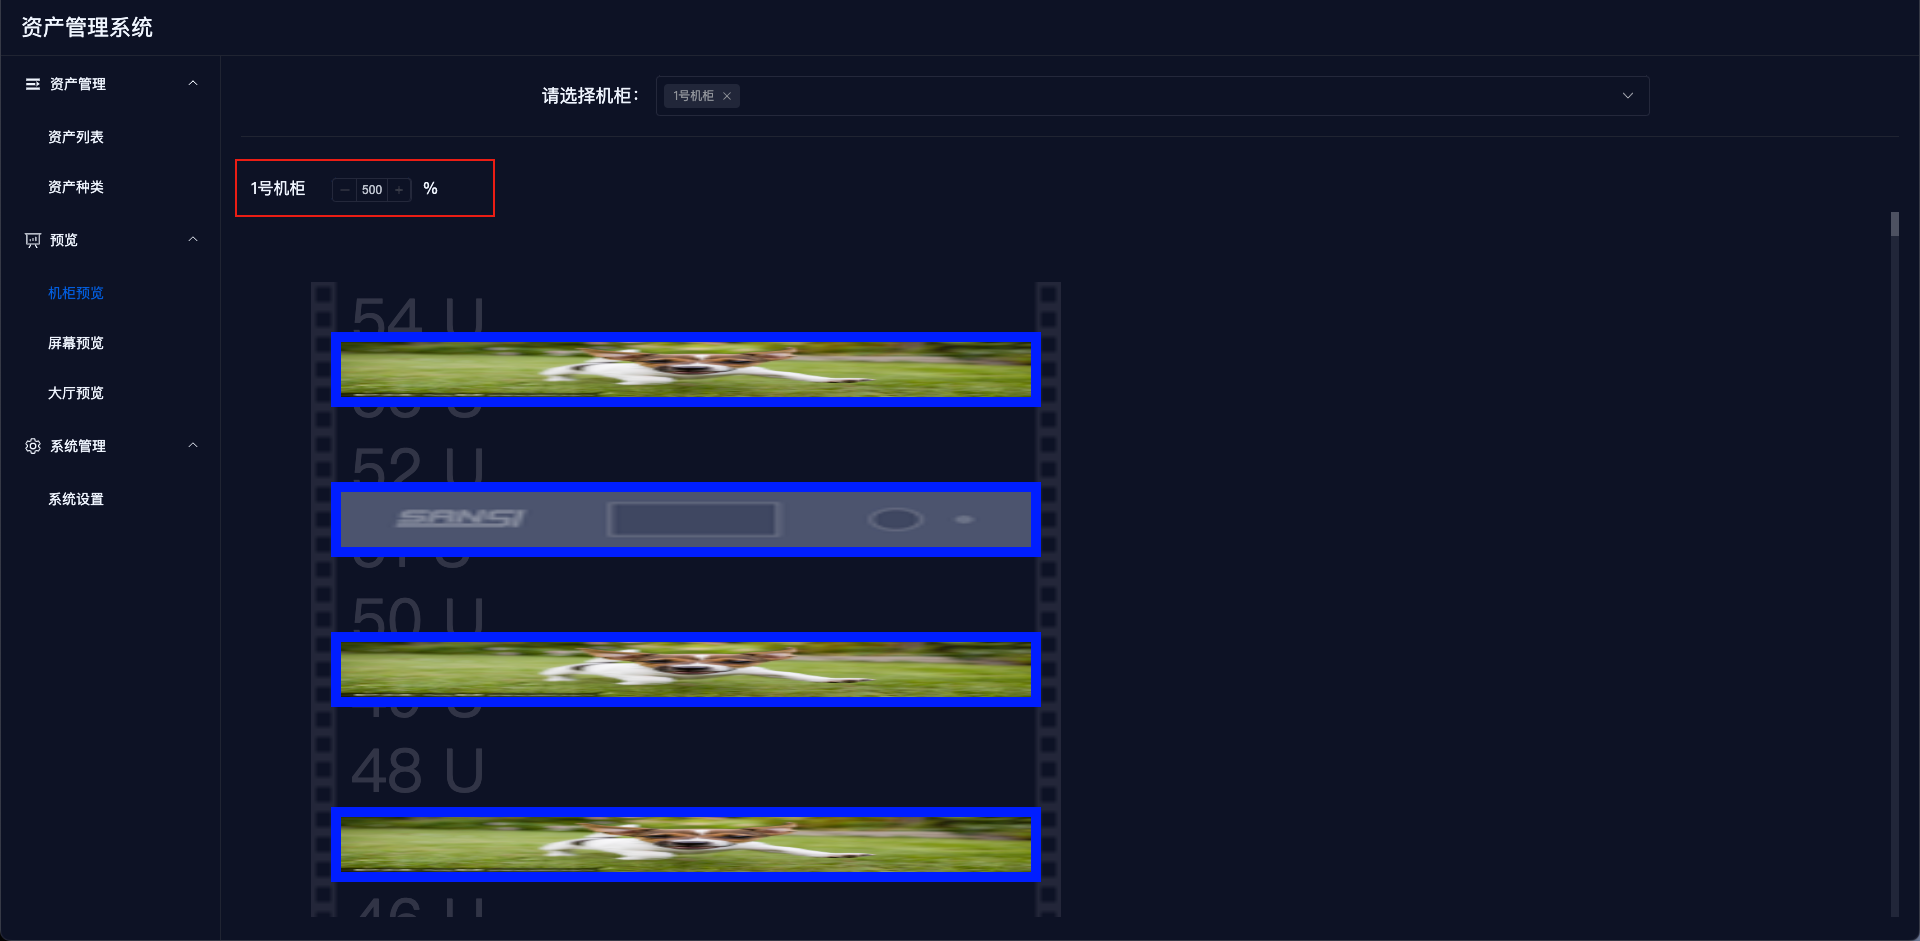
# 1. Rack Preview
Select the 【Rack Preview】 menu and choose the rack you want to preview from the 【Select Rack】 dropdown.
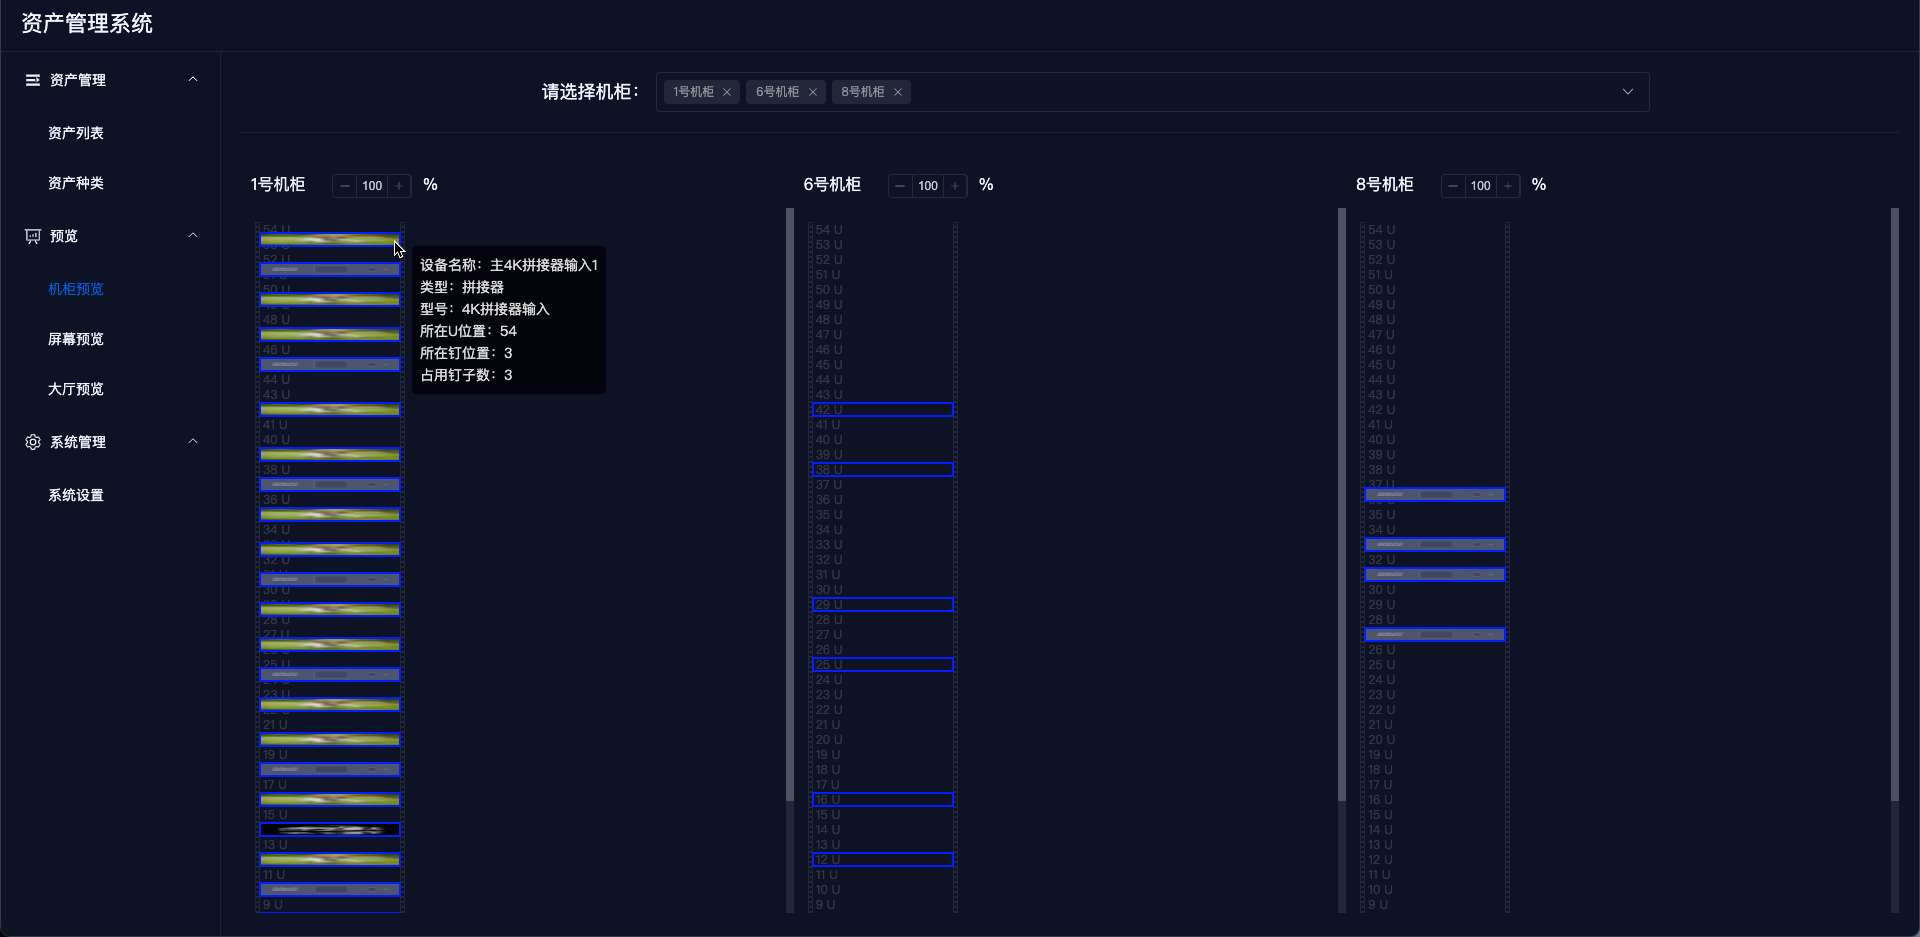
Modify the display ratio to enlarge the view.
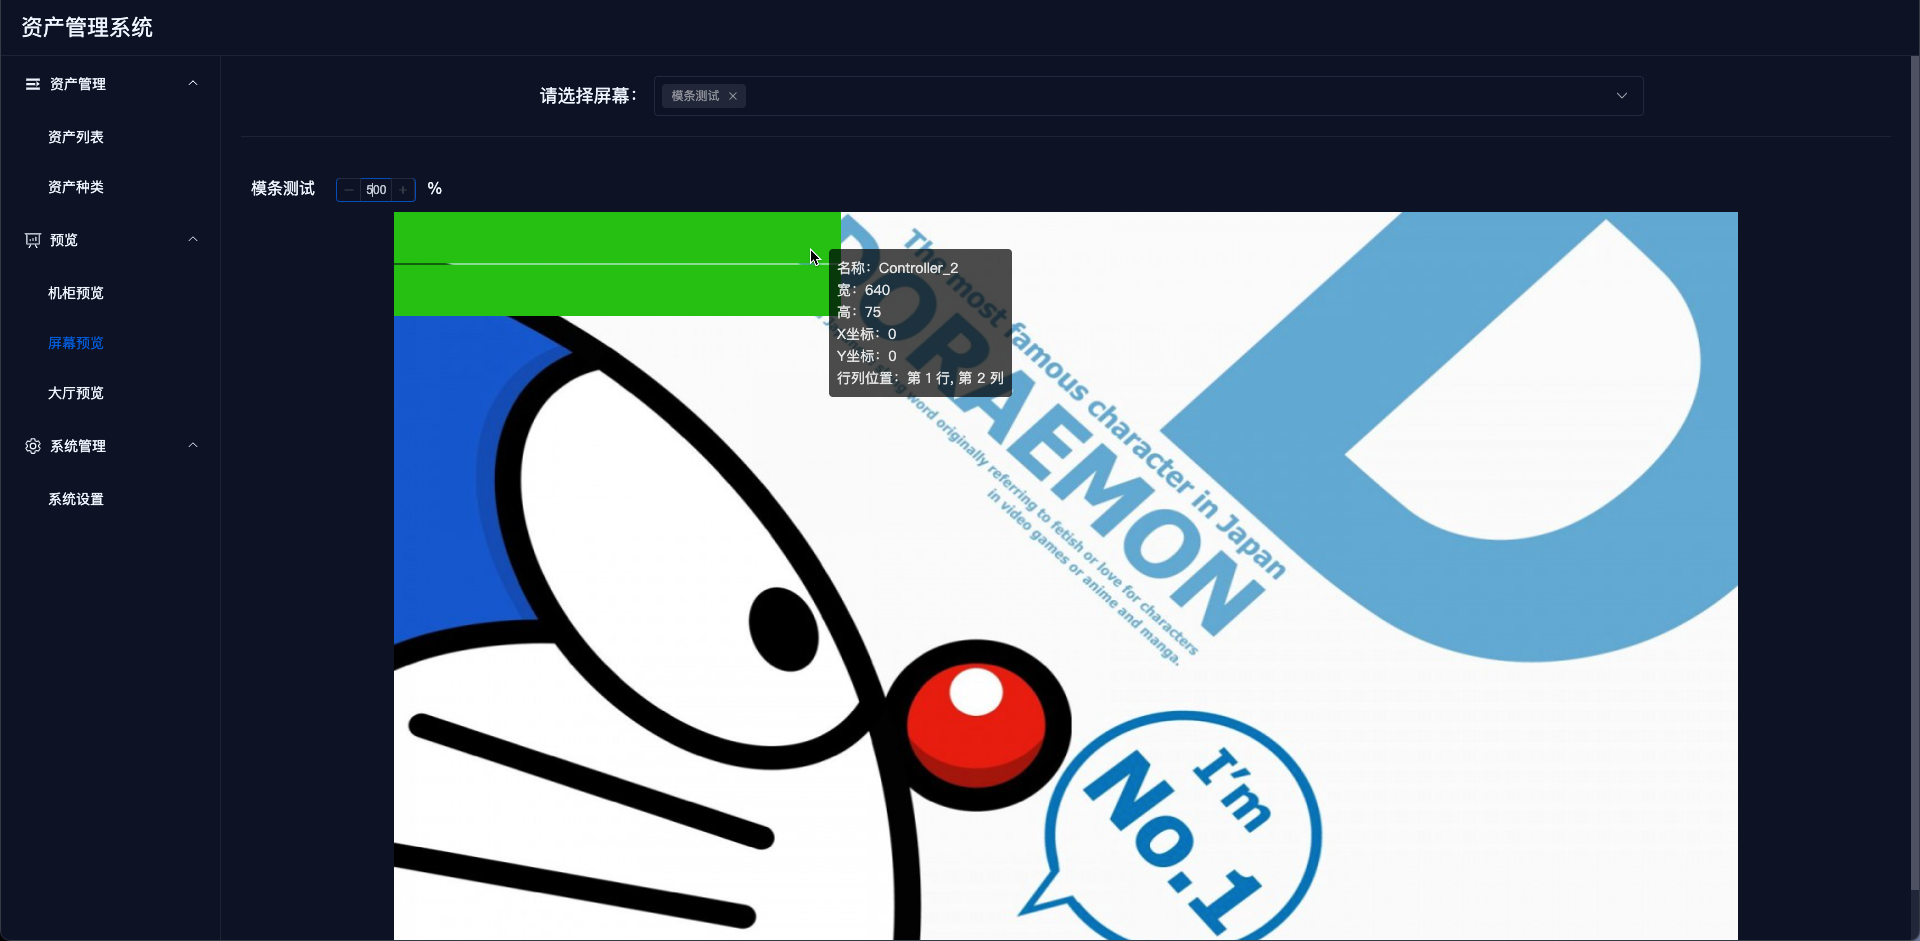
# 2. Screen Preview
Select the 【Screen Preview】 menu and choose the screen you want to preview from the 【Select Screen】 dropdown.
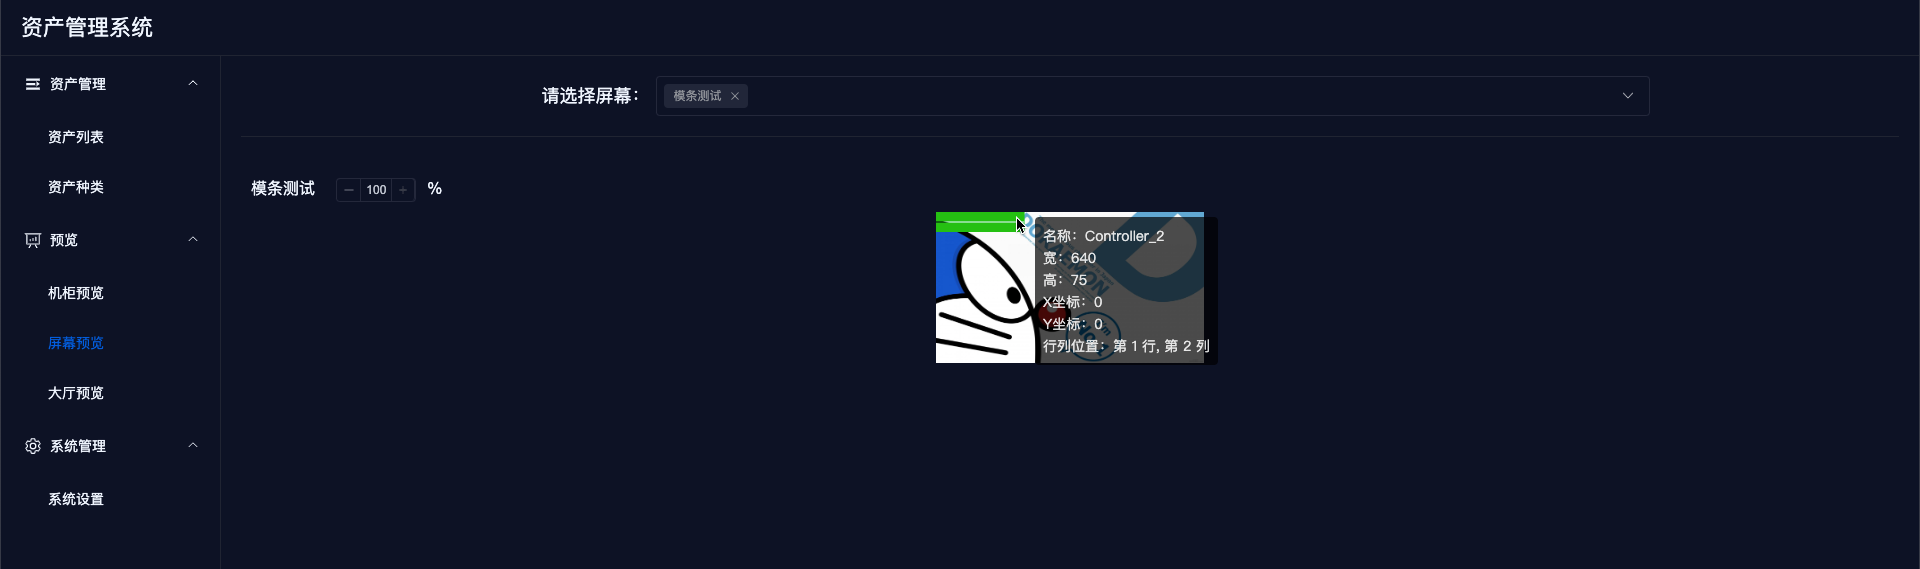
Modify the display ratio to enlarge the view.
# 3. Hall Preview
Select the 【Hall Preview】 menu and choose the hall you want to preview from the 【Select Hall】 dropdown.
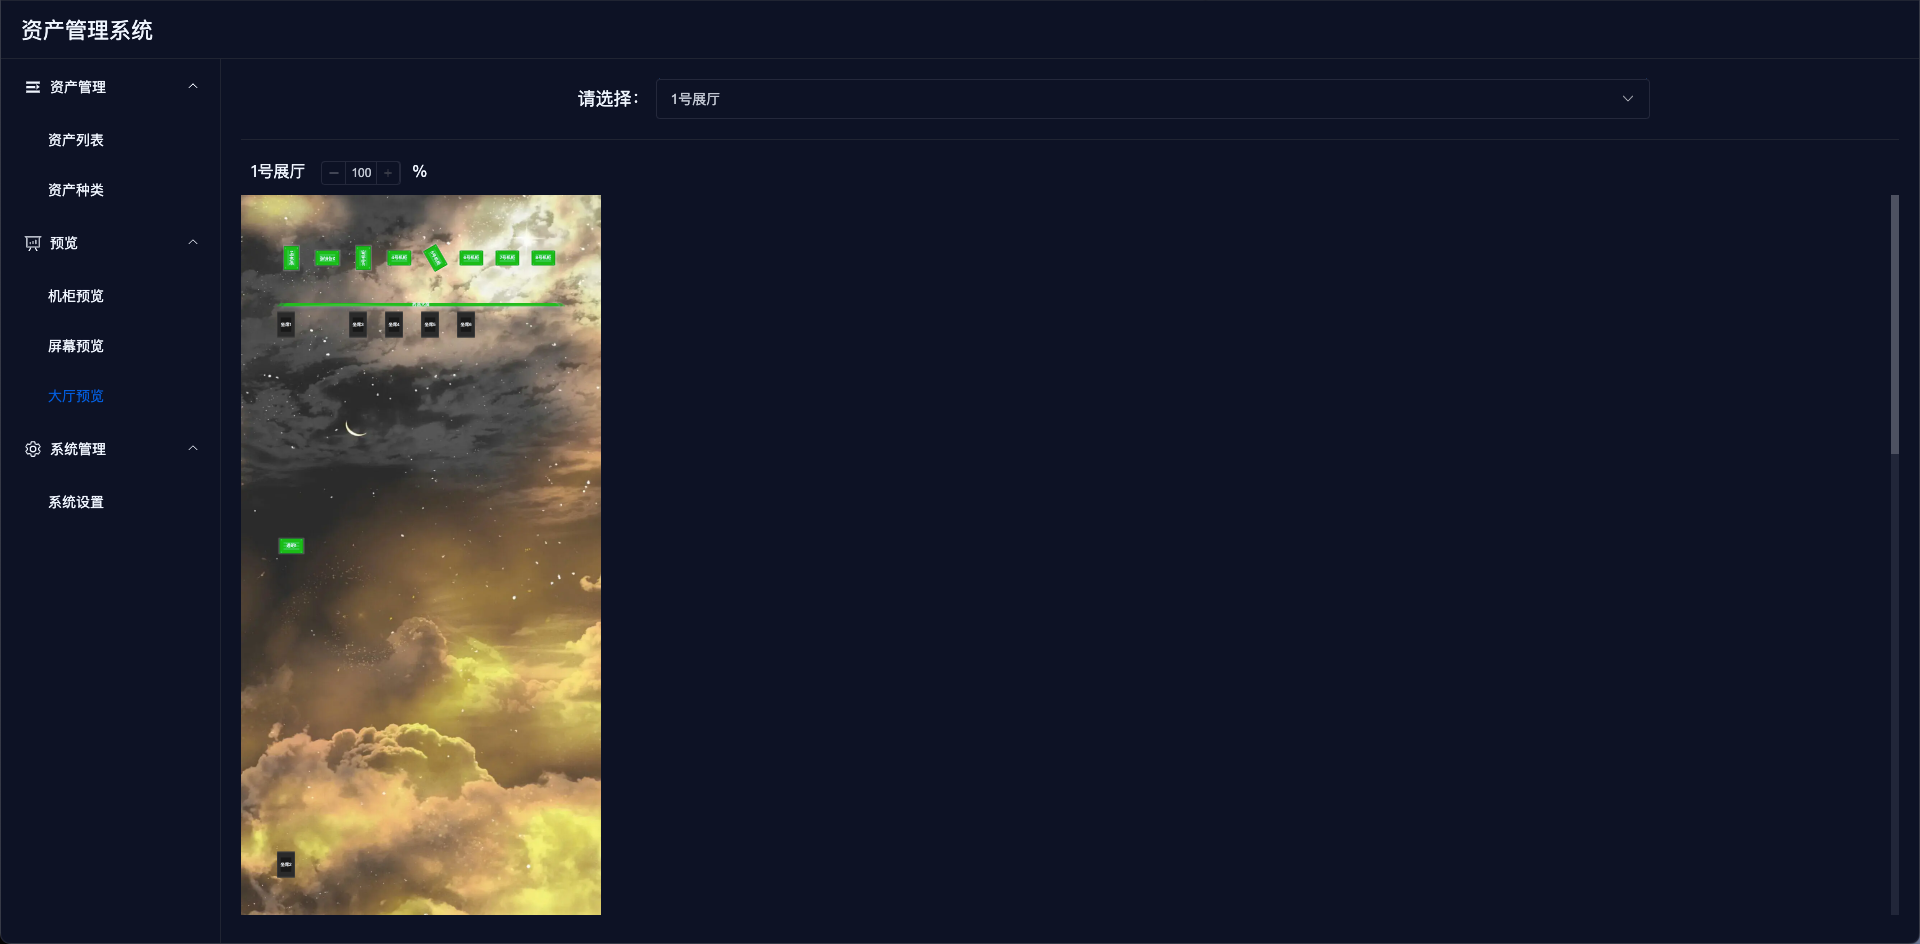
Modify the display ratio to enlarge the view.

# IV. System Settings
# 1. Import and Export
- Exporting will package all device data, type data, and their corresponding image files, naming the exported file as
export.project.timestamp.zip. The extracted files are as follows:
Importing allows you to re-upload the exported zip package. Do not modify the zip file.
Import Logic: If there is data, it will update the existing data; if there's no data, it will create new data. Importing an empty file will not update anything.
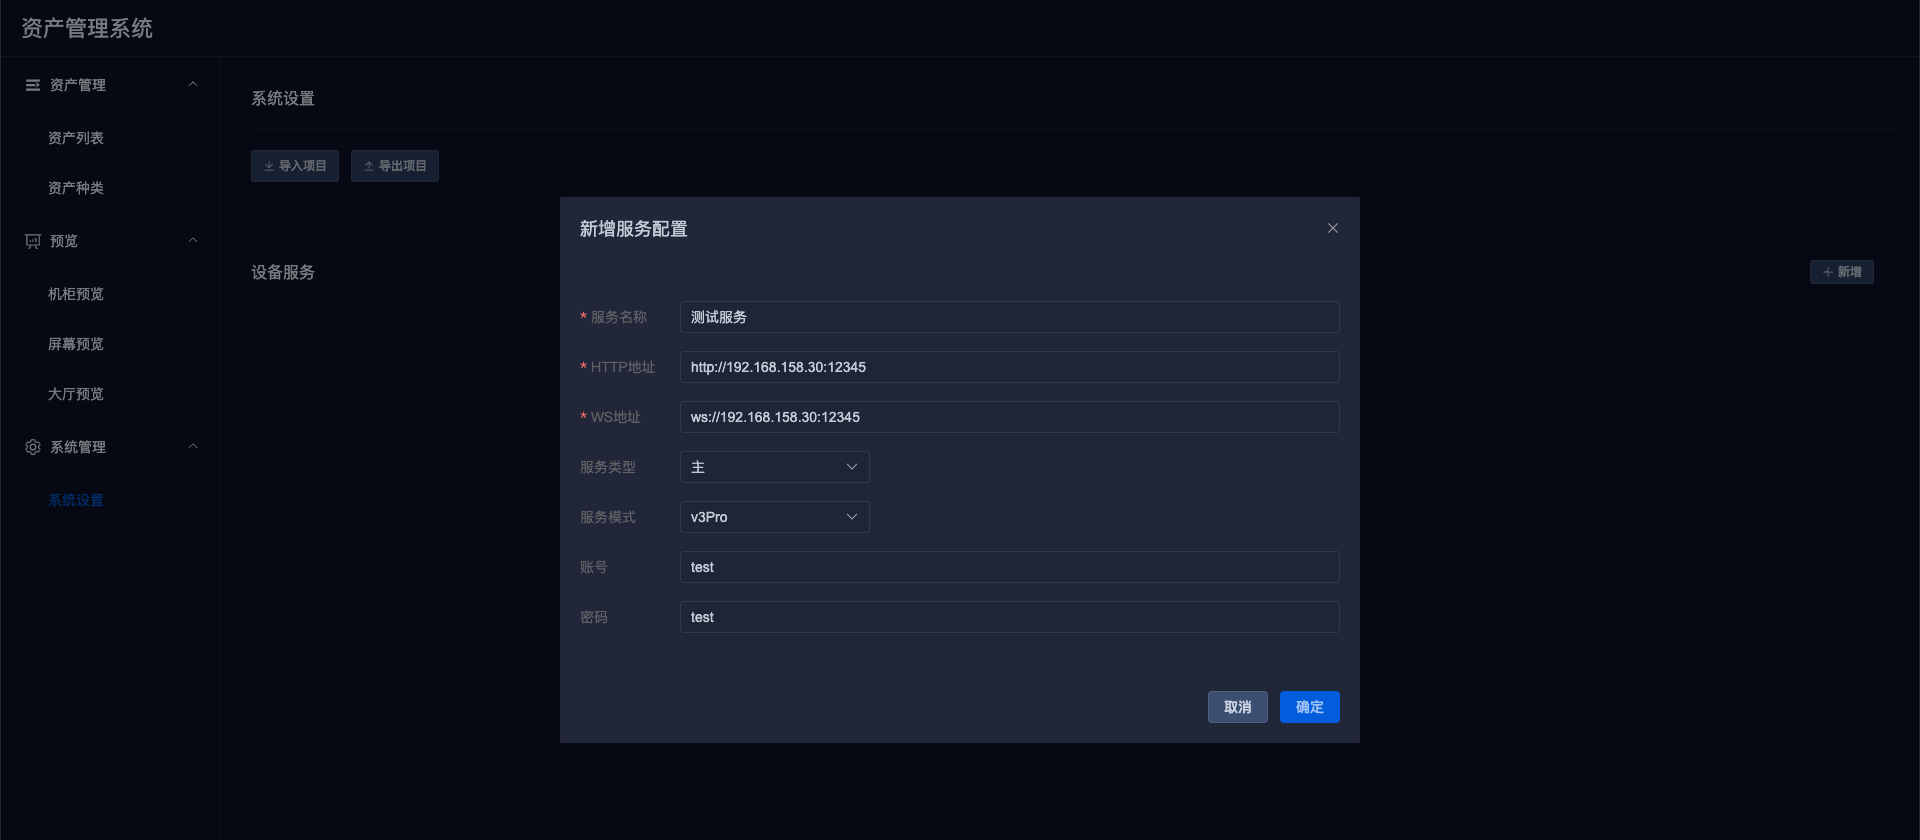
# 2. Add New Service
In the 【System Settings】 section, click the 【Add】 button on the right to open a pop-up for adding a new service.
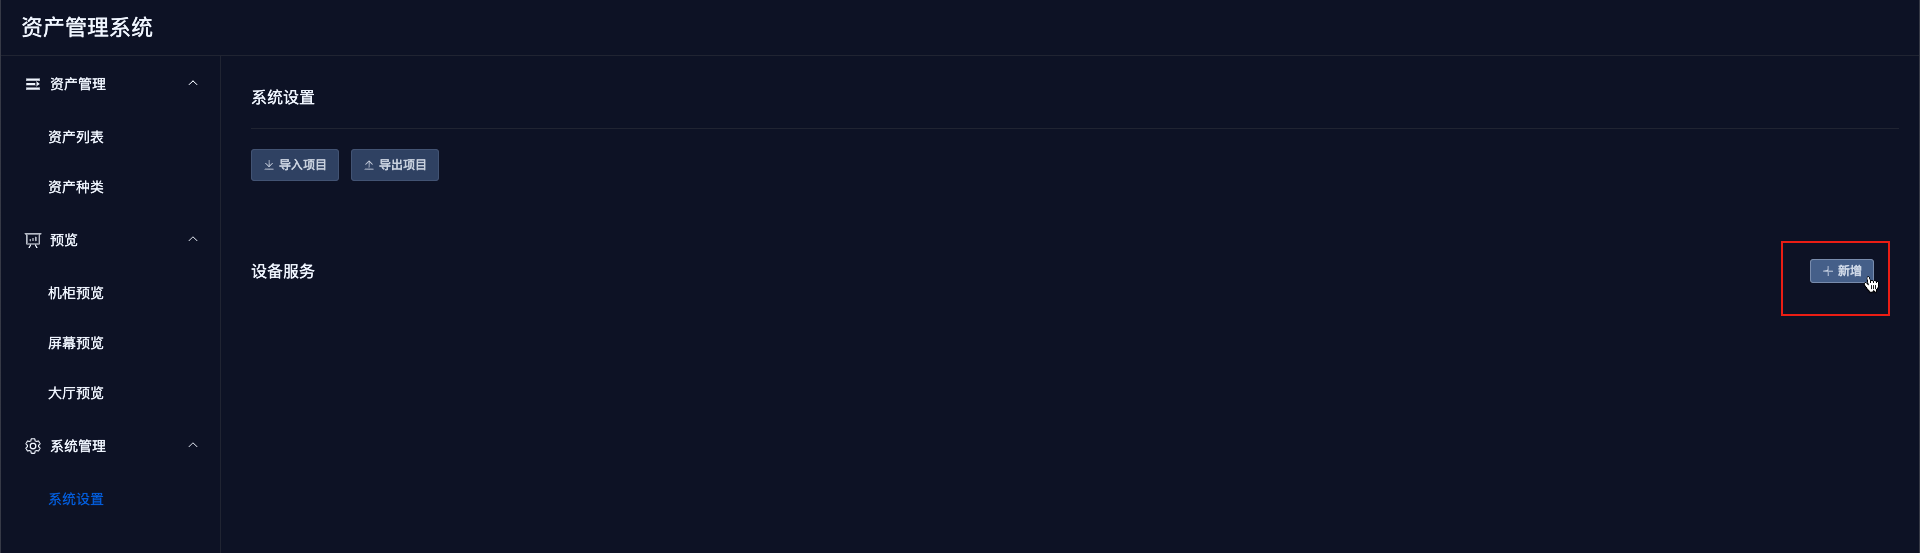
Enter the relevant parameters in the pop-up and click 【OK】 to save the information.
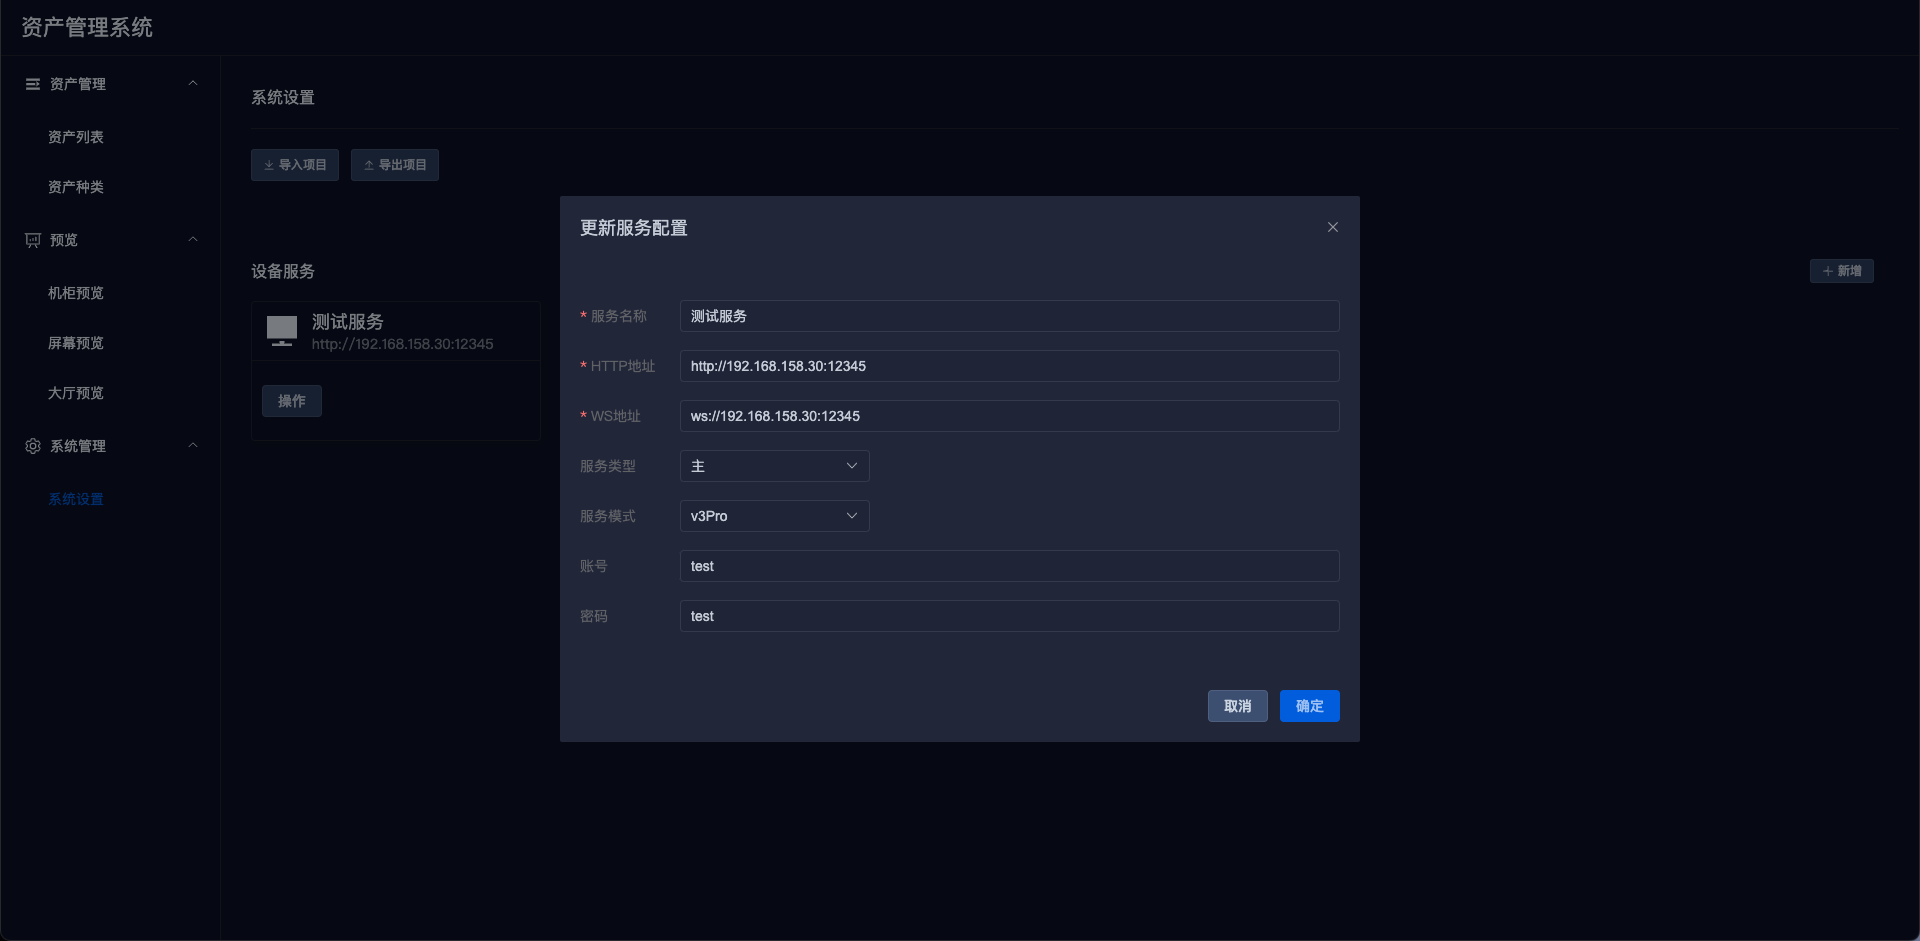
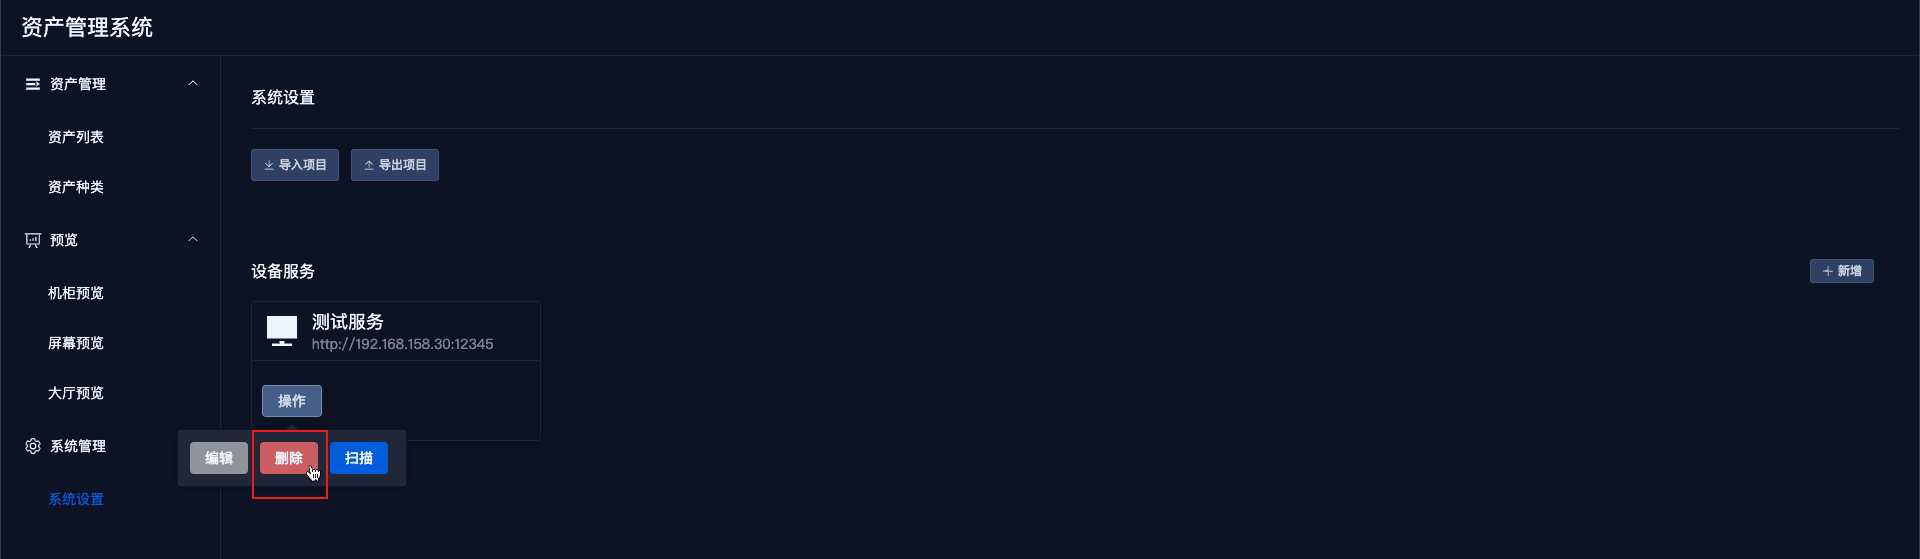
# 3. Edit Service
In the service list, click the operation button, and then click the 【Edit】 button to display the service information details, where you can edit the information.
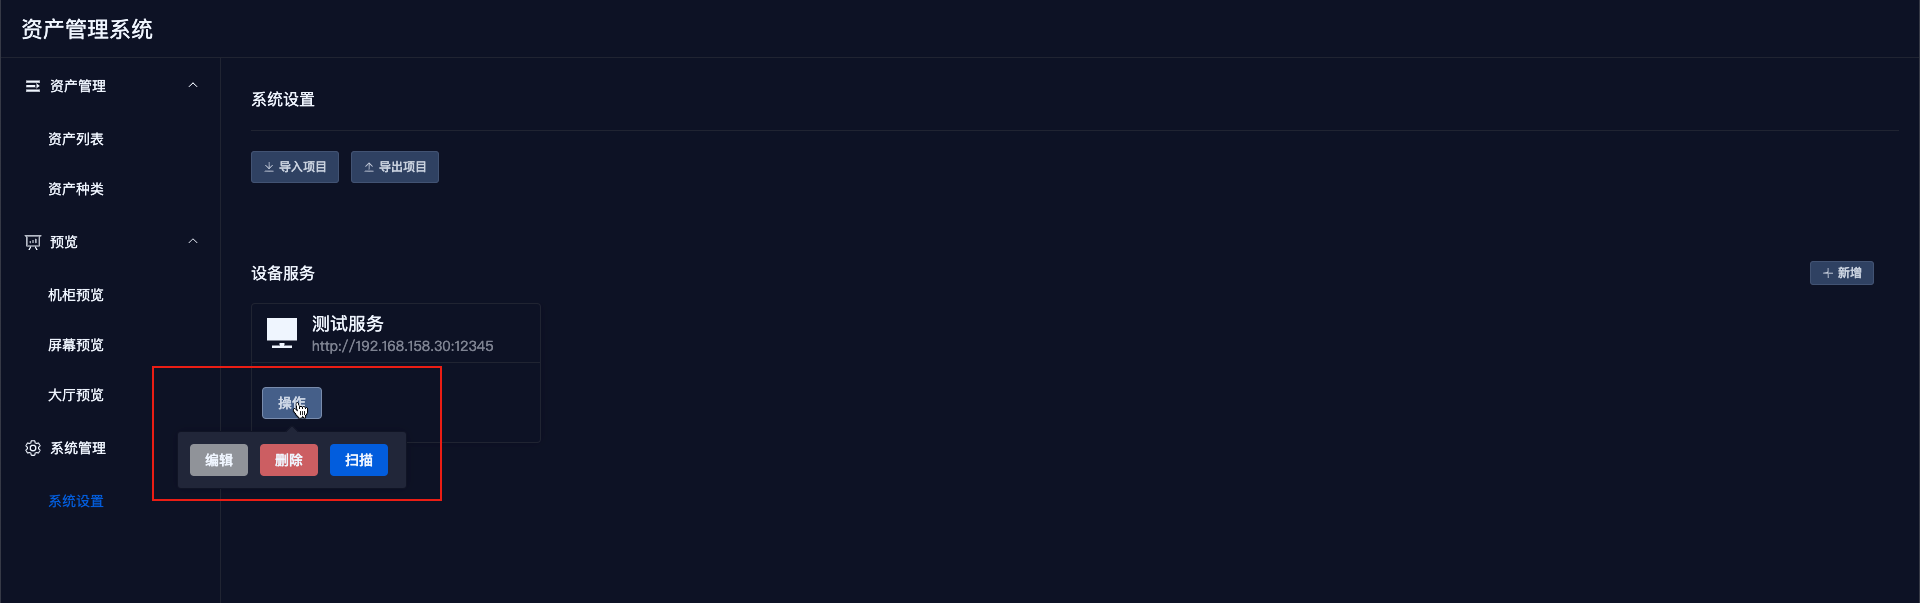
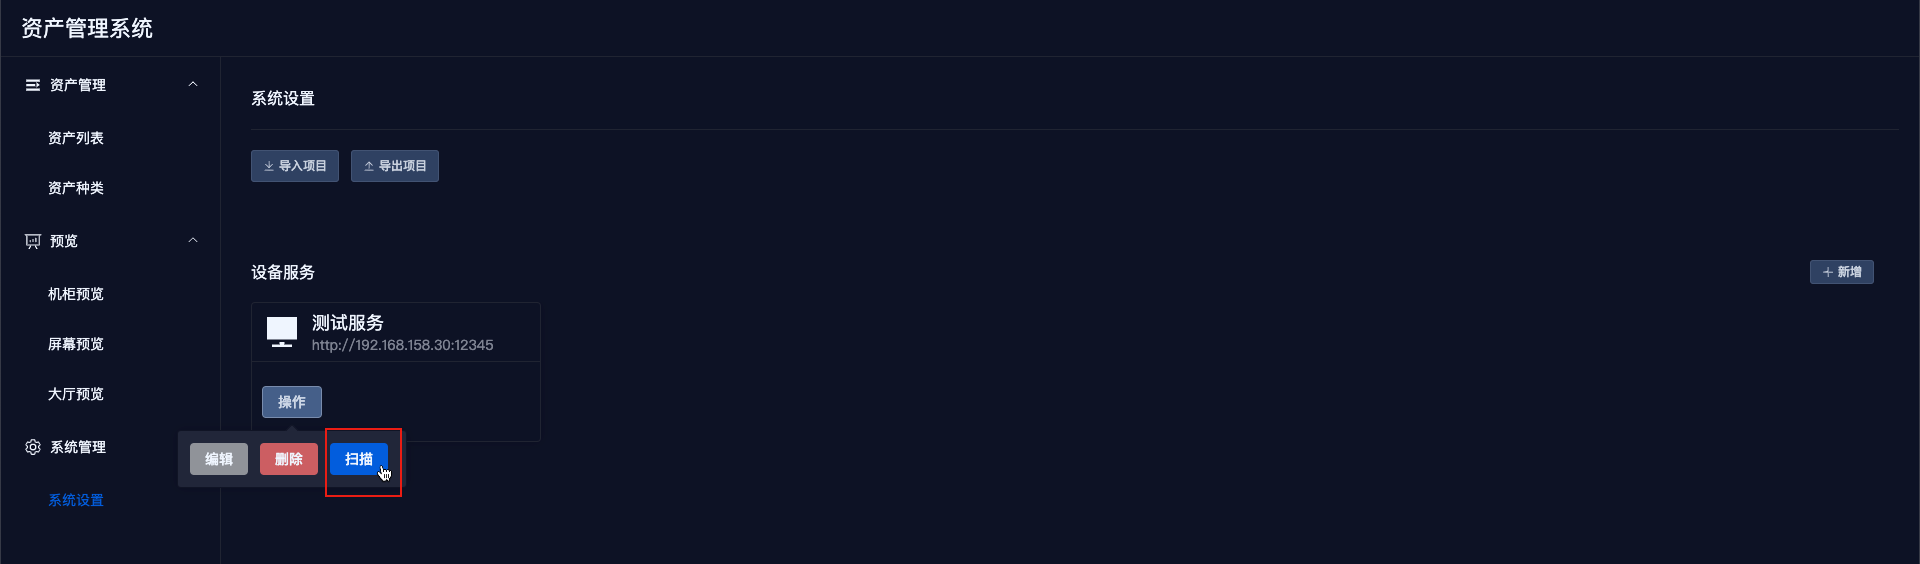
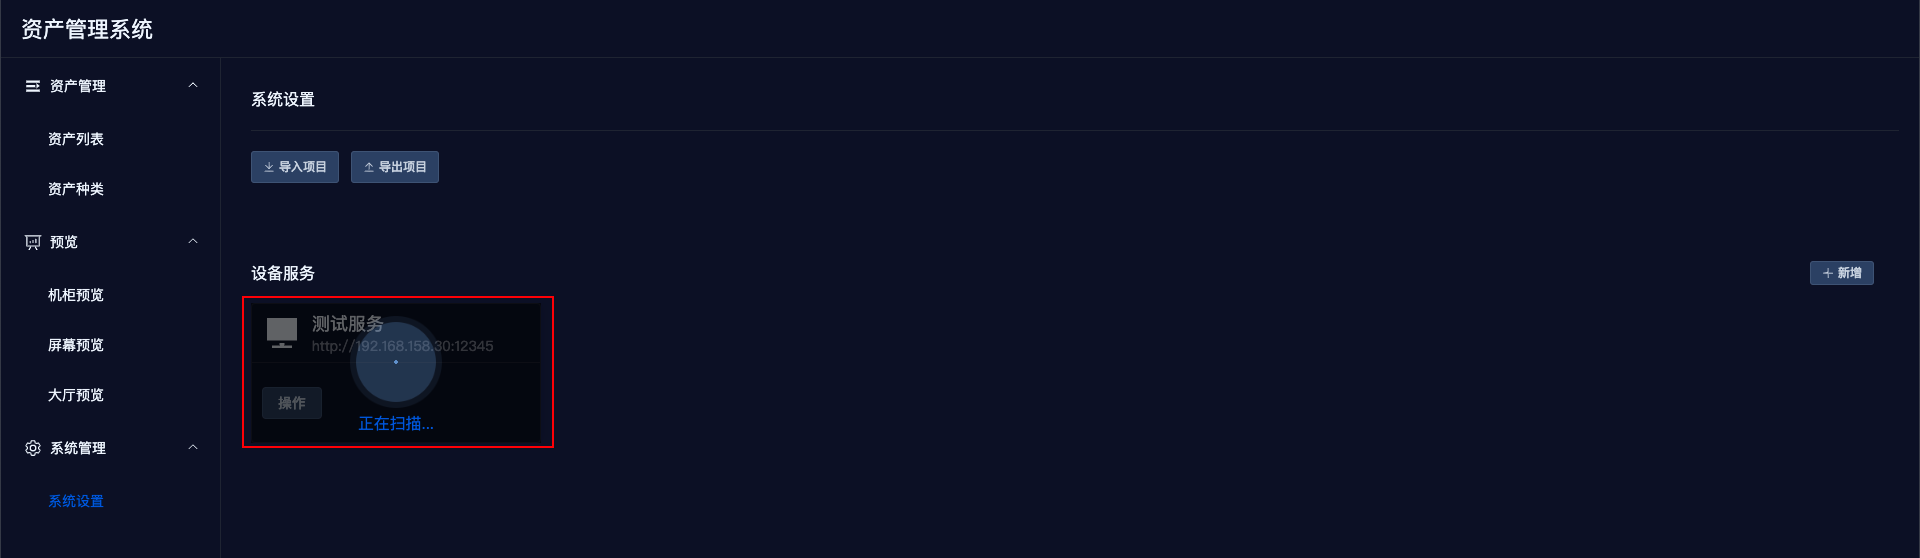
# 4. Manually Scan Service
In the service list, click the operation button, and then click the 【Scan】 button to perform a manual scan.
# 5. Delete Service
In the service list, click the operation button, and then click the 【Delete】 button to remove the service.
# V. Statistics
Statistics are a separate component.
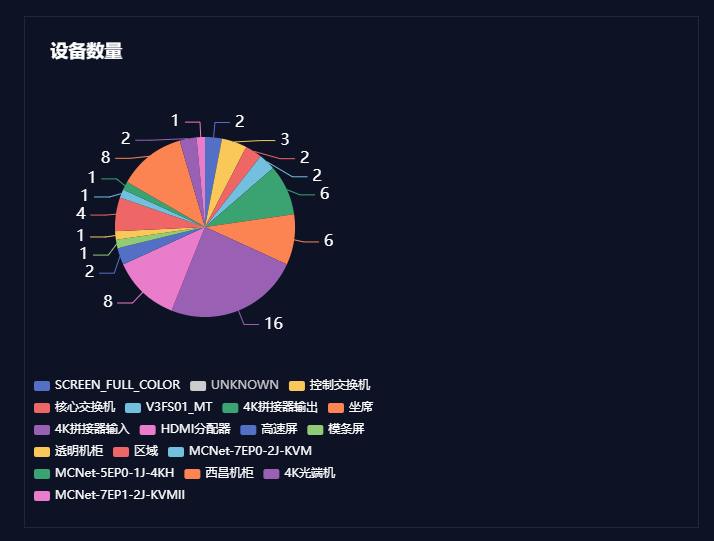
The pie chart displays the current number of devices in the project.