# Remote Power Management User Manual
| Document Version | Content Revision | Reviser | Revision Date |
|---|---|---|---|
| V1.0 | Draft | wangyao | 2020-12-10 |
# Table of Contents
Remote power management is a method to remotely turn on and off other devices through the control panel. A common scenario is to turn on and off computers that play corresponding displays via the control panel. Note that during remote power management, the computer running the control panel must be turned on; otherwise, it cannot connect to the control panel.
# I. Windows Remote Wake Up
Remote wake-up uses the universal Wake-on-LAN protocol, which allows any device that supports Wake on LAN to be awakened through this protocol.
Wake-on-LAN (WoL) is an Ethernet computer network standard that allows a computer that is powered off to be awakened by a network message. This standard protocol is mostly used in local networks but can also be used over the Internet.
Enabling Wake-on-LAN (WoL) functionality on Windows involves two aspects: configuring the network adapter and BIOS settings. Please follow the steps below:
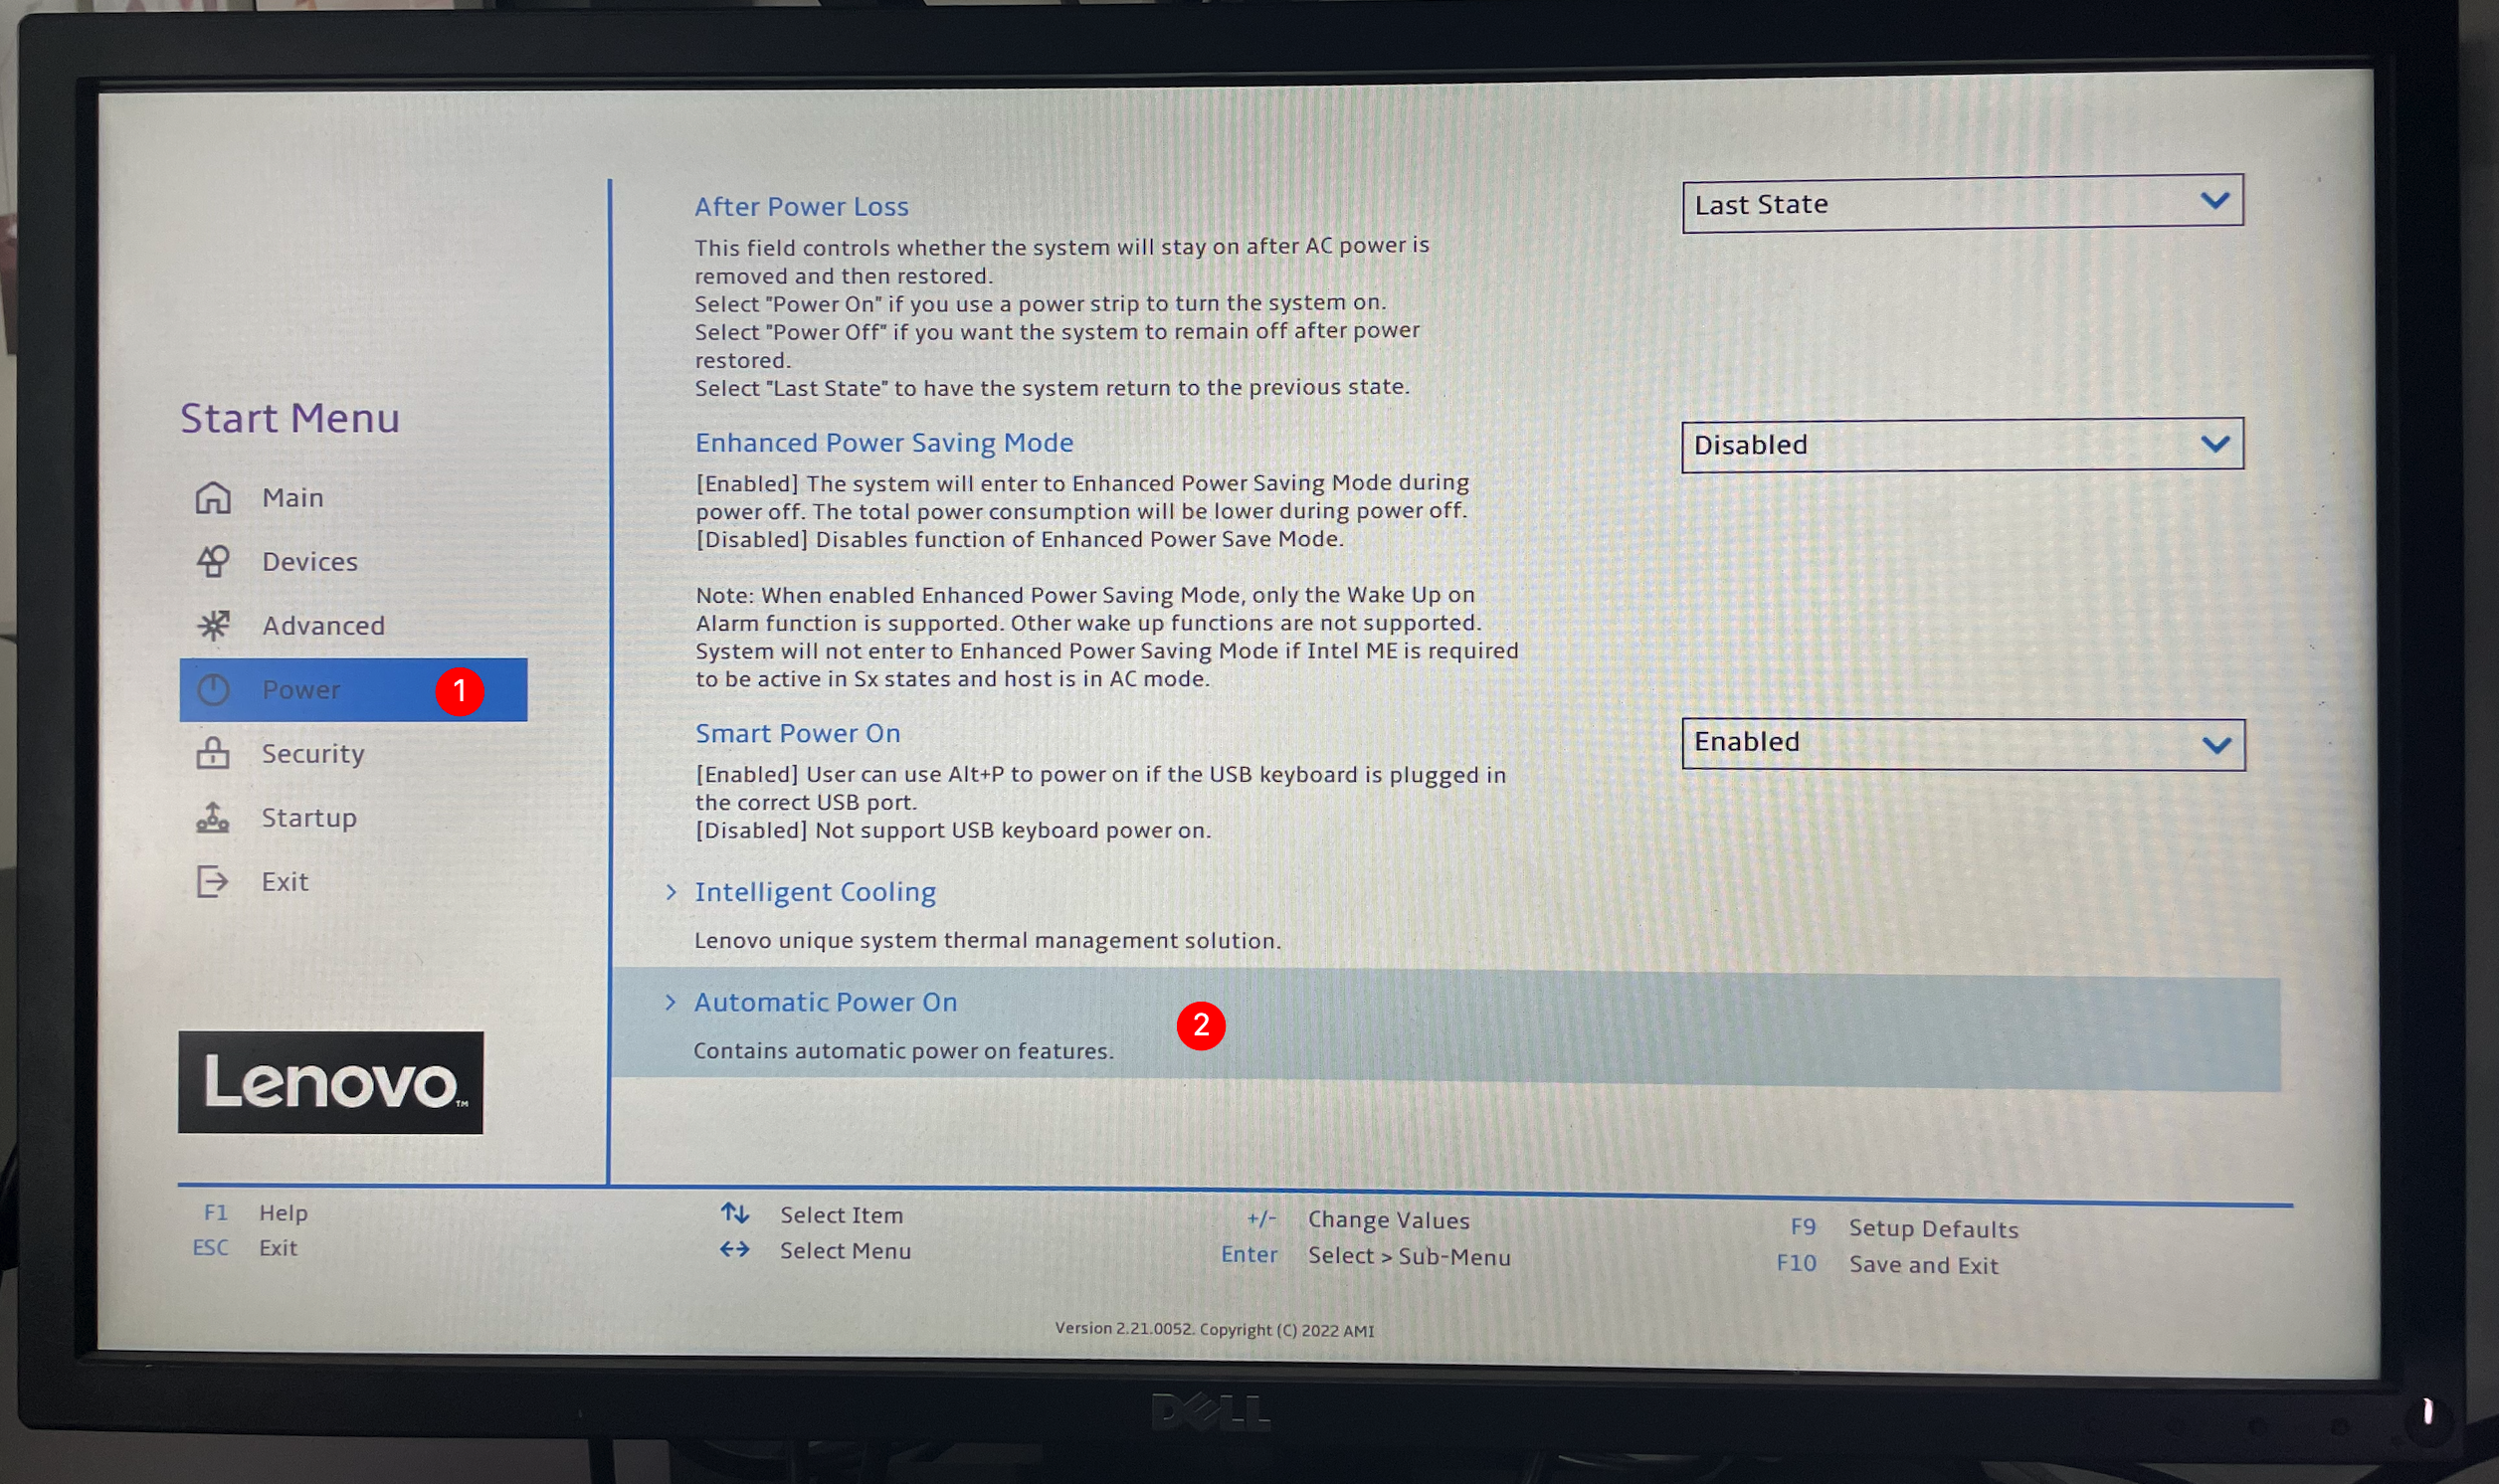
# Step 1: BIOS Settings
- Restart your computer and enter the BIOS settings. This usually requires pressing a specific key during startup, such as
Delete,F2,F10, orEsc(the specific key depends on your motherboard). - In the BIOS, find the option named "Power Management" or similar.
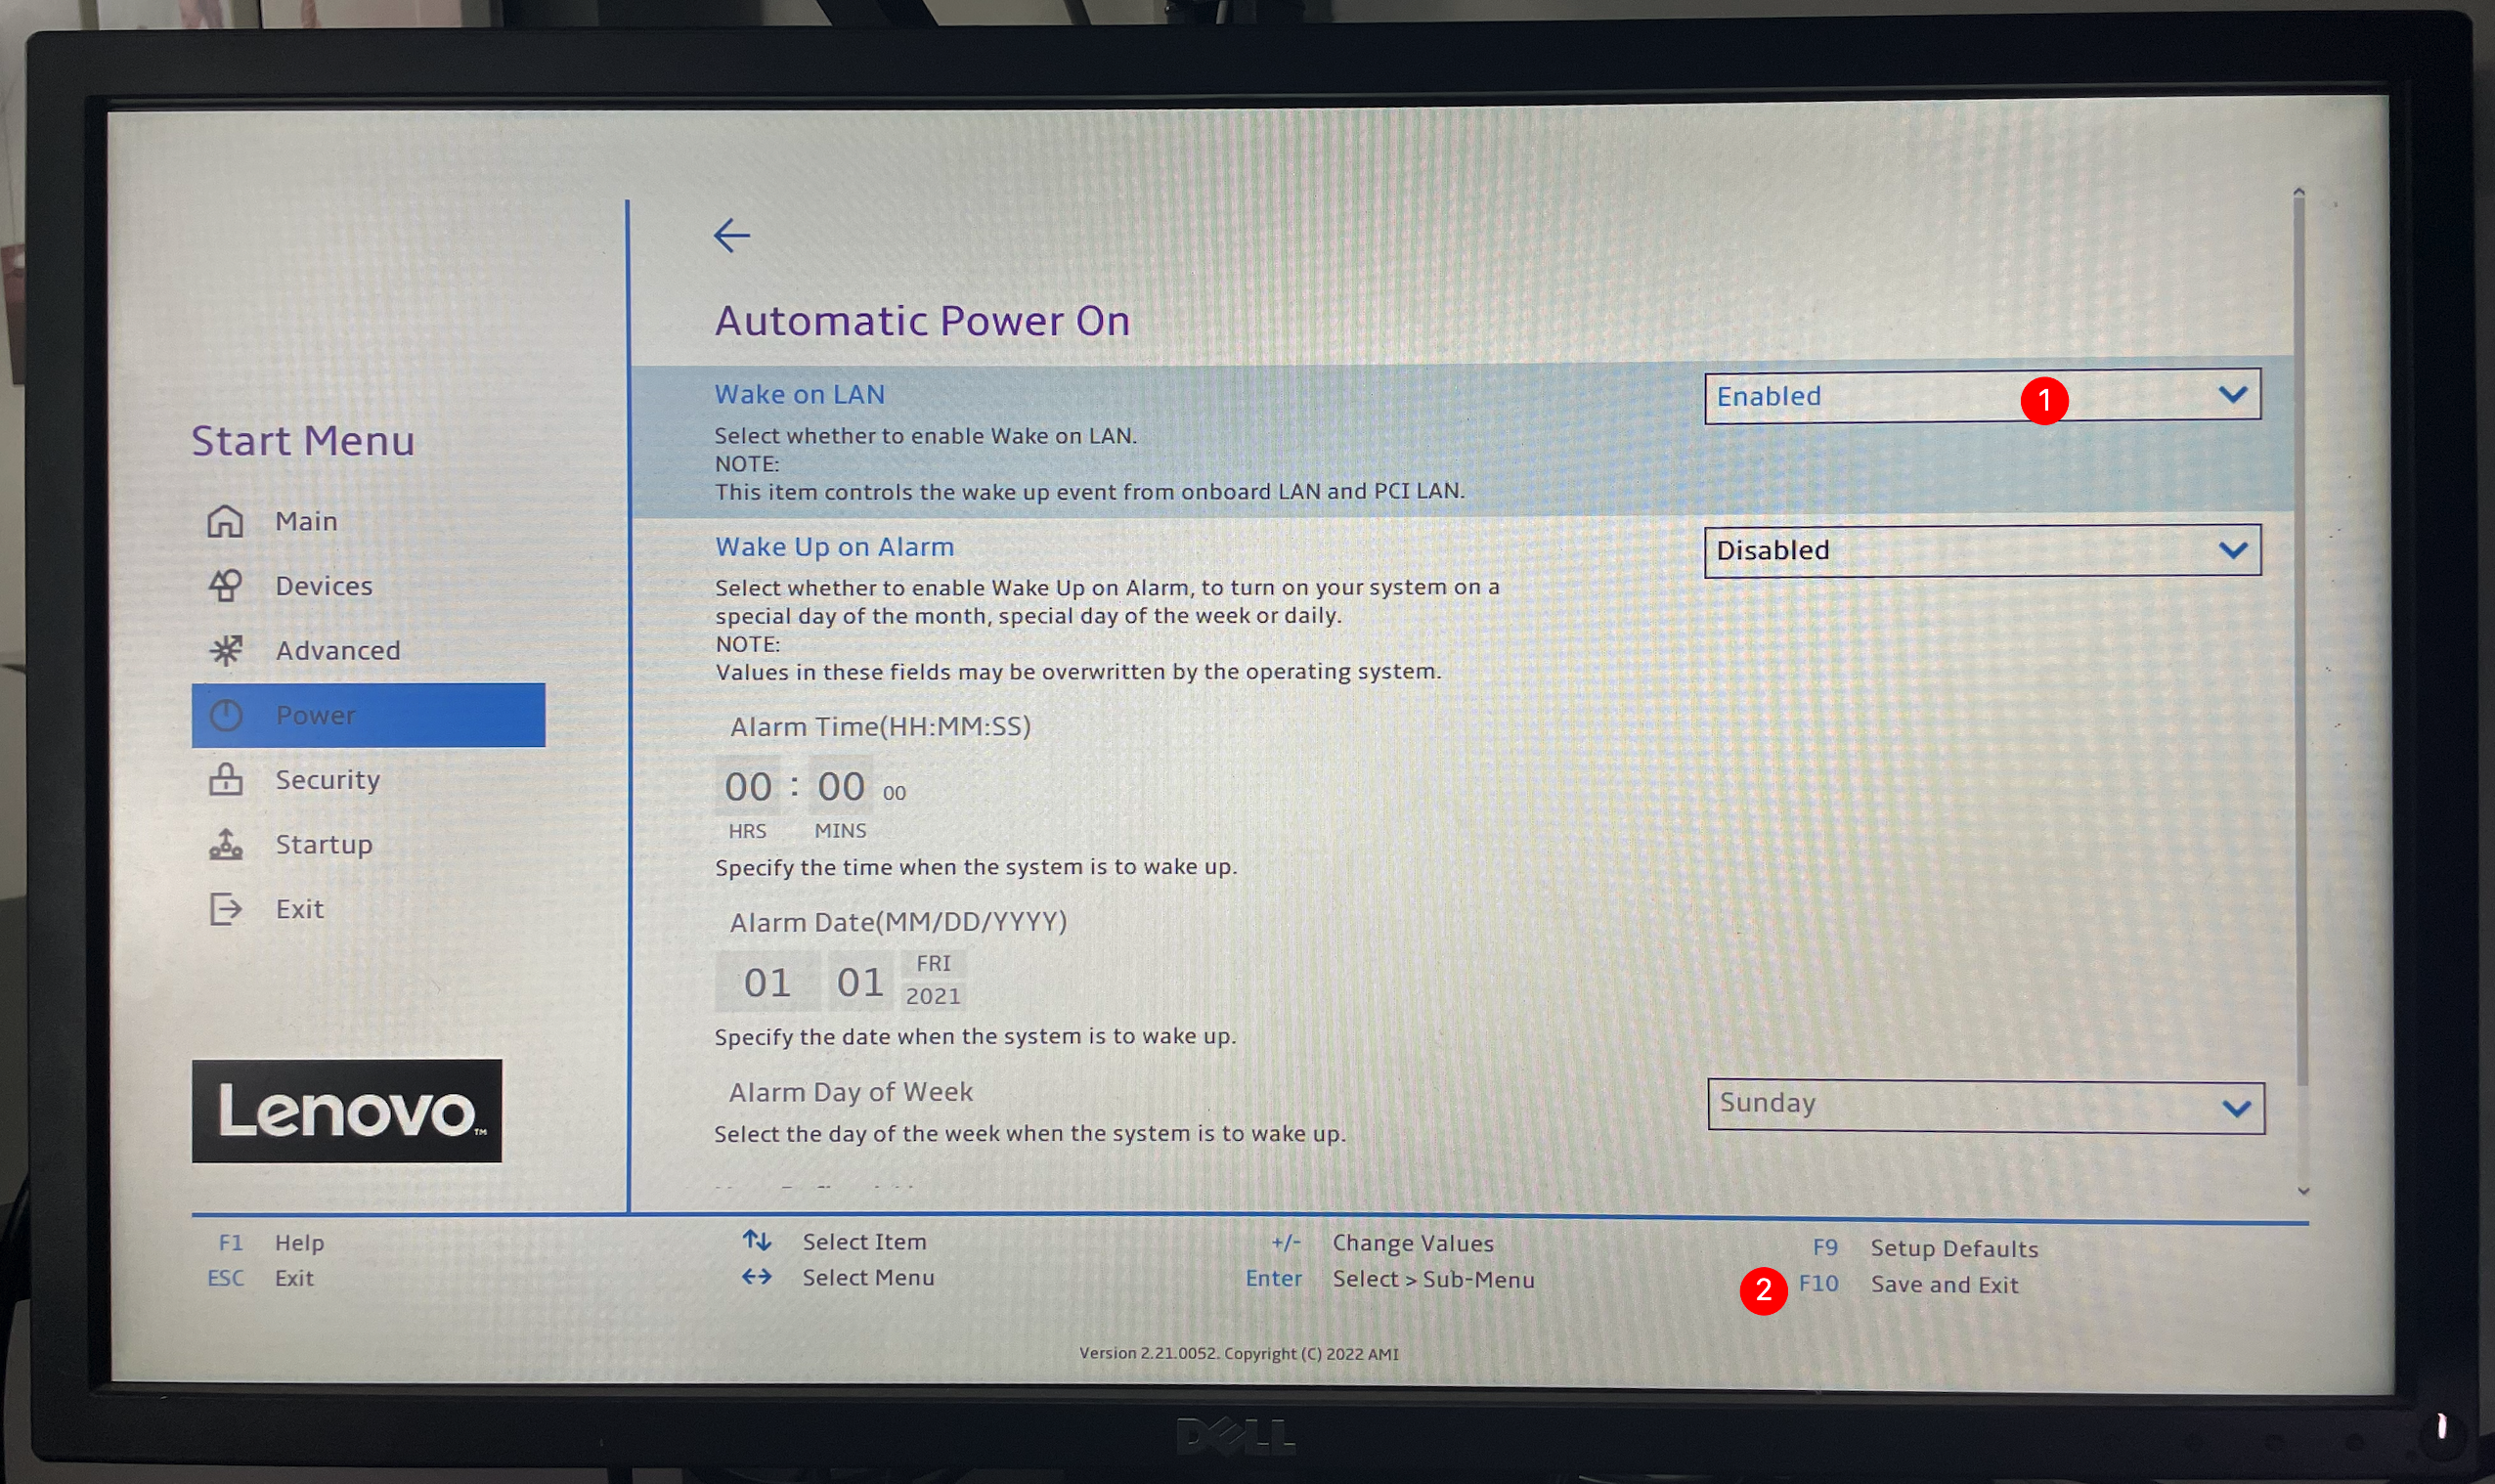
- In the "Power Management" settings, locate the "Wake-on-LAN" or "WOL" option and enable it.
- Save your BIOS settings and restart your computer.
This example uses the BIOS of a Lenovo desktop; different motherboards will vary, so please search for the activation method according to your specific model.
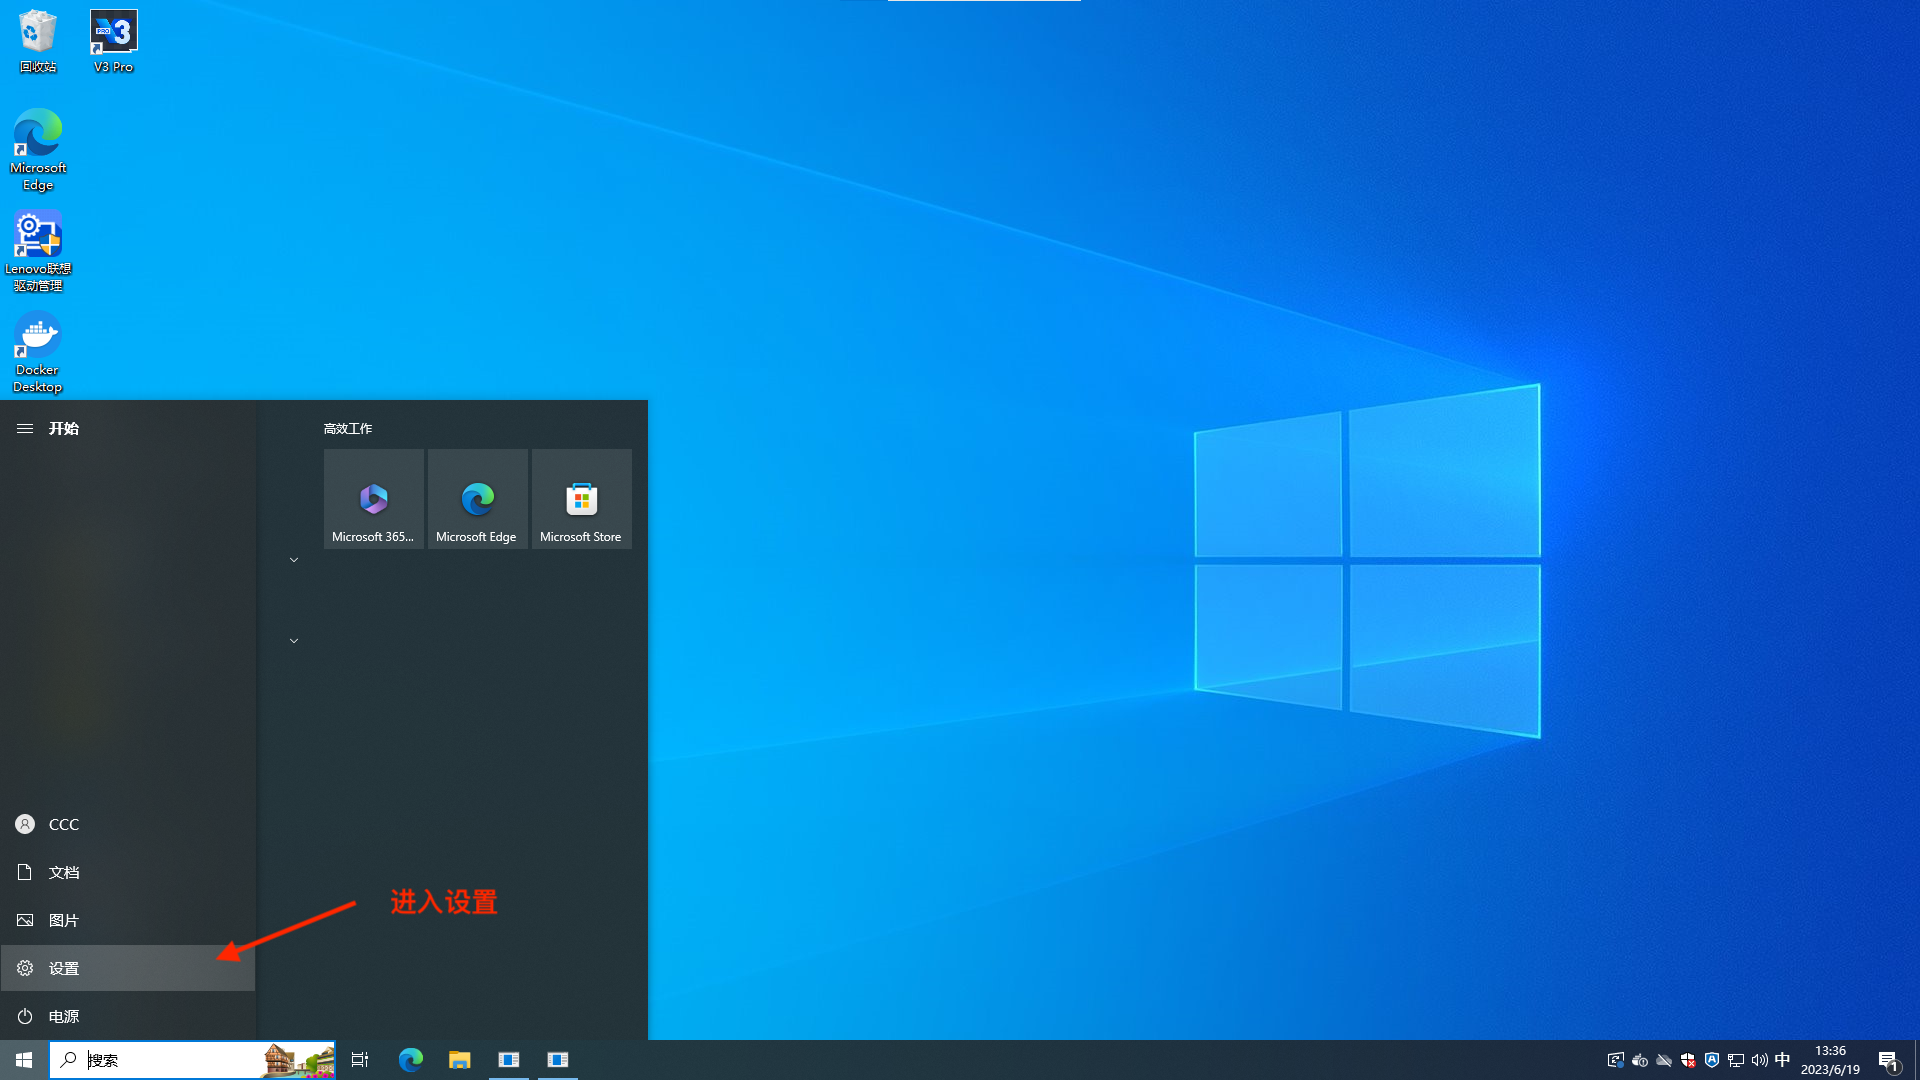
# Step 2: Windows System Settings
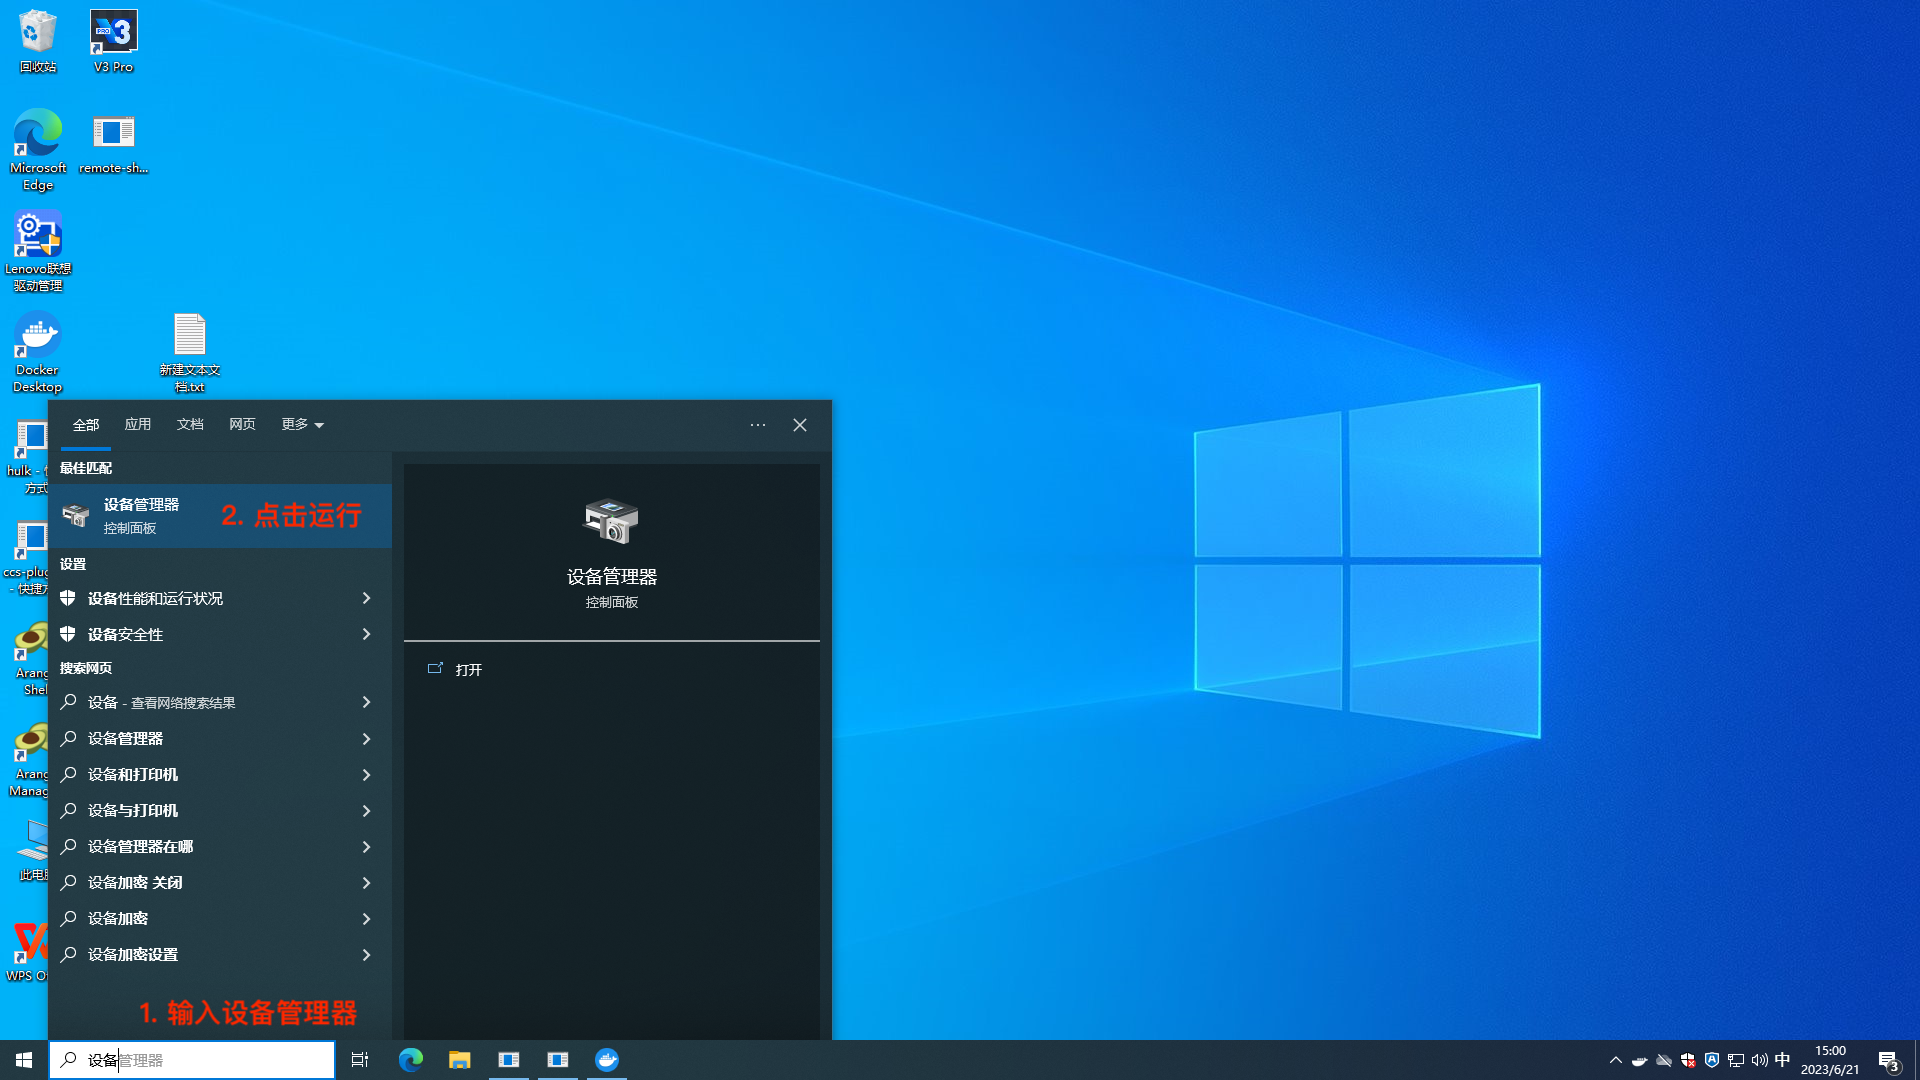
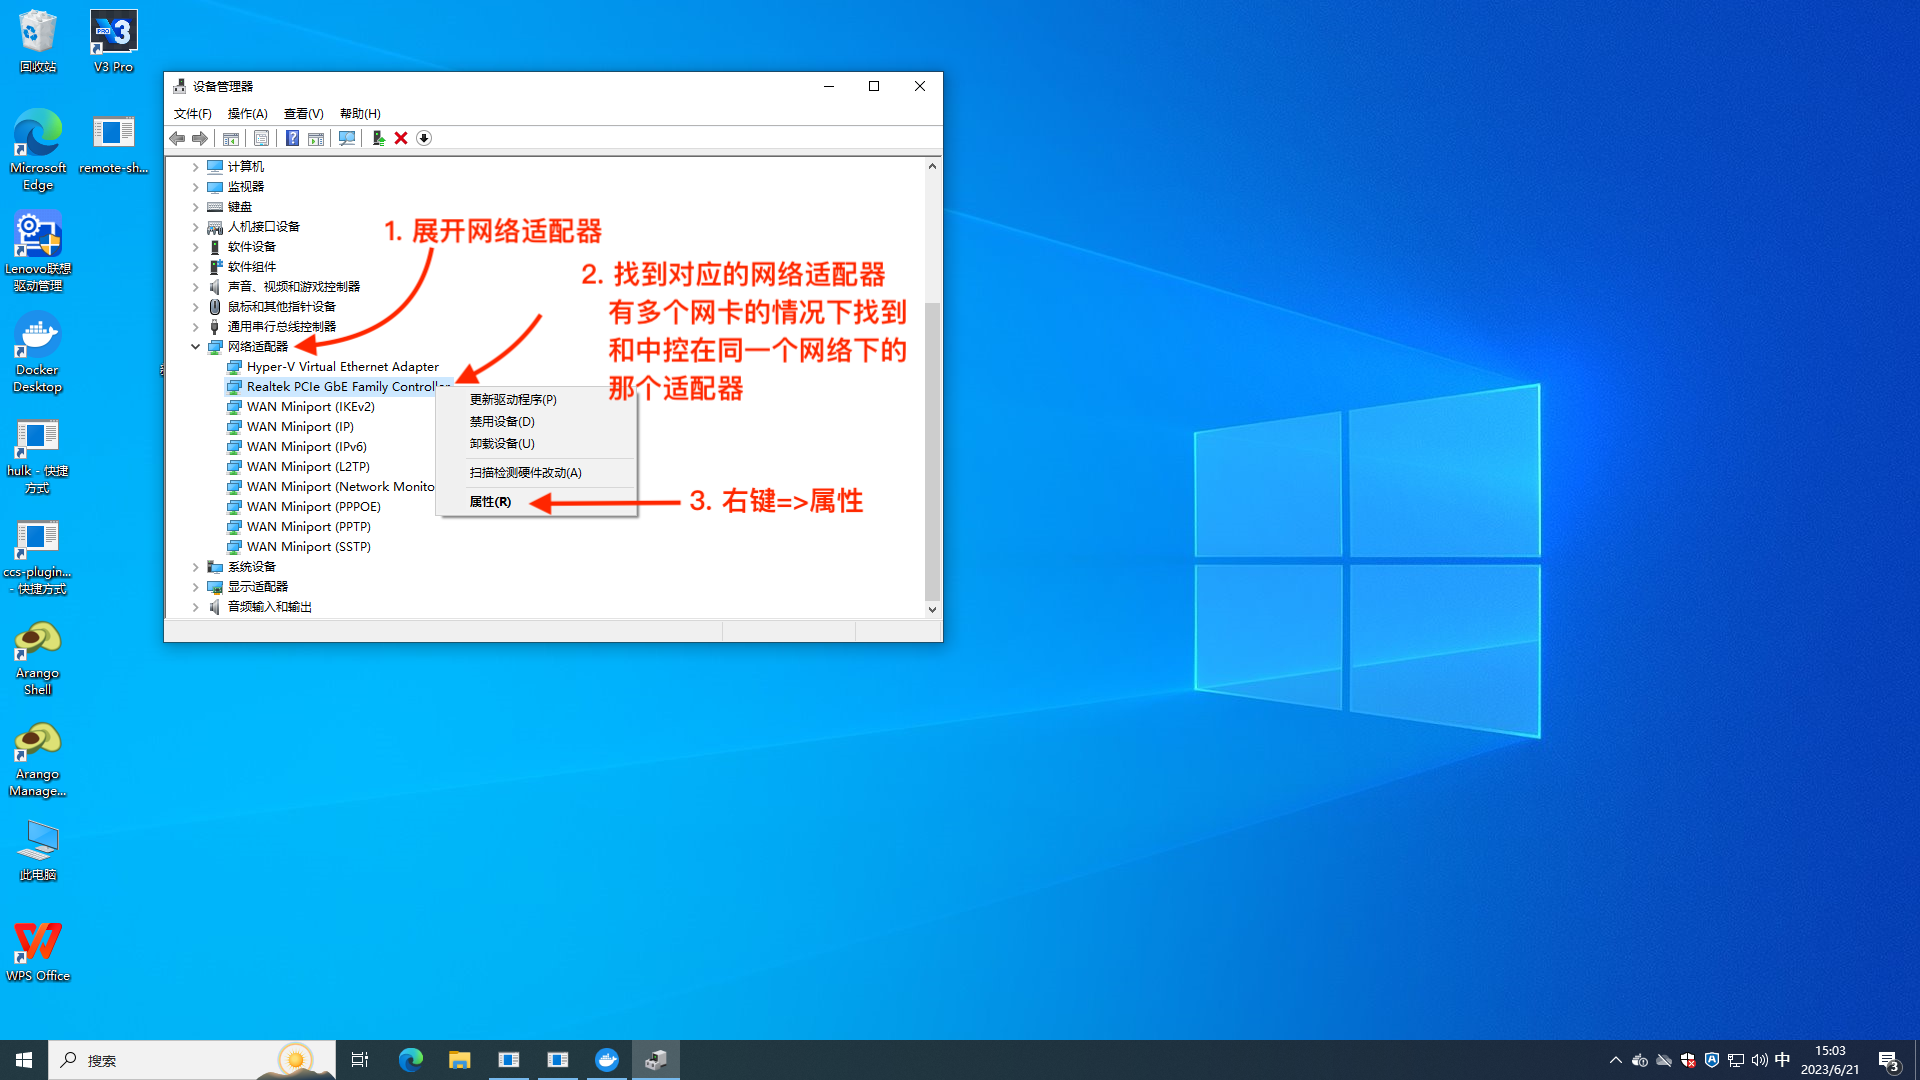
In the Windows system, right-click the "Start" button in the lower left corner, then select "Device Manager".
In the "Device Manager", expand the "Network Adapters" category.
Right-click your Ethernet adapter, then select "Properties".
In the Ethernet adapter's "Properties" window, go to the "Advanced" tab.
In the "Advanced" tab, find the "Wake on Magic Packet", "Wake on Pattern Match" or similar option, and set it to "Magic Packet", "Enable", or similar.

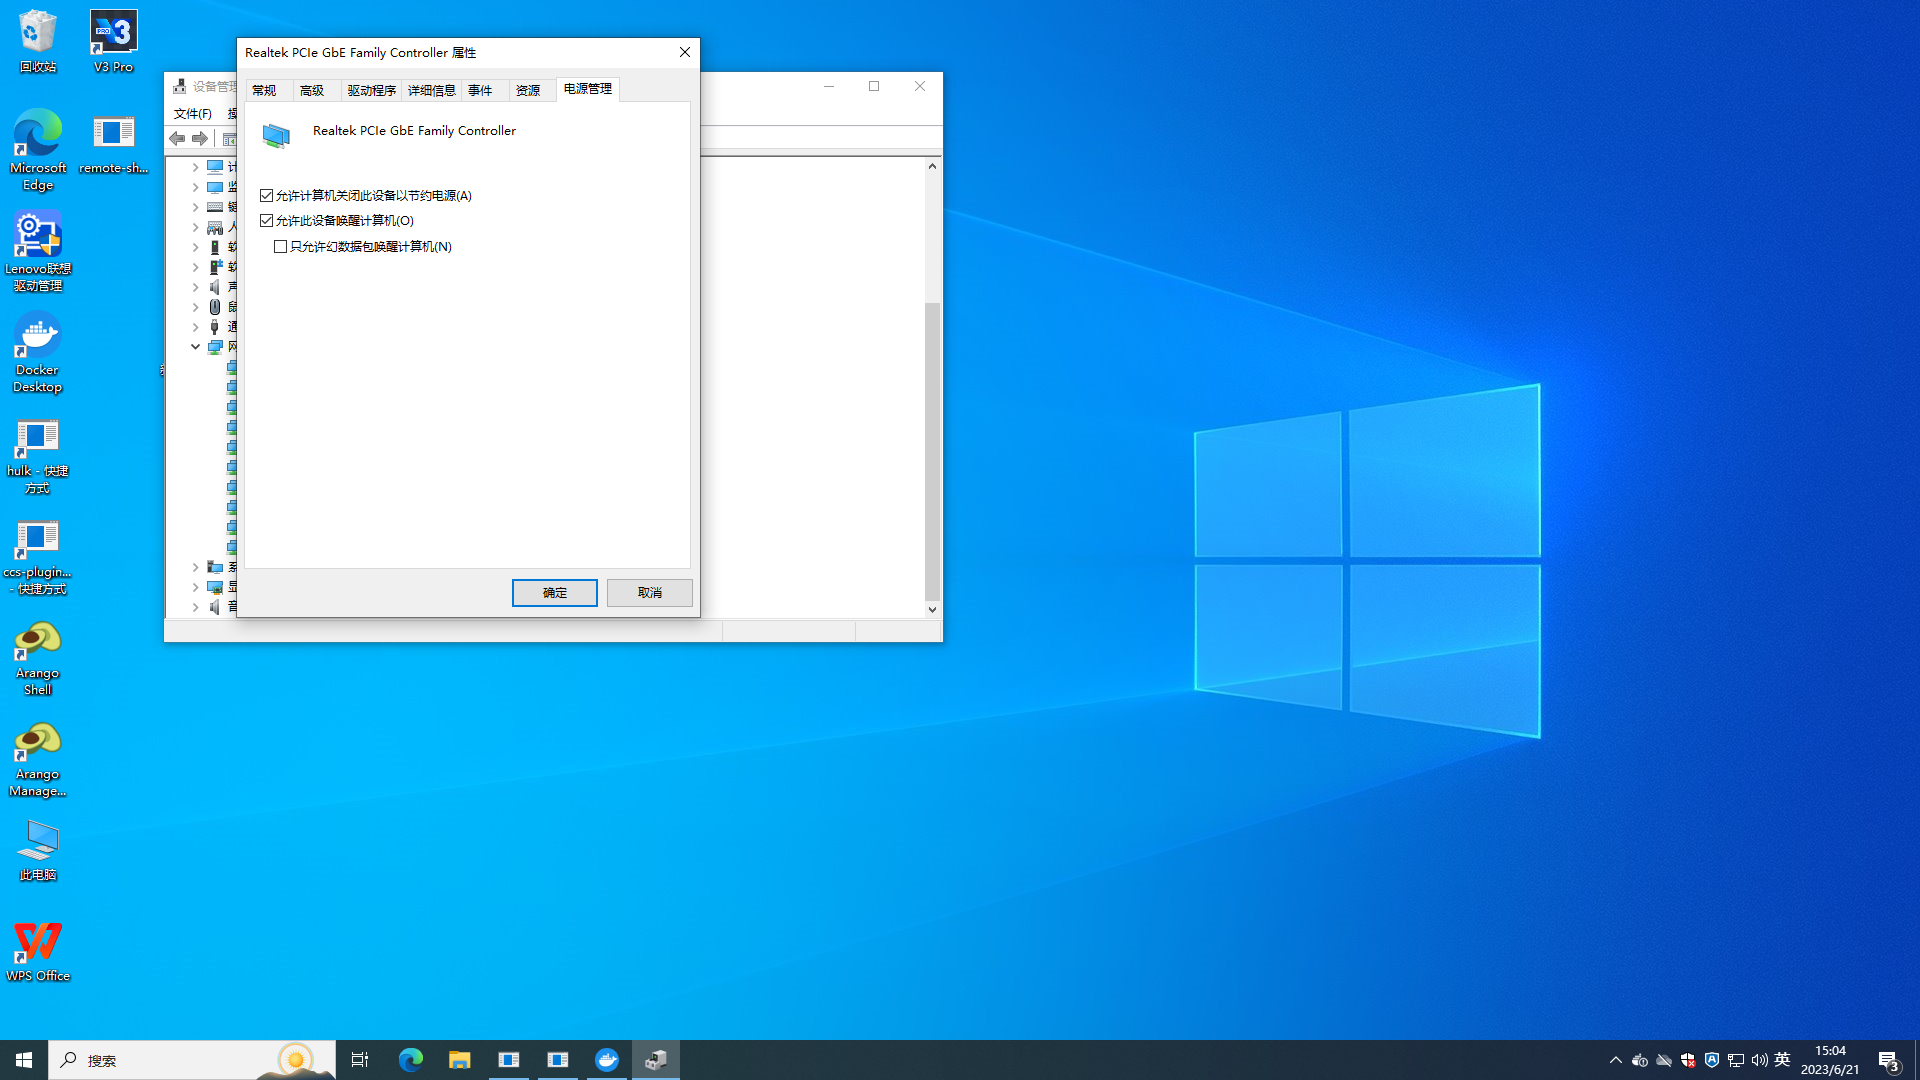
Next, go to the "Power Management" tab.
In the "Power Management" tab, ensure that the "Allow this device to wake the computer" checkbox is checked.
Click "OK" to save the settings.
Now, your Windows computer should be configured to respond to Magic Packet using the Wake-on-LAN function. Please note that different computer hardware and Windows versions may have slightly different option names and settings; therefore, refer to the computer manufacturer's or Windows documentation for any differences.
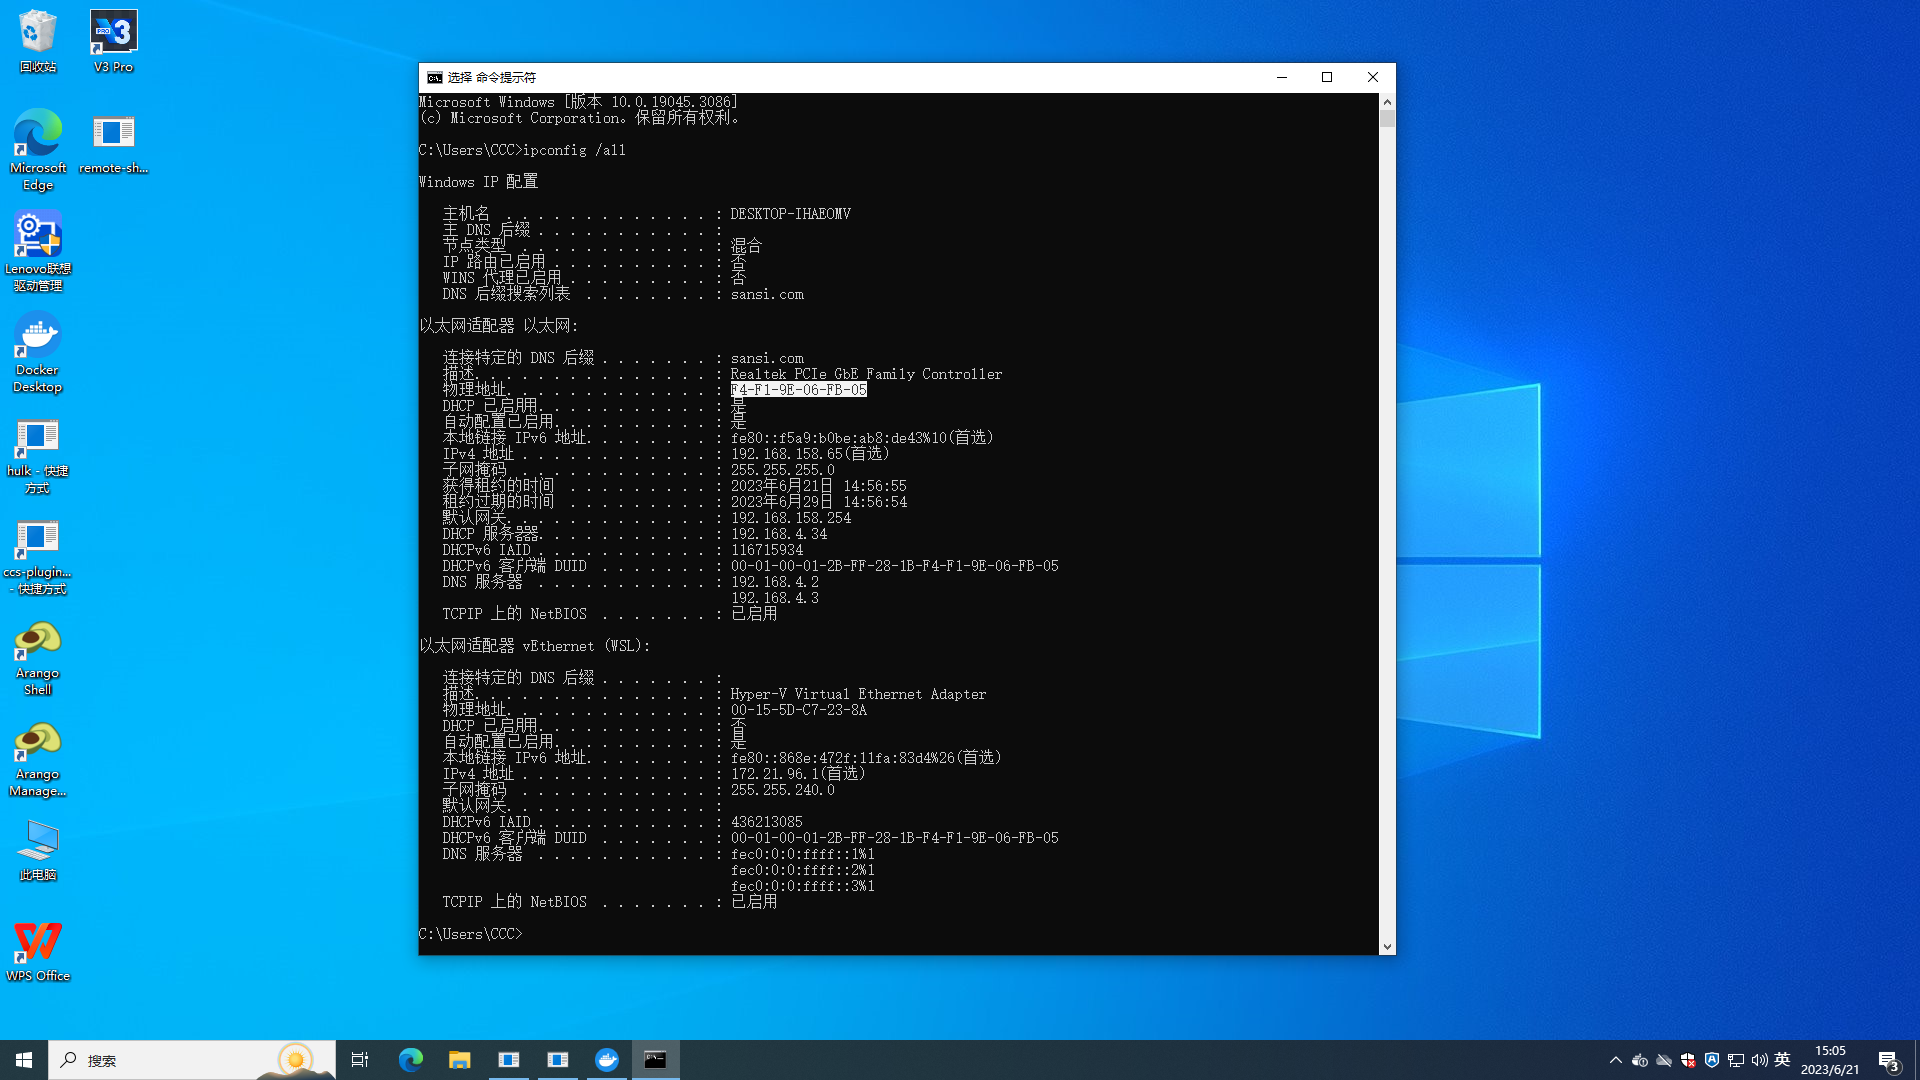
# Step 3: Obtain the Corresponding Network Card MAC Address
Open Command Prompt (cmd) and input ipconfig /all to view all network card information and find the MAC address of the corresponding network card.
# Step 4: Test Wake-Up Command
Shut down the Windows system.
Open the browser on the control panel computer and directly access:
http://127.0.0.1:3436/sansi/ccs/api/v1/transfer/power/wakeup/00-00-00-00-00-00, replacing the MAC address at the end of the link with the one obtained from the previous step.If the corresponding device wakes up, the process is correct.
⚠️Note:
- Remote power management requires control panel version 2.2.6 or higher.
- If the above steps do not wake the device, check the following potential issues:
- Whether Wake on LAN is enabled in the BIOS of the remote device.
- If the corresponding network card is configured correctly.
- Whether the control panel and target devices are under the same router (switch); if not, configuration of forwarding policies may be needed.
- After the target device is powered on, check if the control panel computer can ping the target device's IP address.
- If there are multiple network cards, check that the configured network adapter is on the same network as the control panel.
- If there are multiple network cards, ensure the MAC address entered matches the corresponding network card.
# Step 5: Add a Power On Button
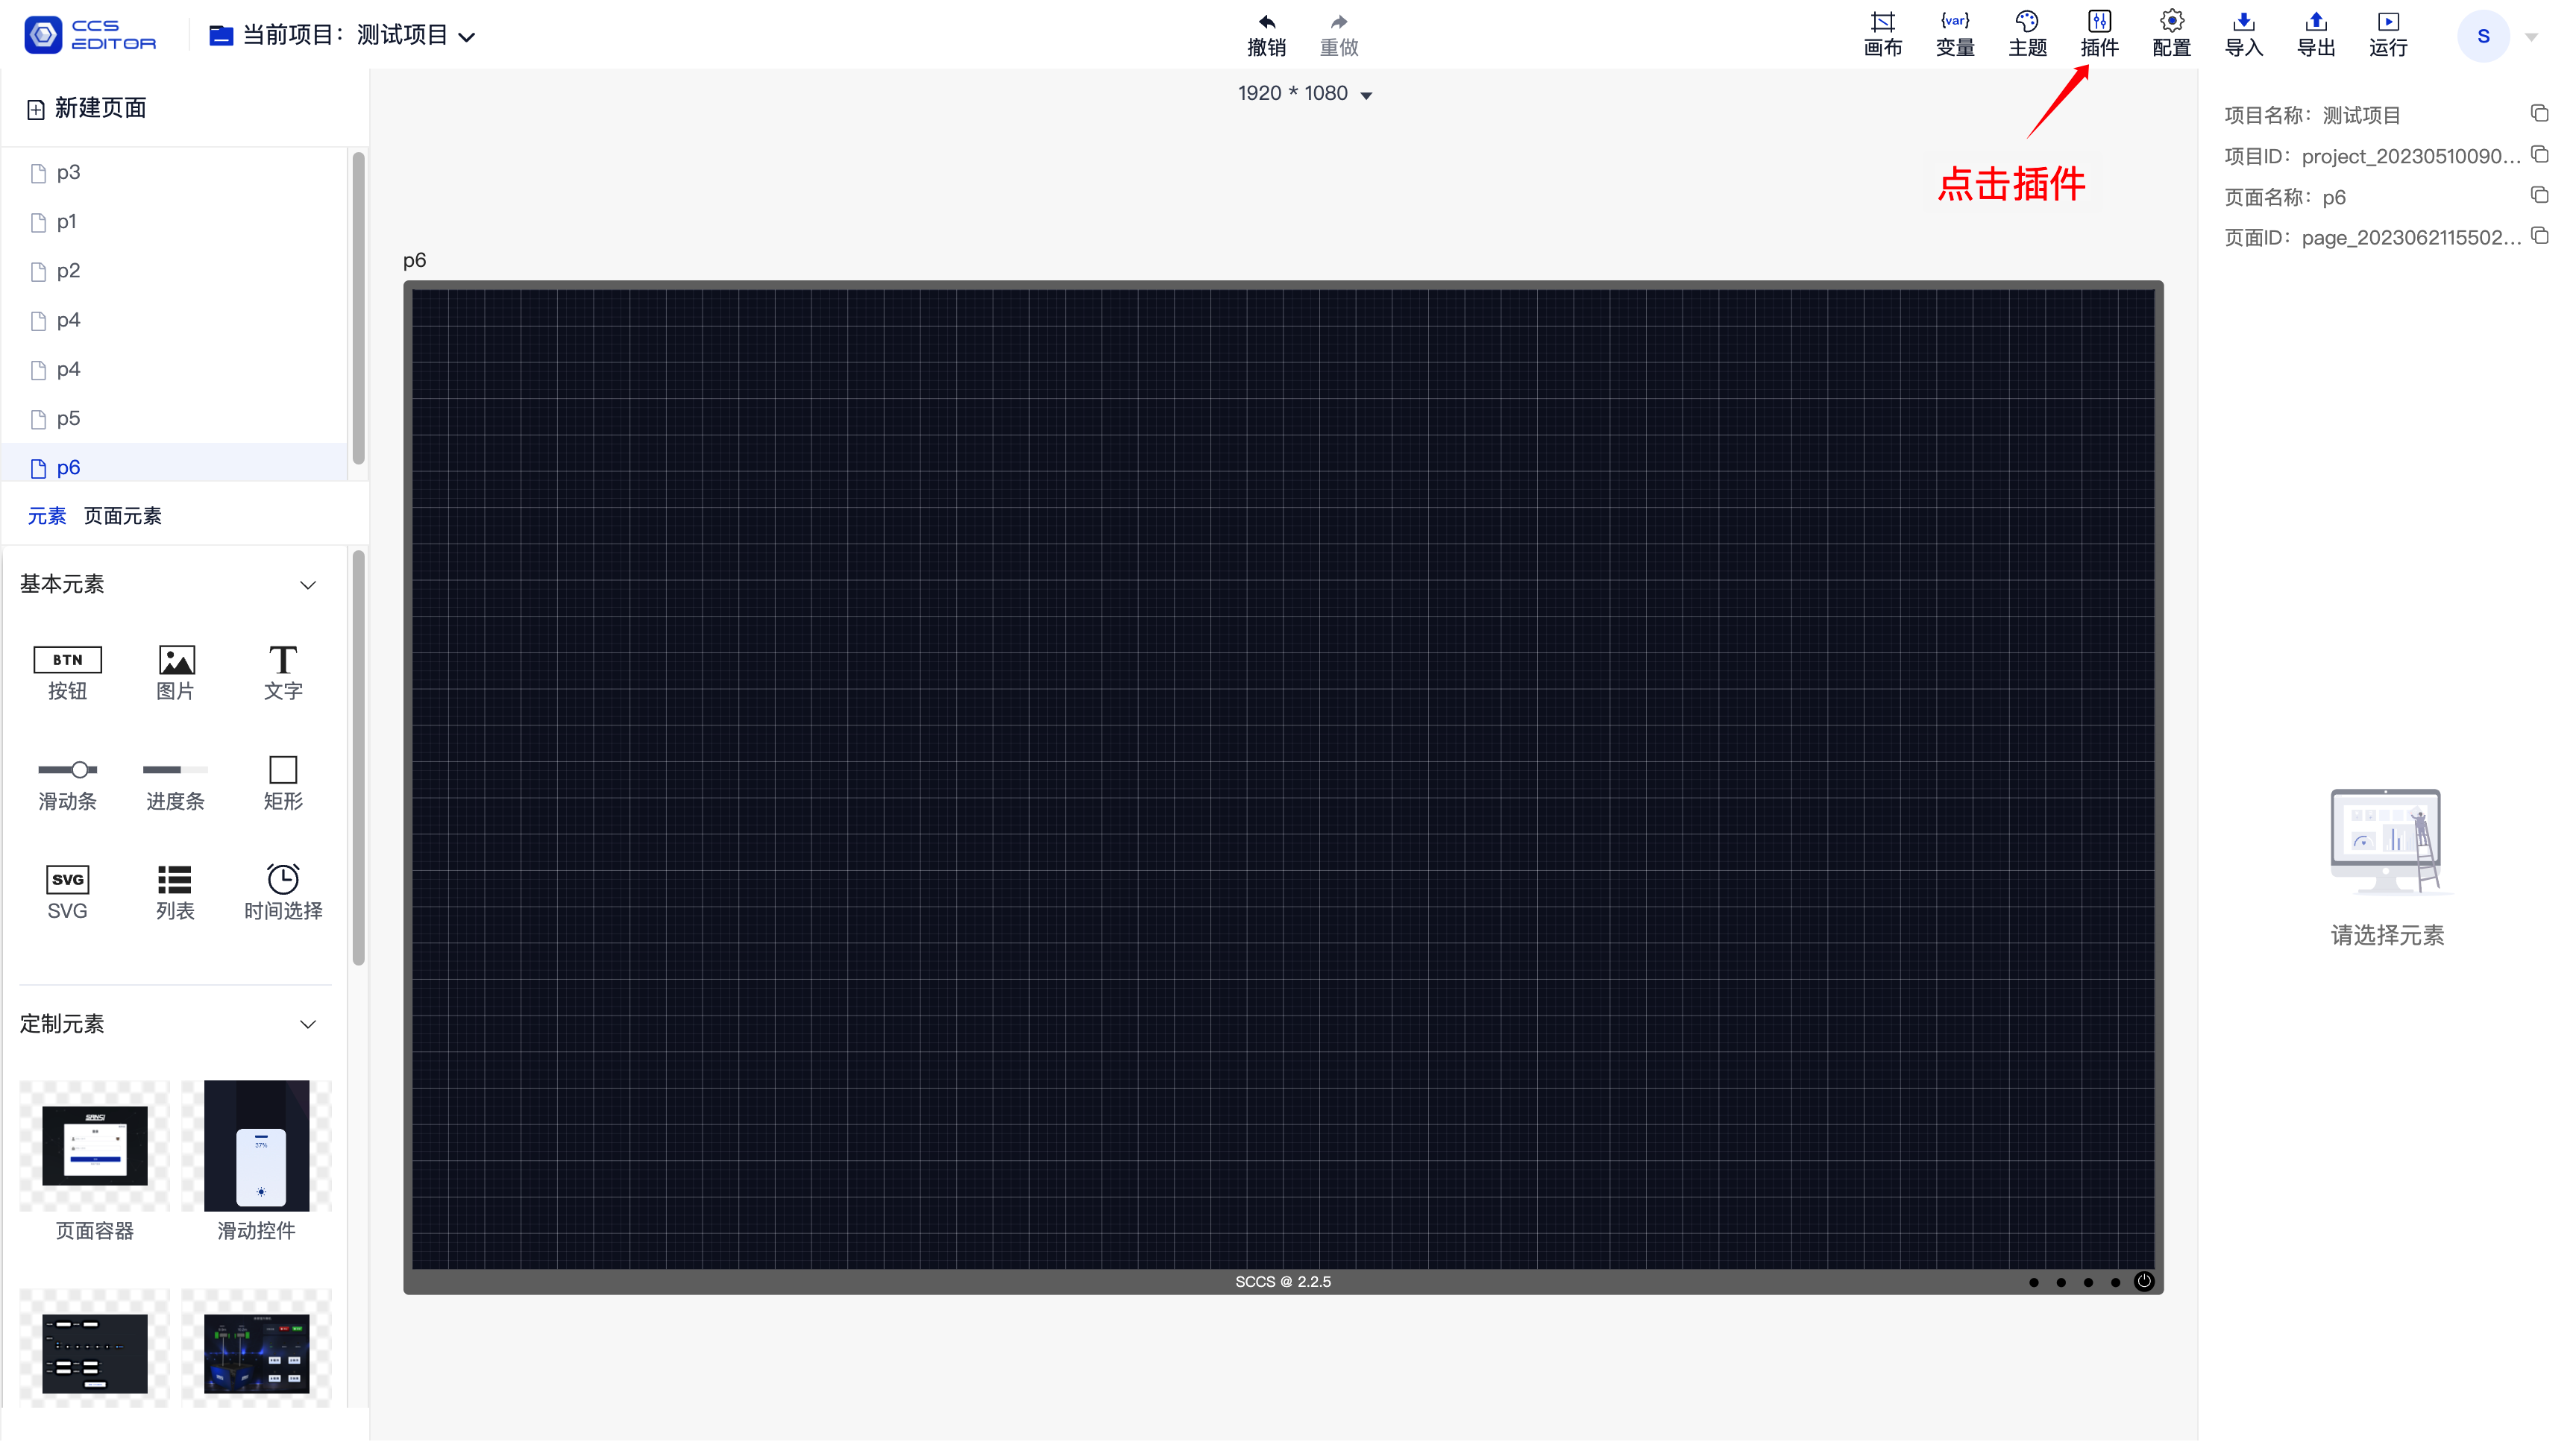
There are two ways to add a power-on button:
One is through a plugin, where all operations are visualized, allowing for one-click activation of multiple devices, but this method is slightly less customizable.
The other way is through scripts, which allows for greater customization but requires some programming knowledge; familiarity with JavaScript is preferred. Choose based on your needs.
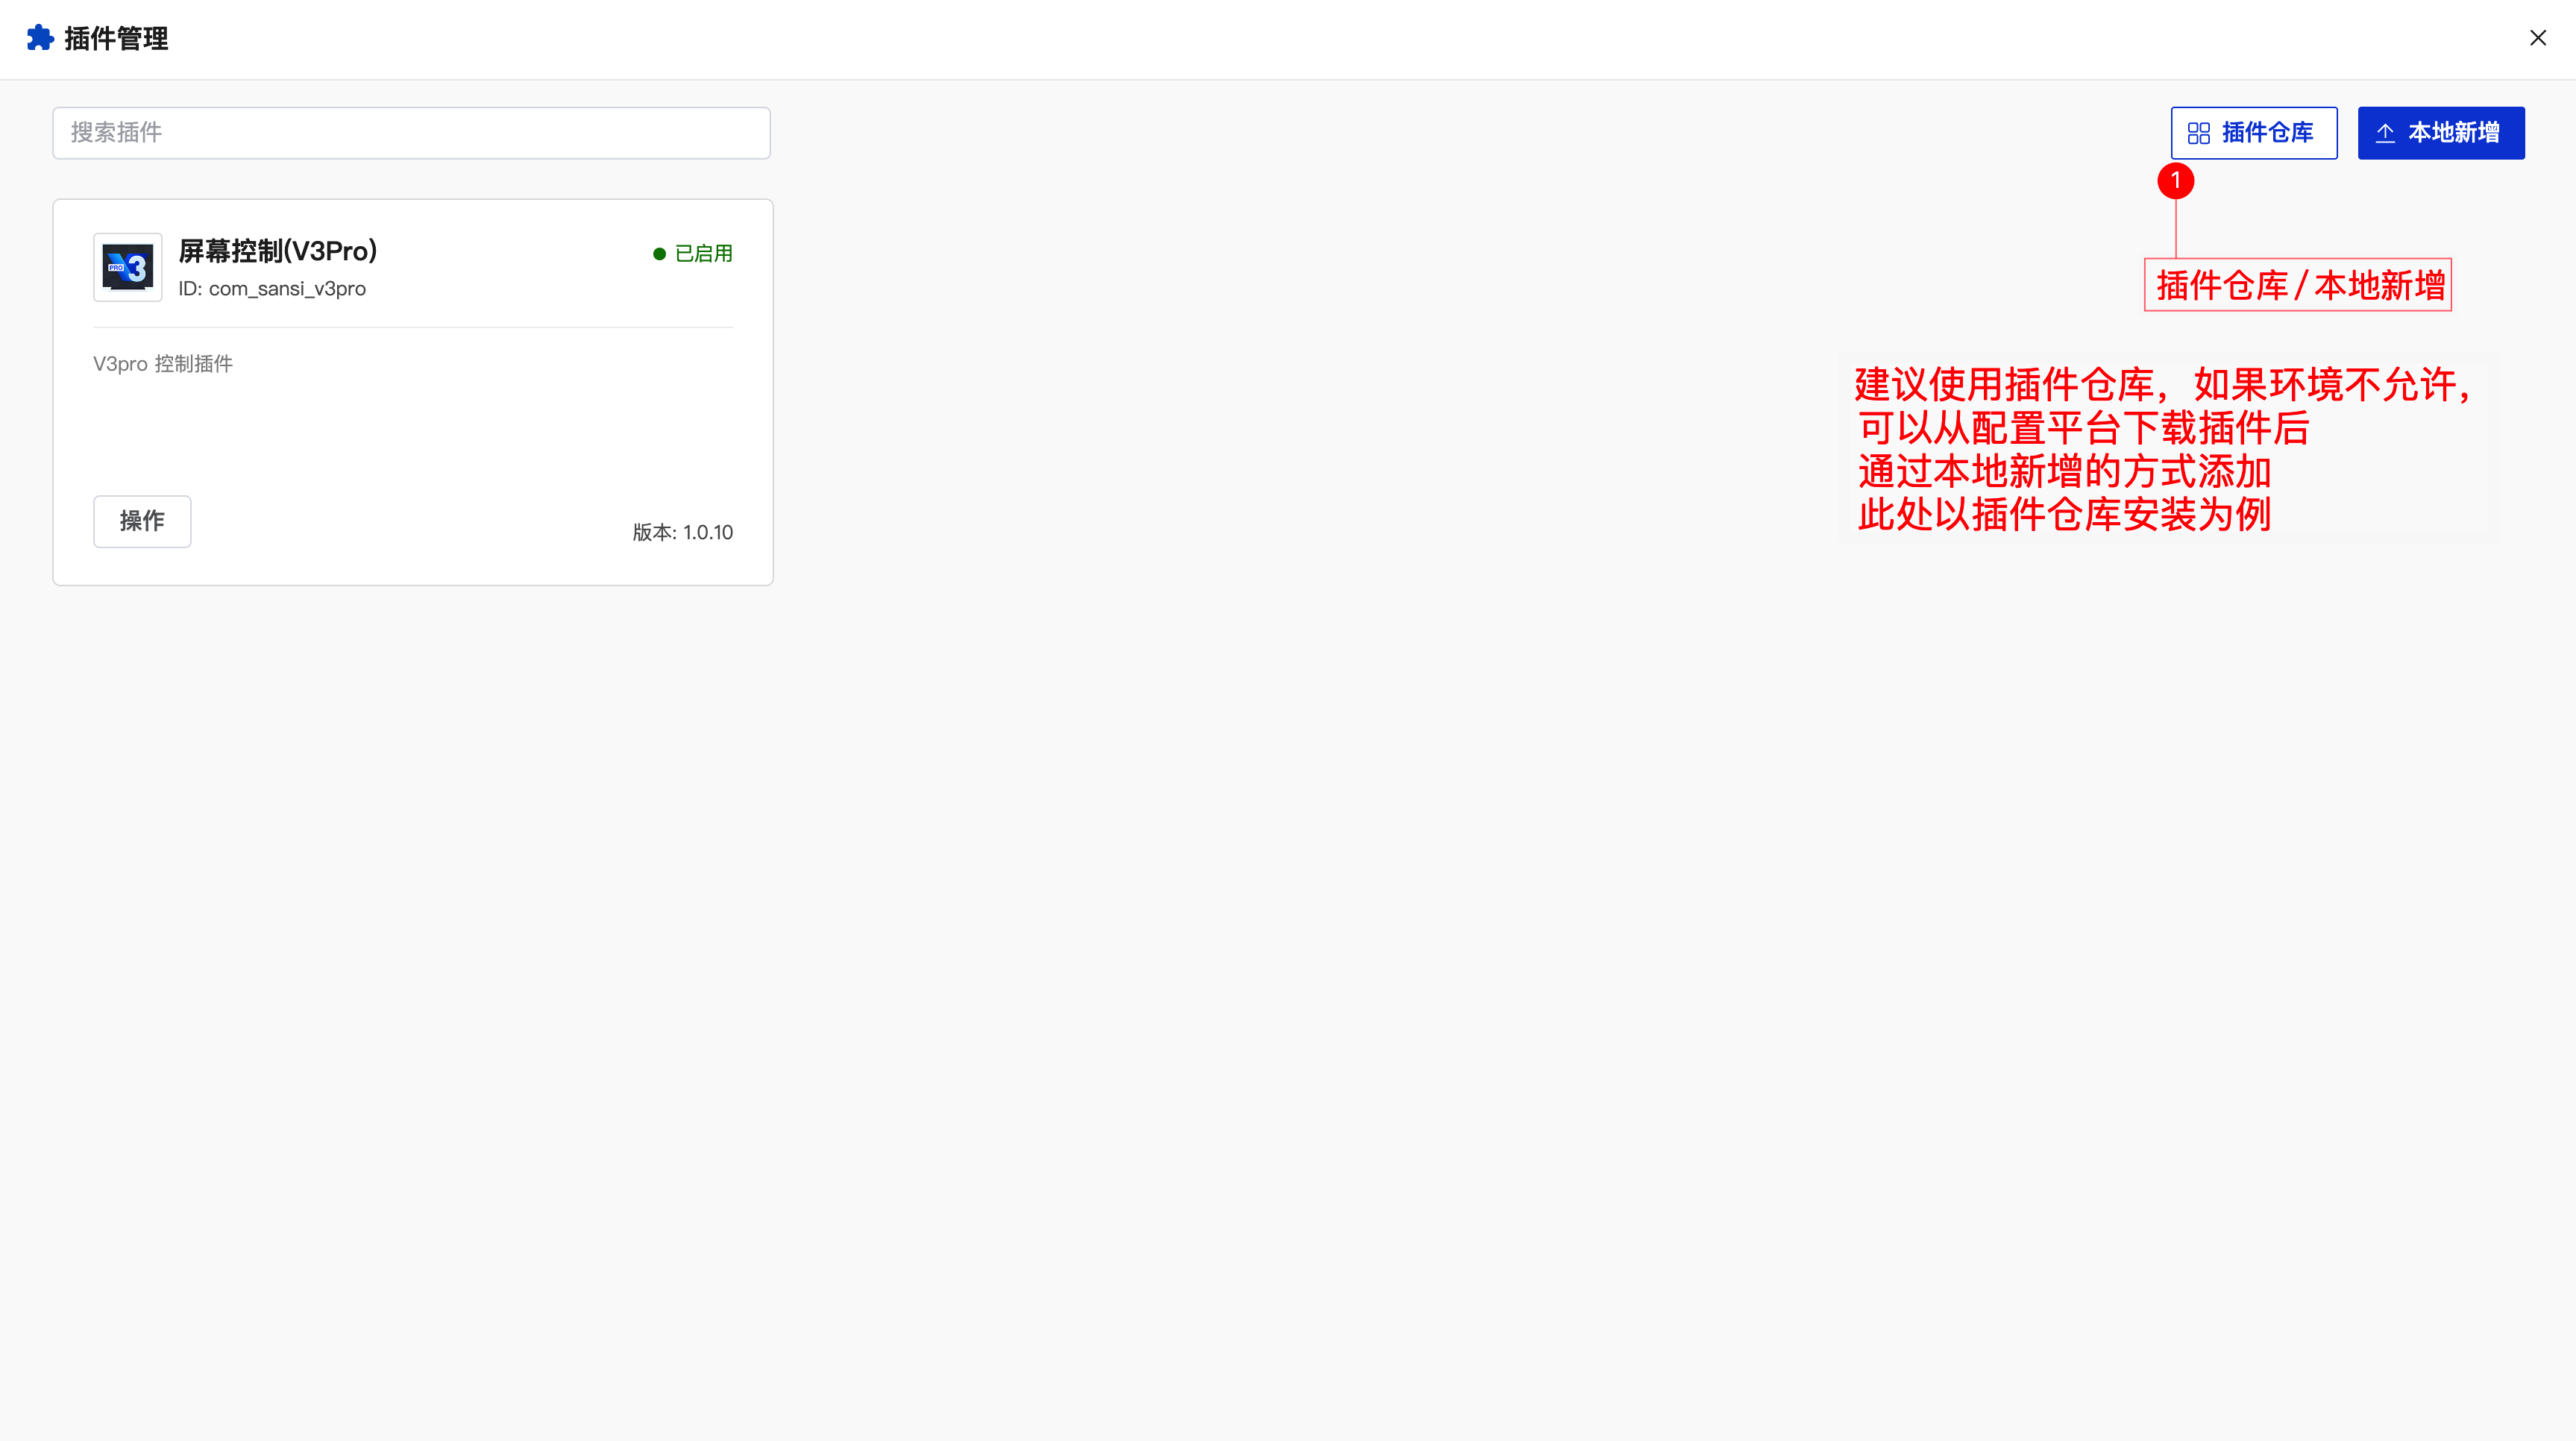
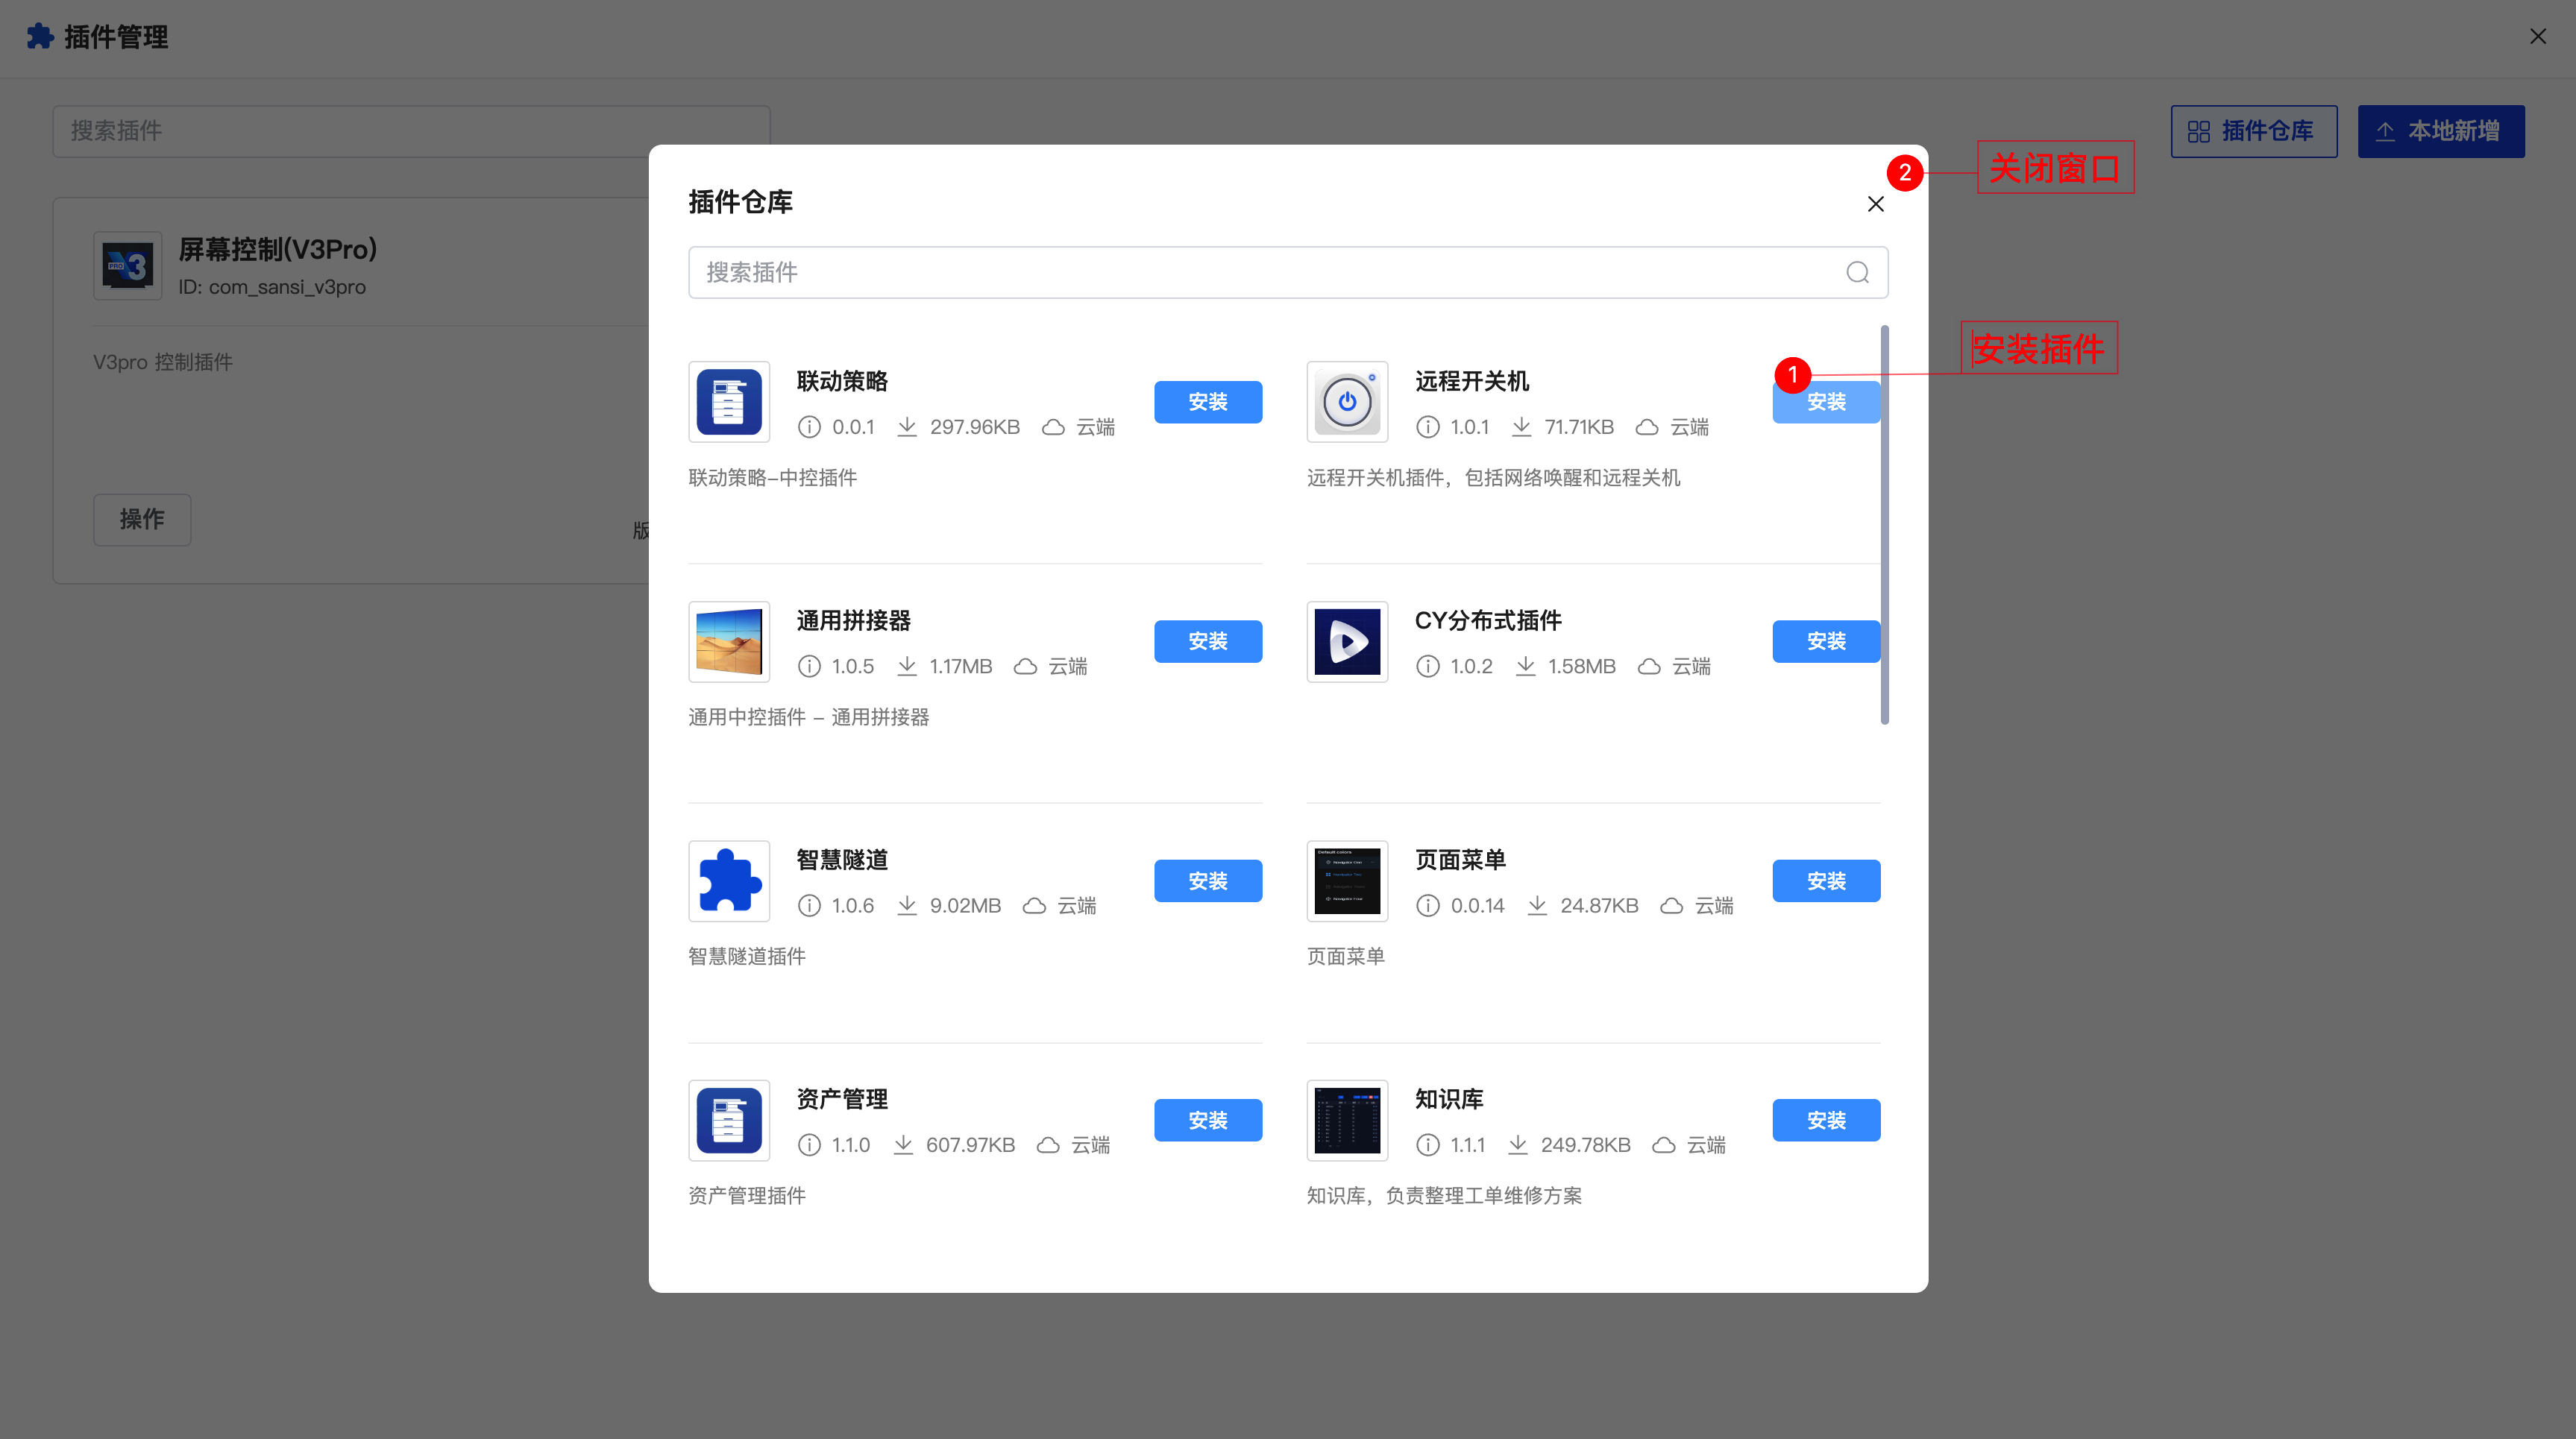
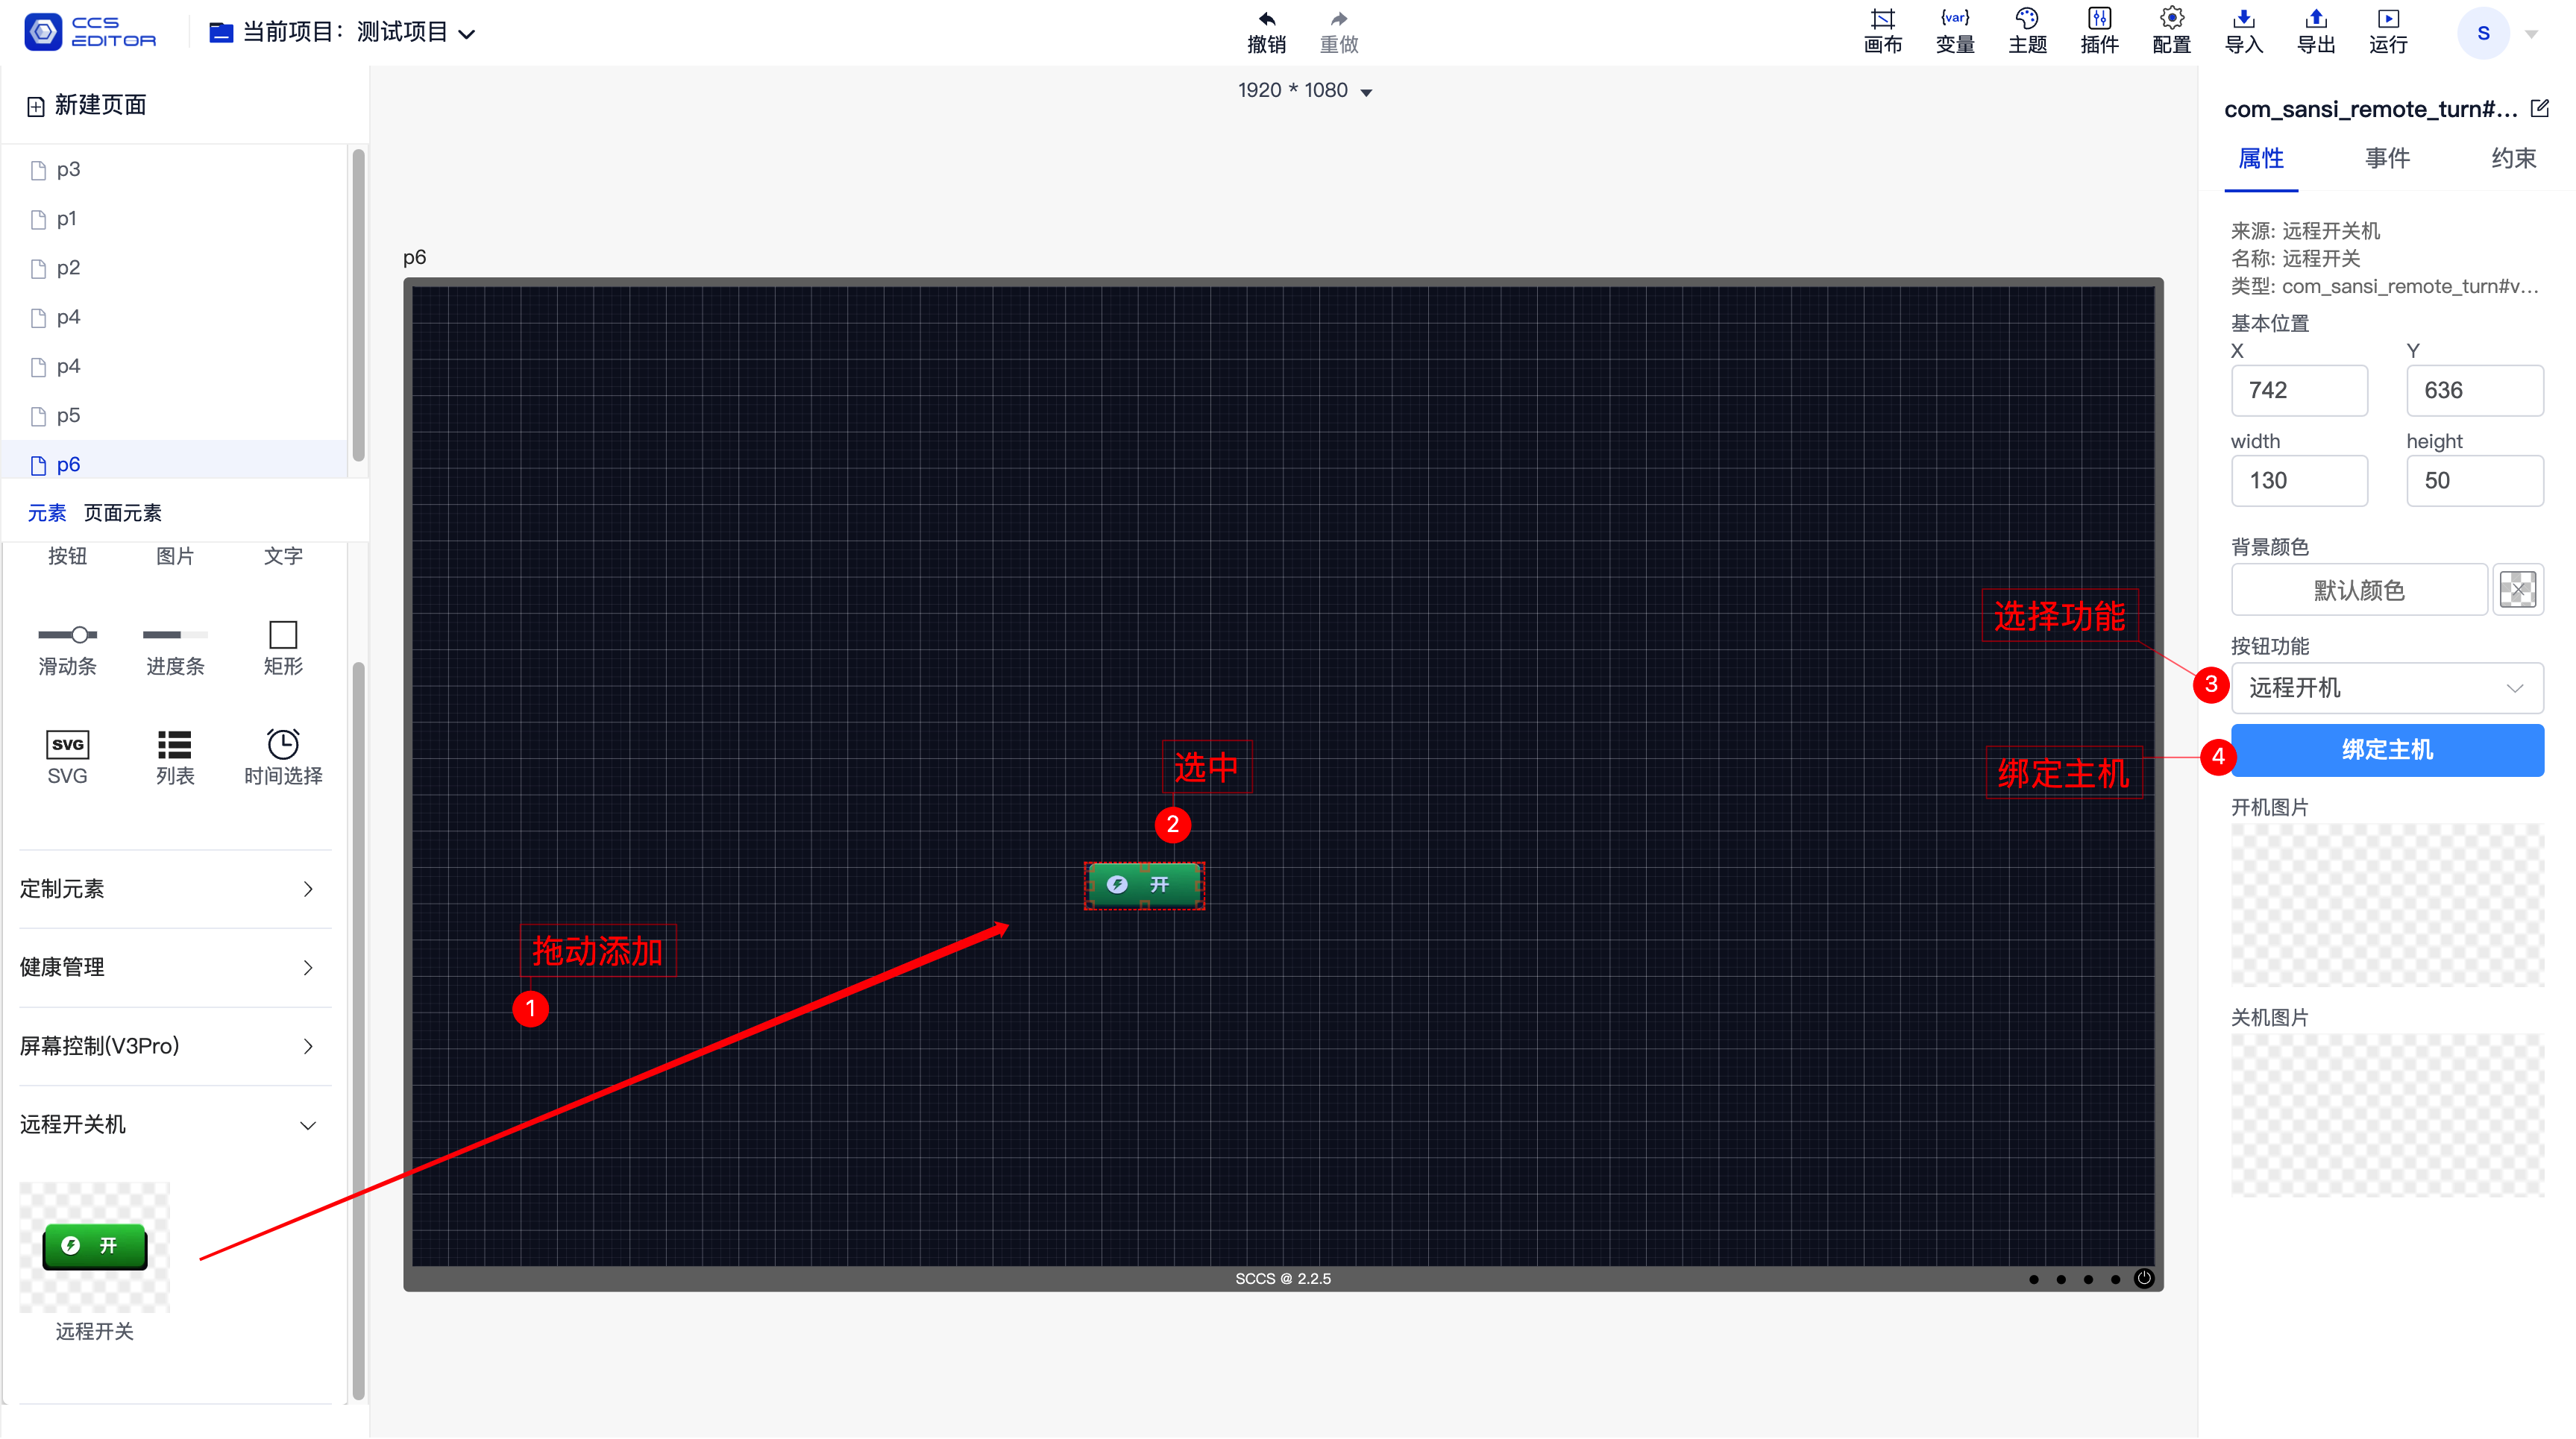
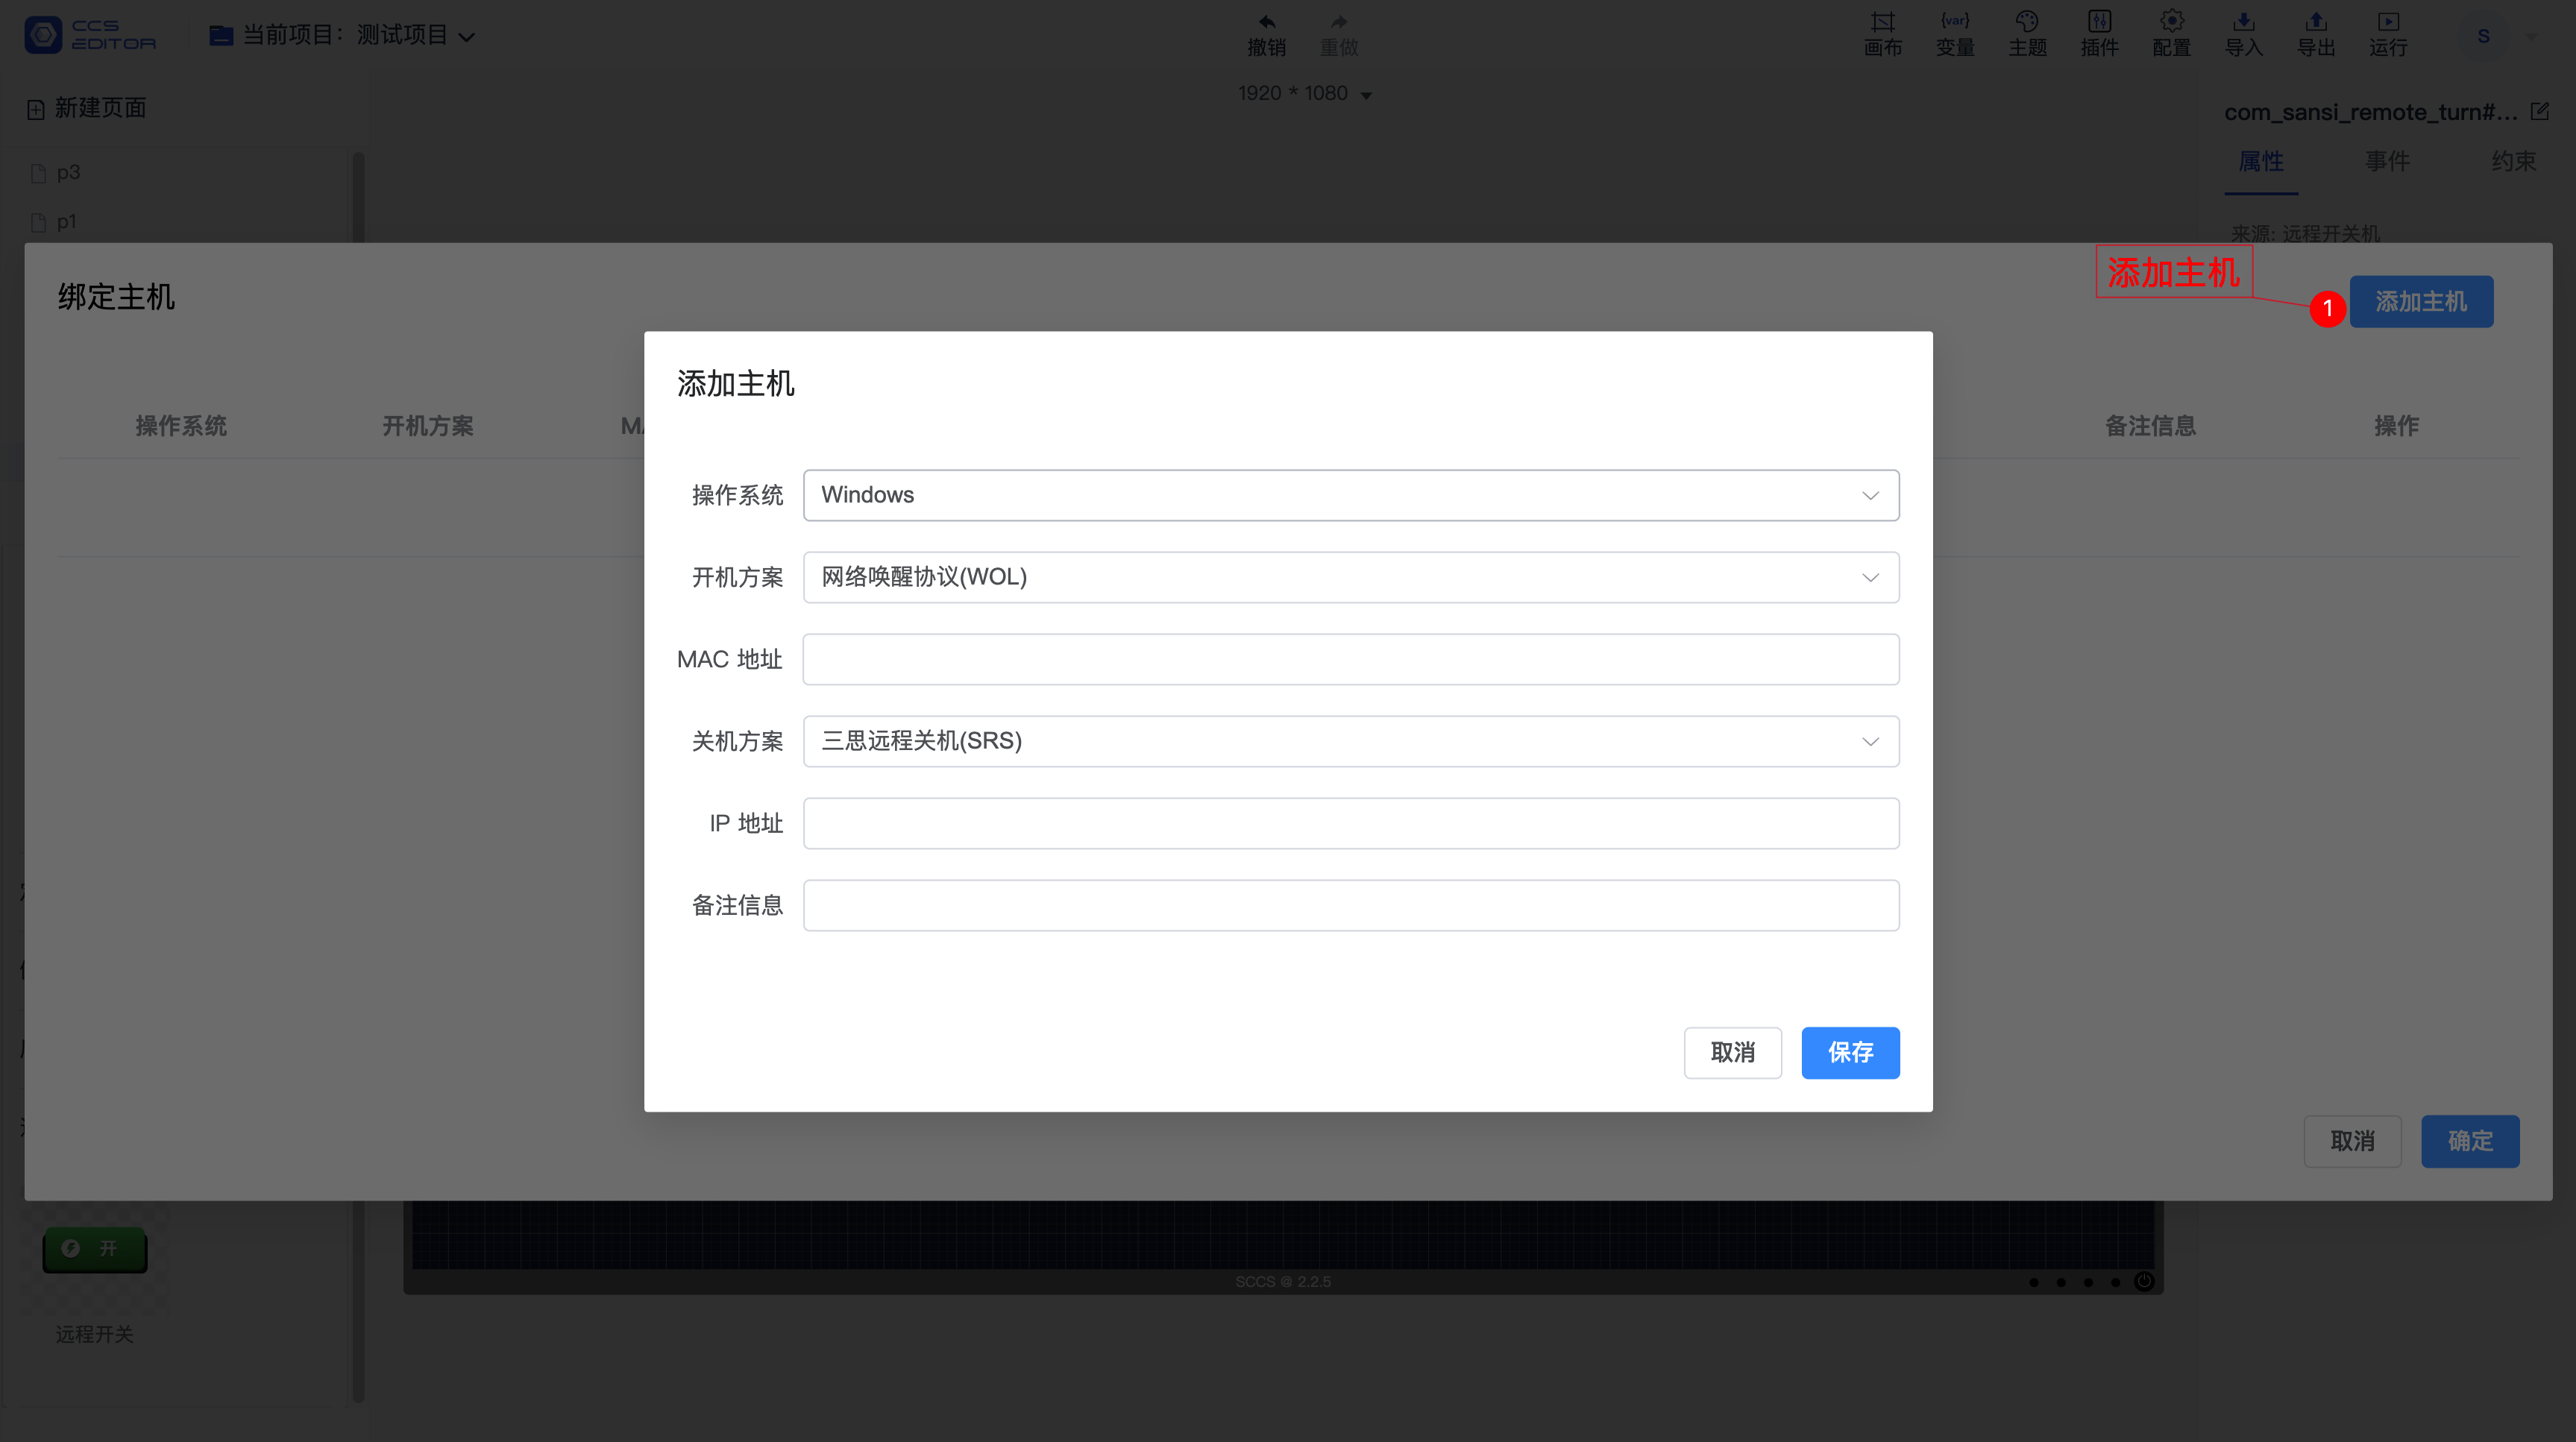
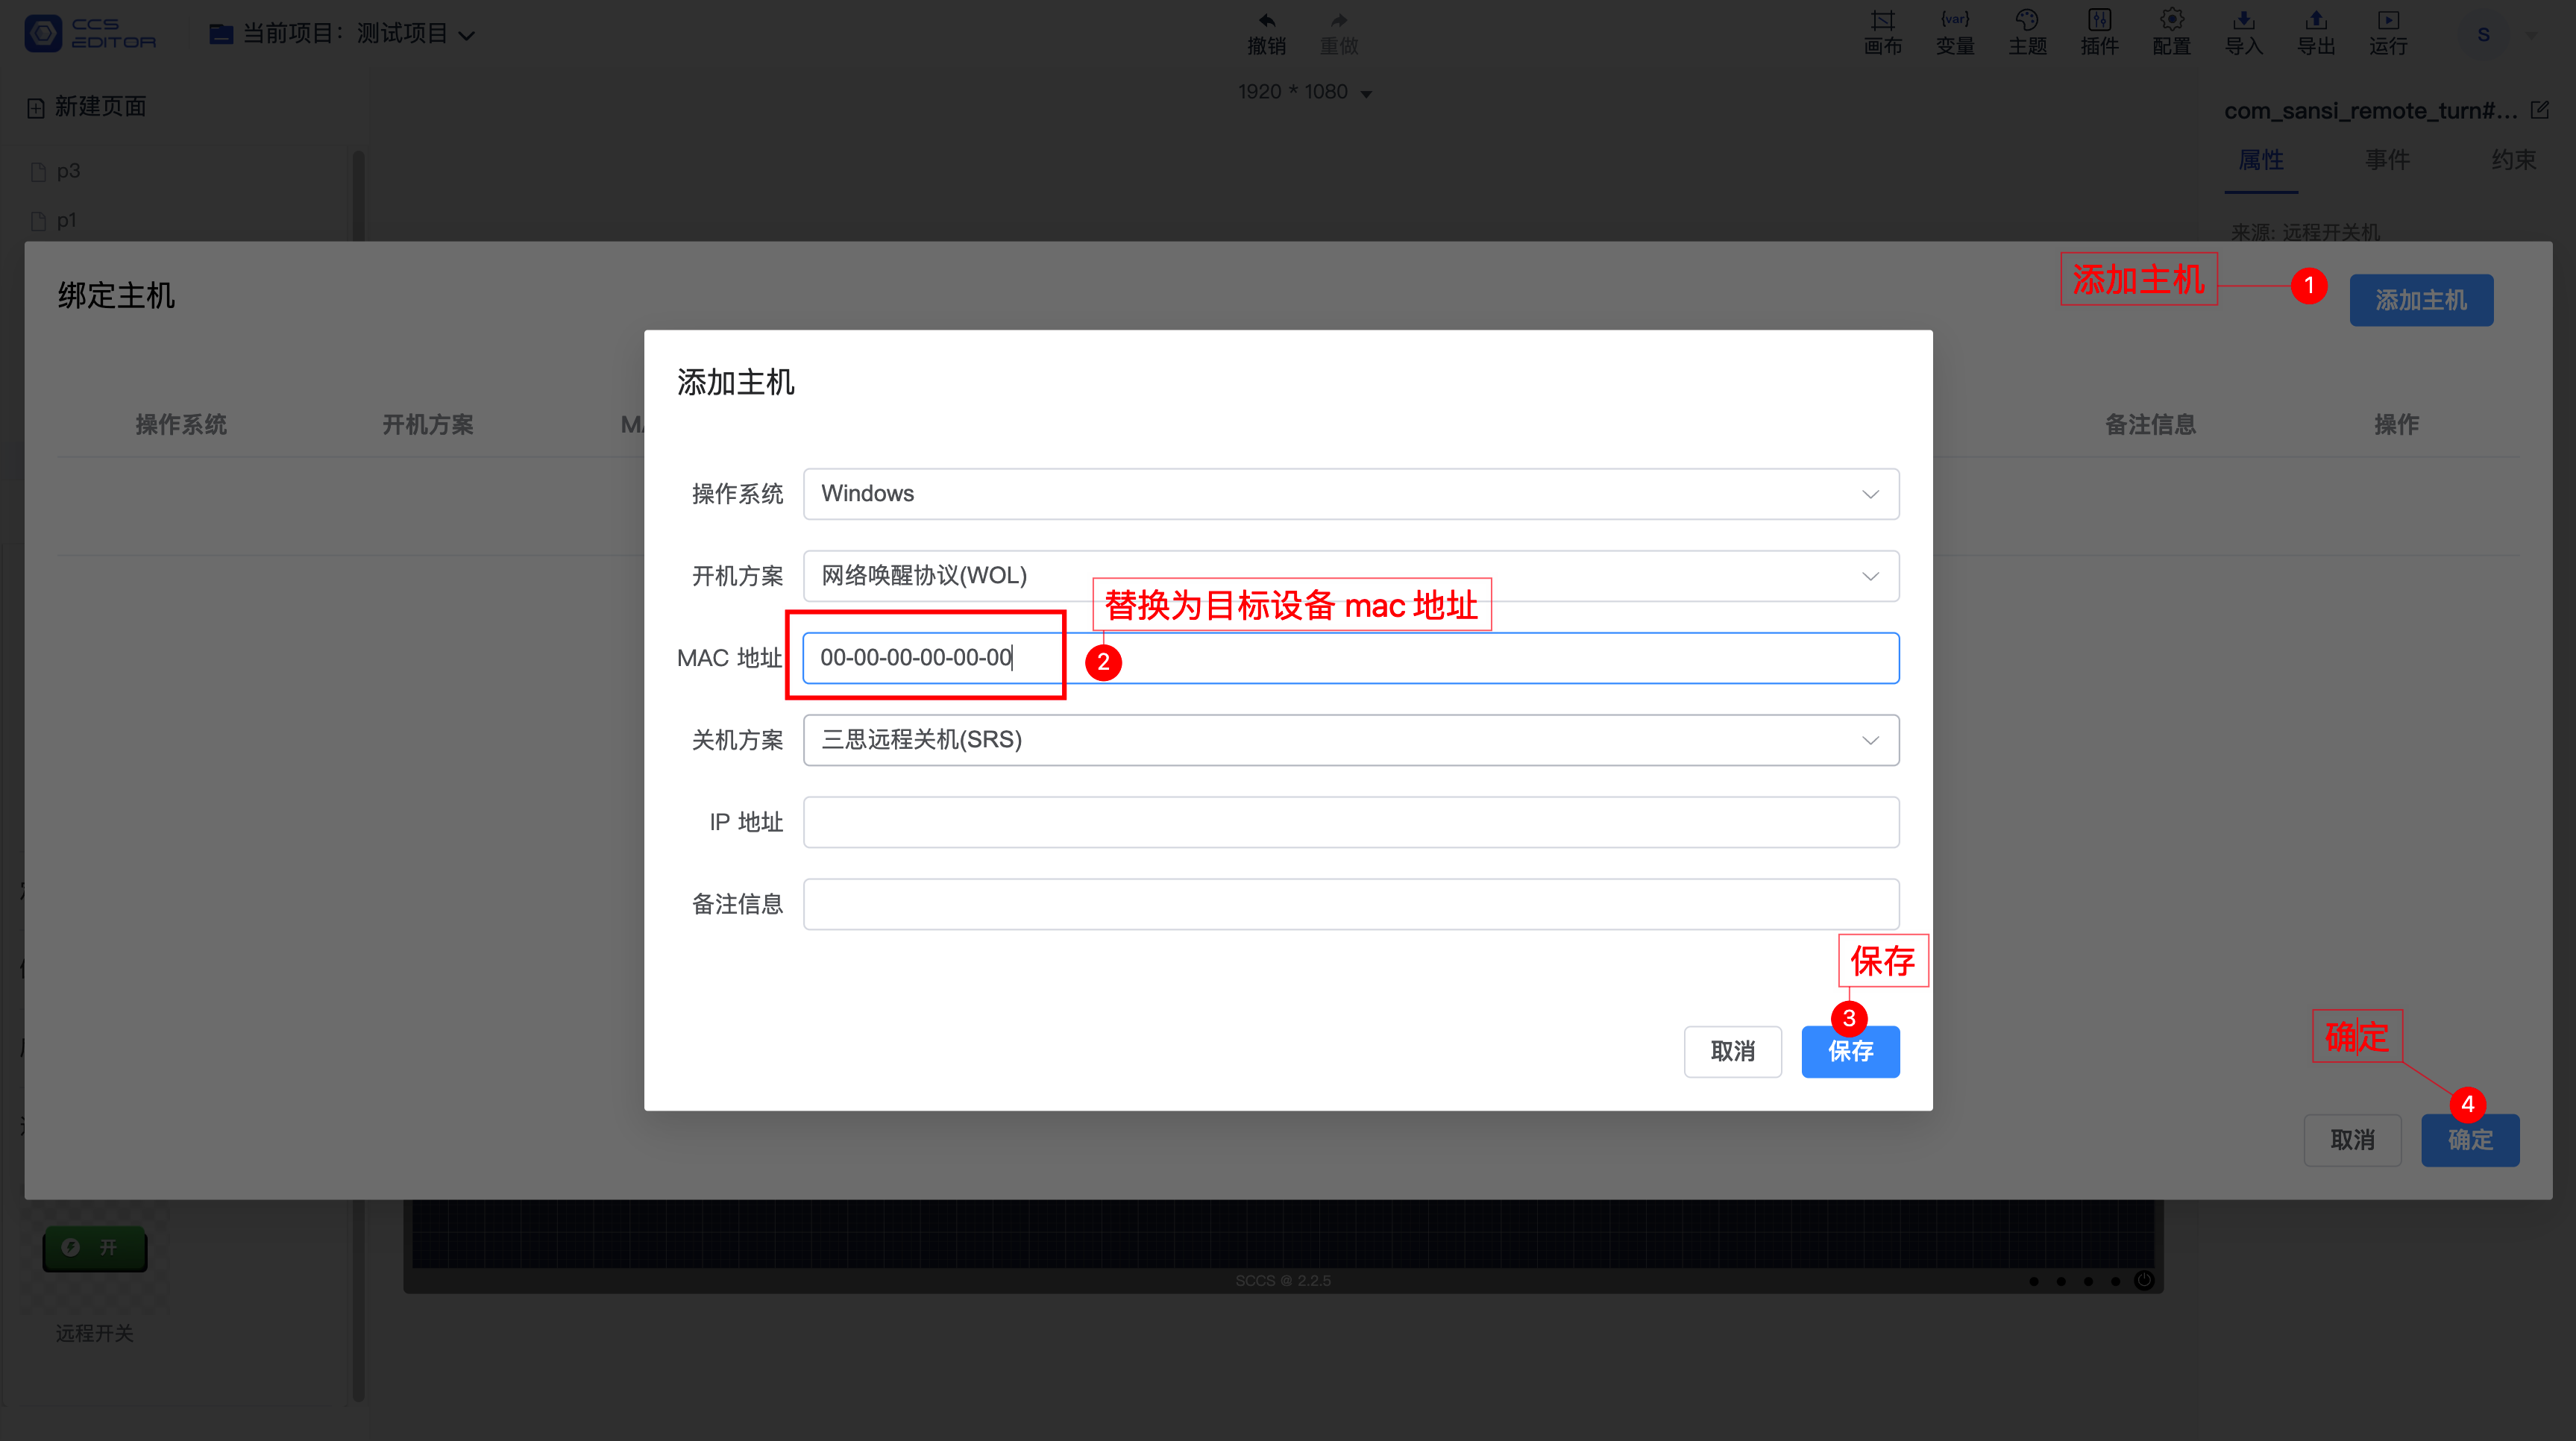
# 1. Using a Plugin
⚠️Note: Remote power management requires control panel version 2.2.6 or higher.


# 1. Using a Script
⚠️Note: Remote power management requires control panel version 2.2.6 or higher.
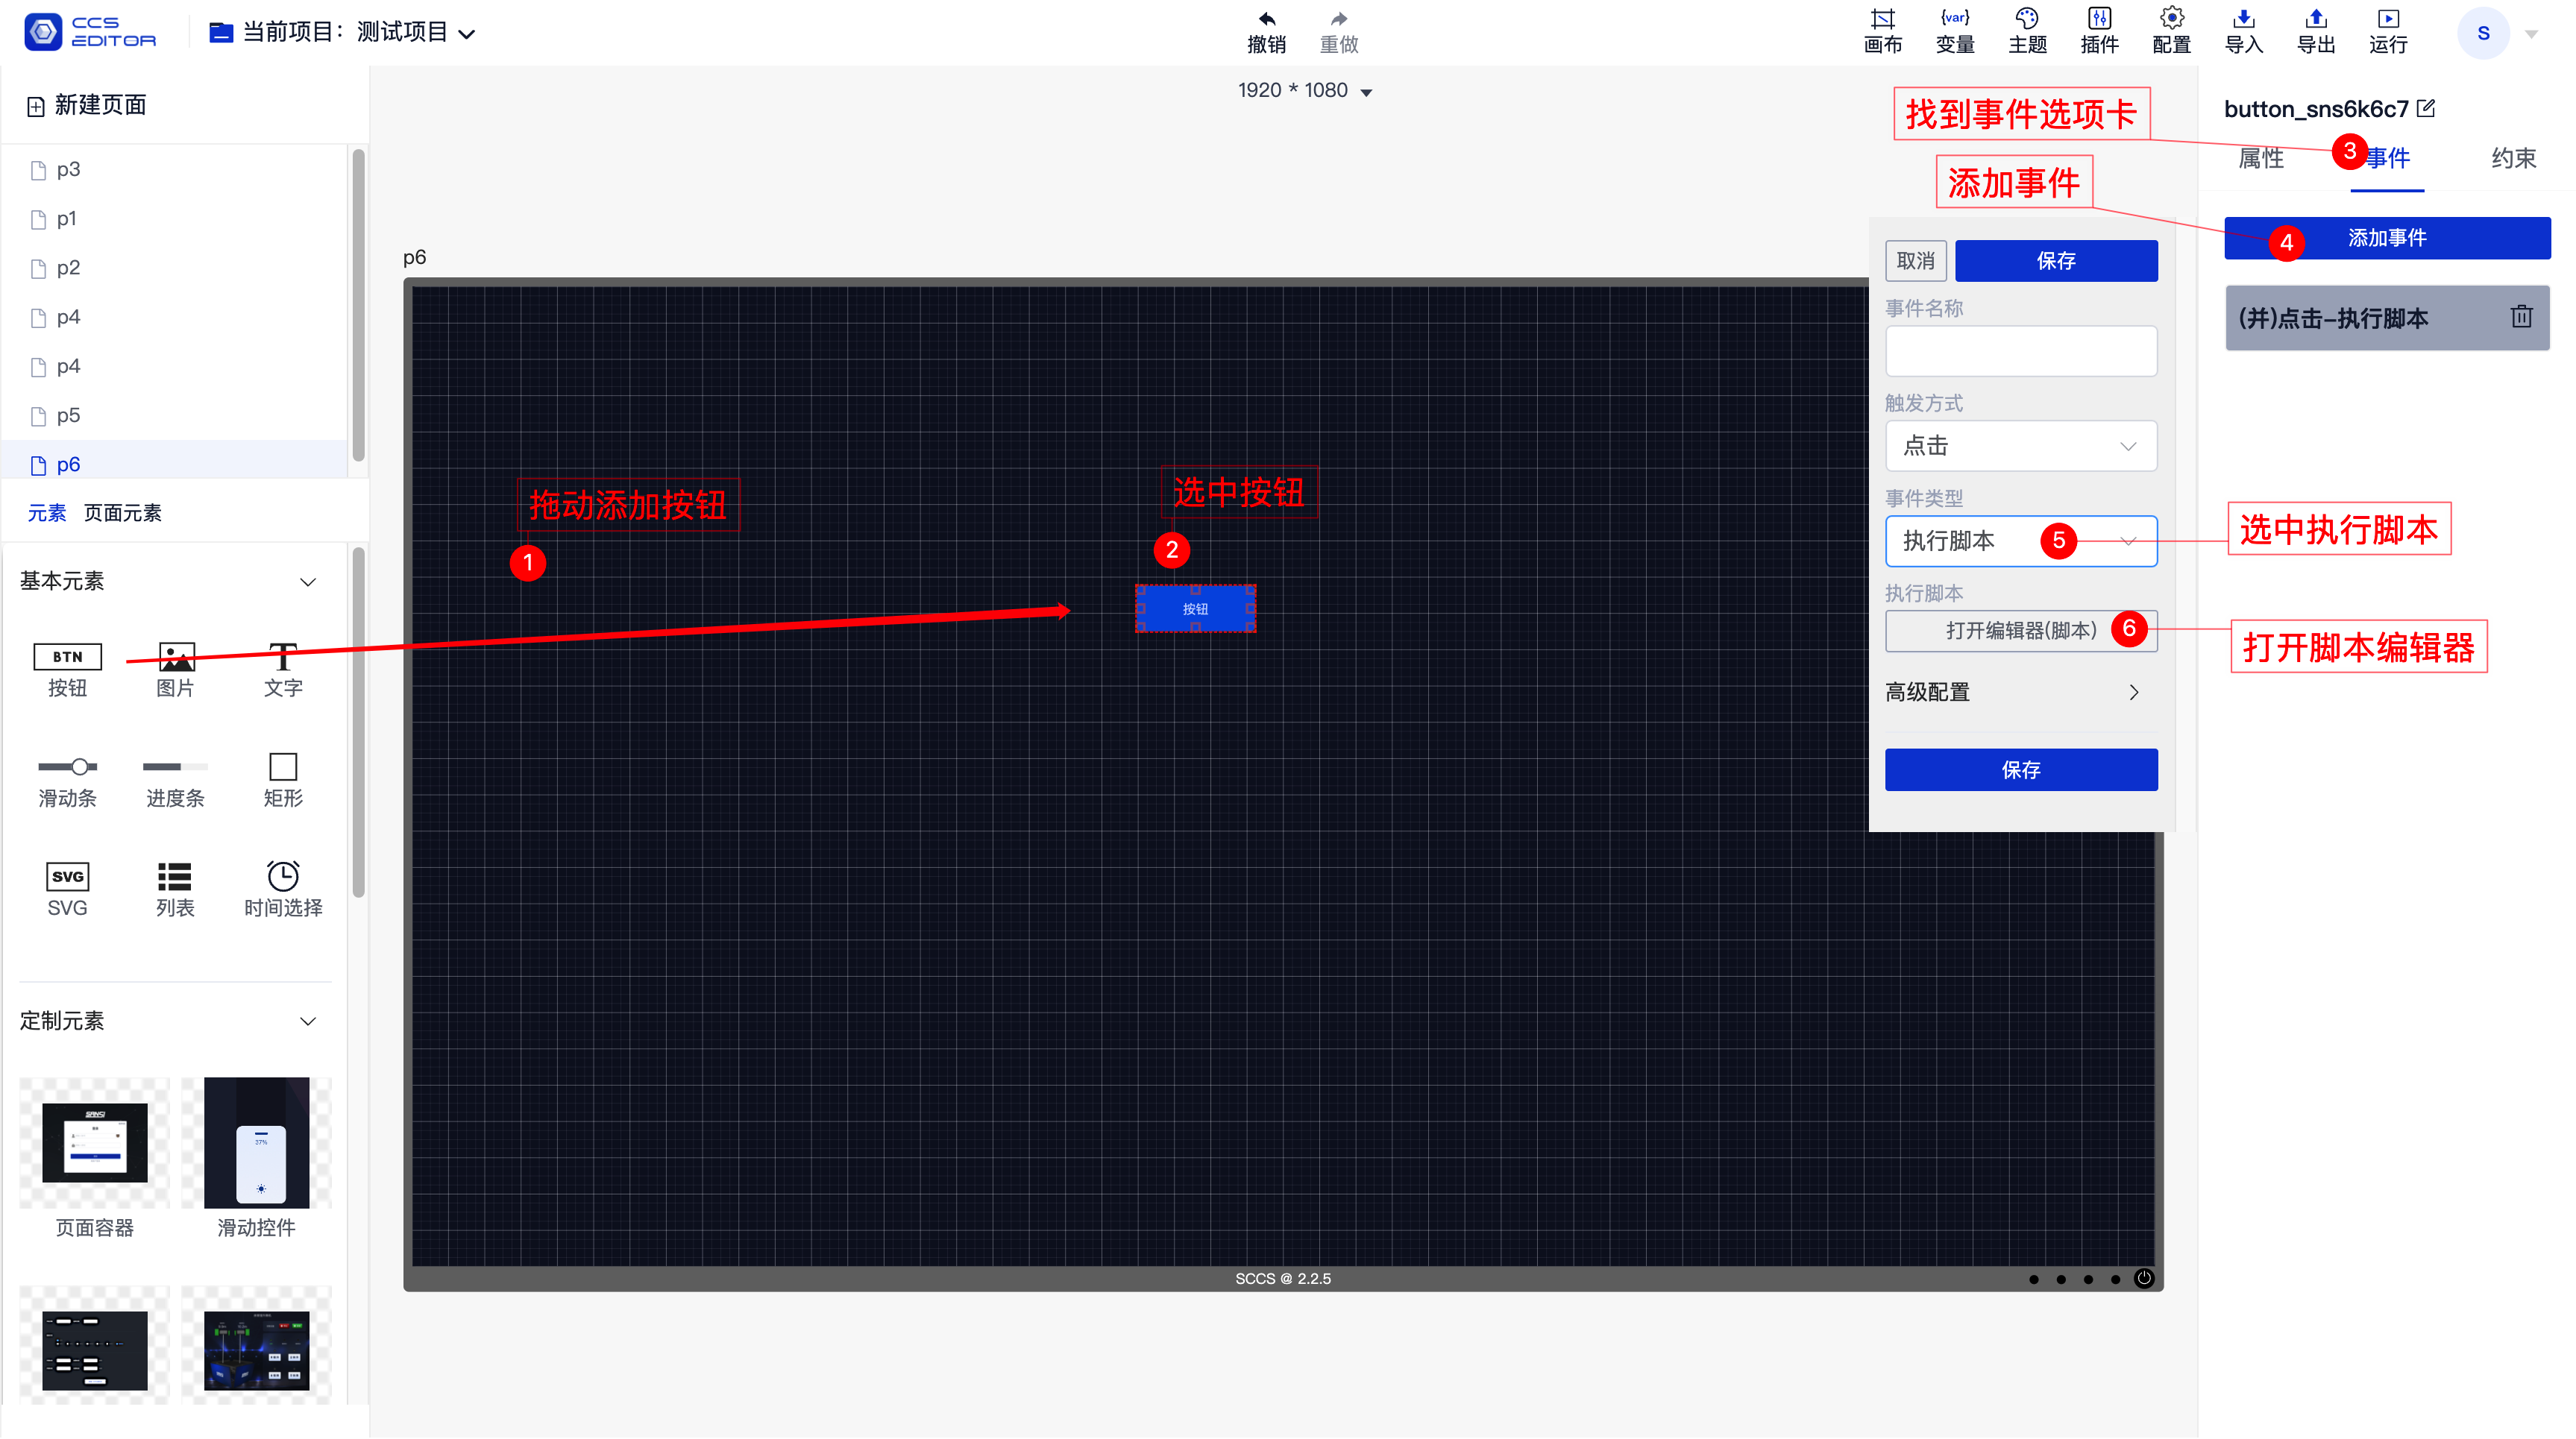
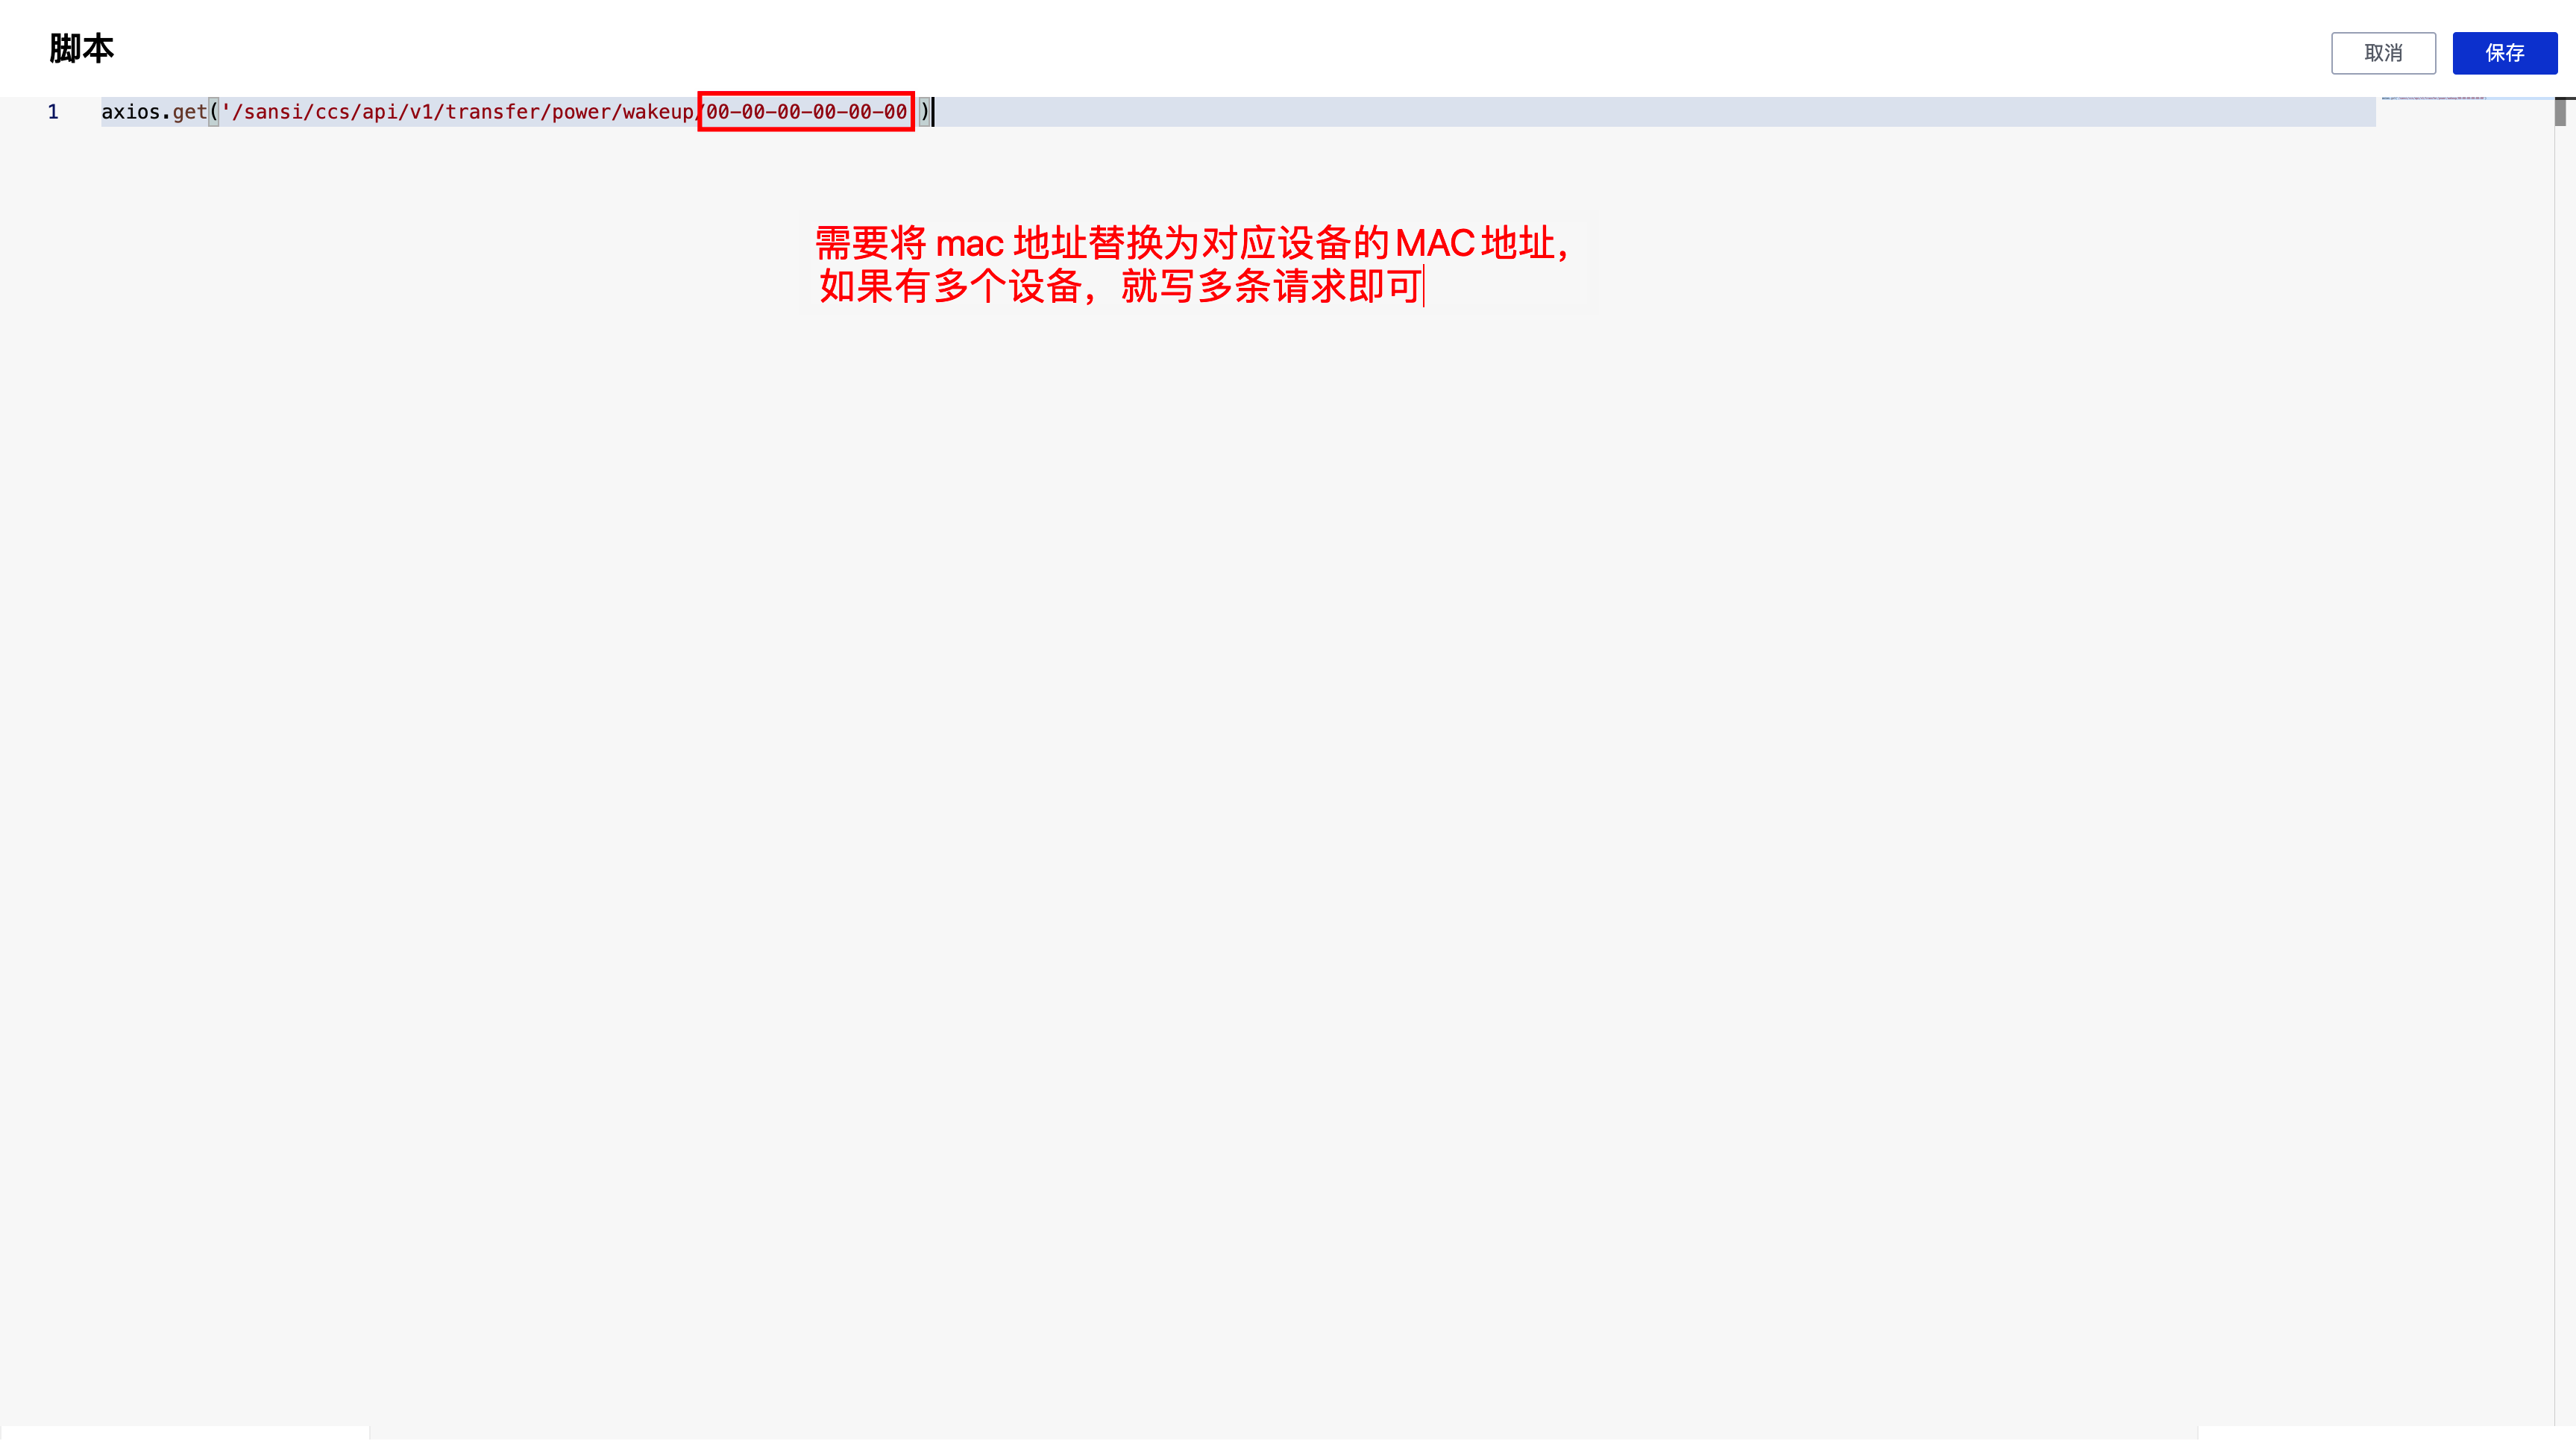
The script content is:
// Replace 00-00-00-00-00-00 with the MAC address of the device to be powered on, not your own device's MAC address.
axios.get('/sansi/ccs/api/v1/transfer/power/wakeup/00-00-00-00-00-00')
After adding the script, click save. After saving and running, clicking the button should successfully wake the target device when it is powered off.
# II. Windows Remote Shutdown
There are two solutions for remote shutdown: one based on the SSH protocol and the other based on the Sansi Remote Shutdown Service (SRS).
# 2.1 Remote Shutdown Based on SSH
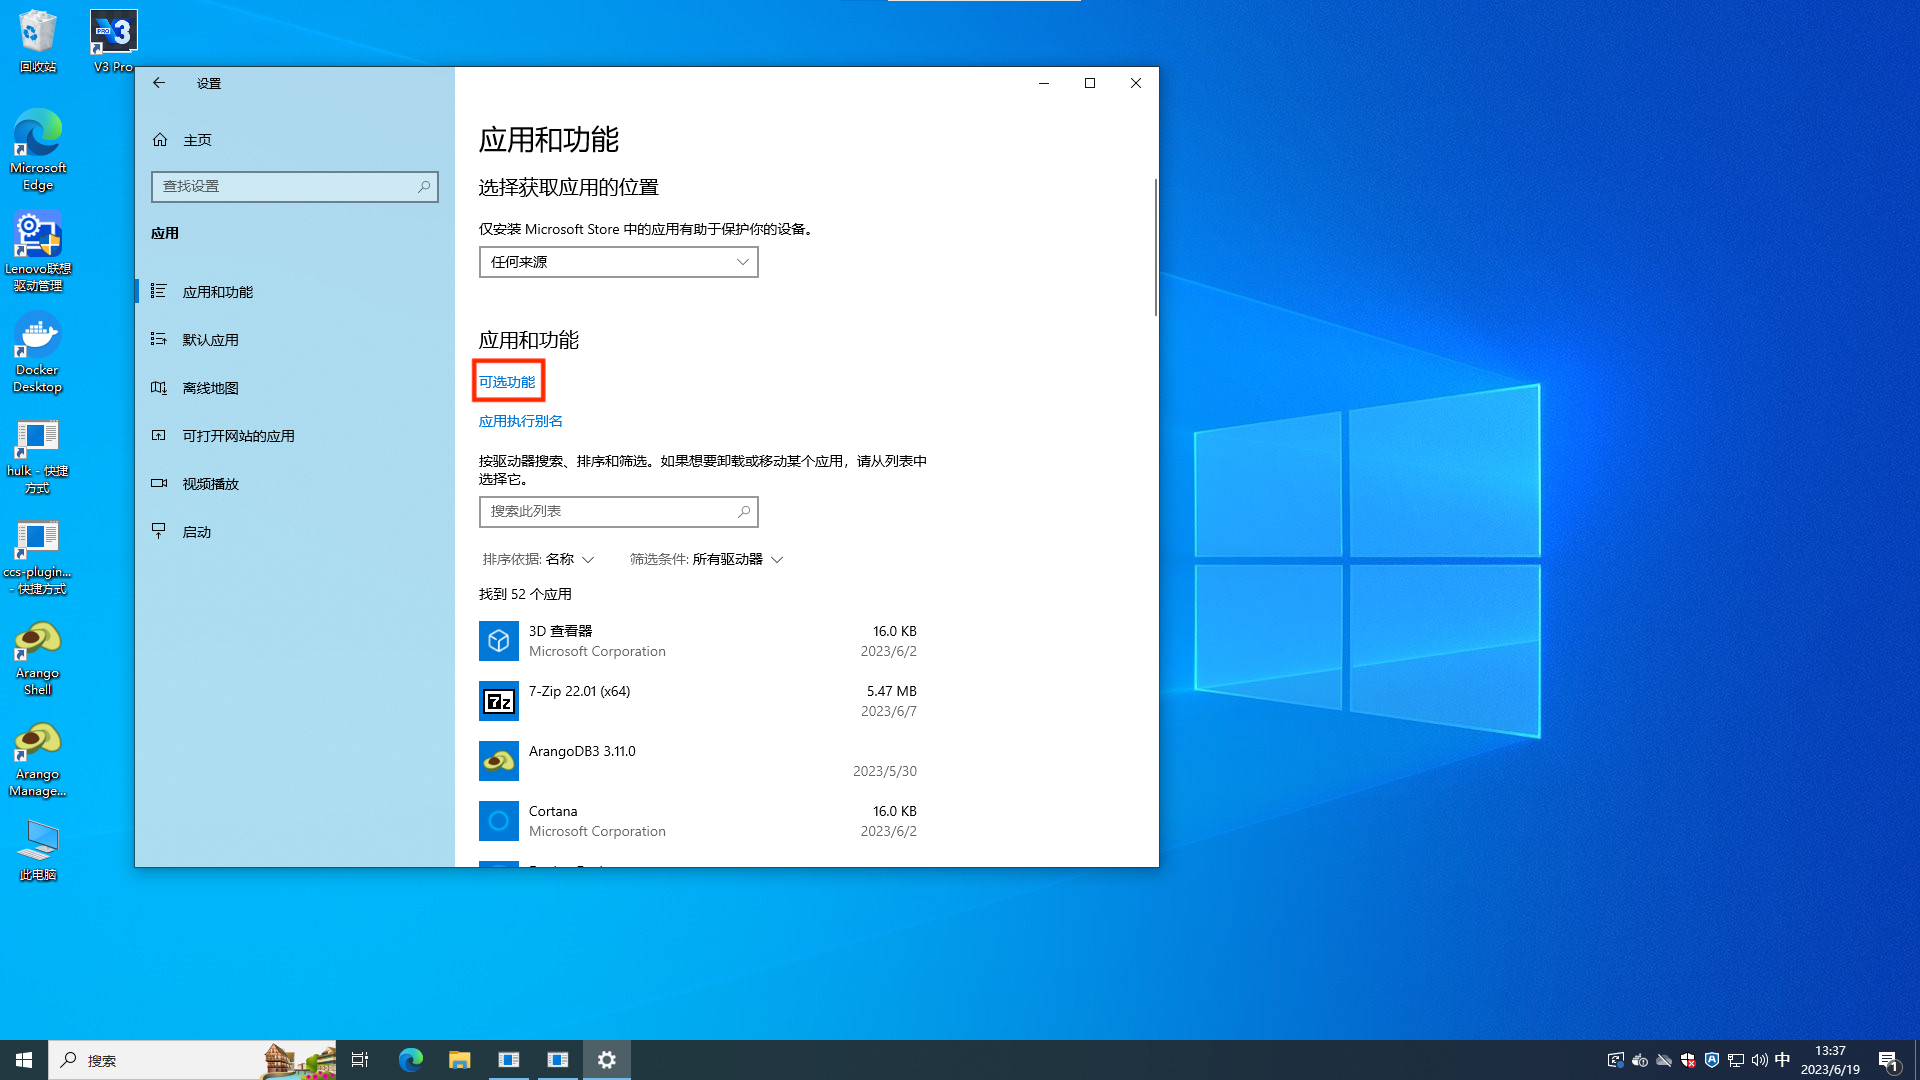
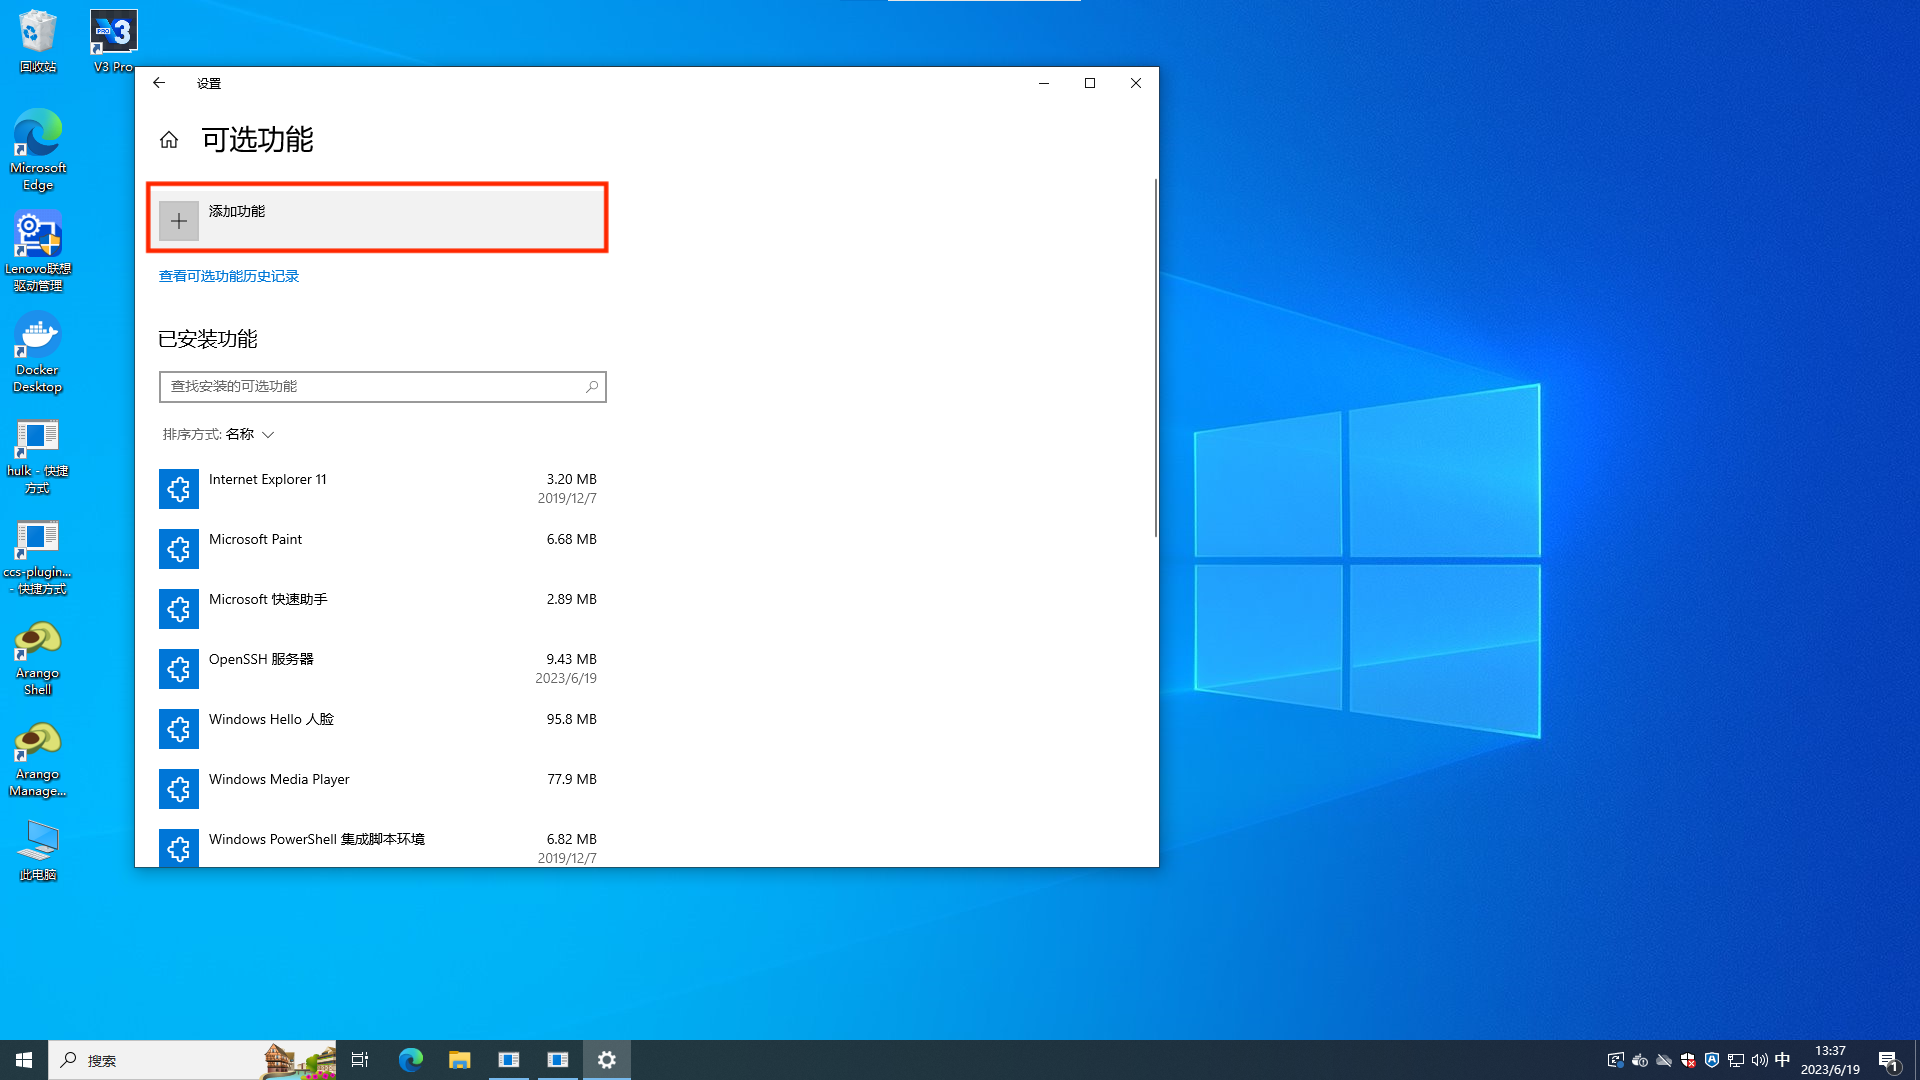
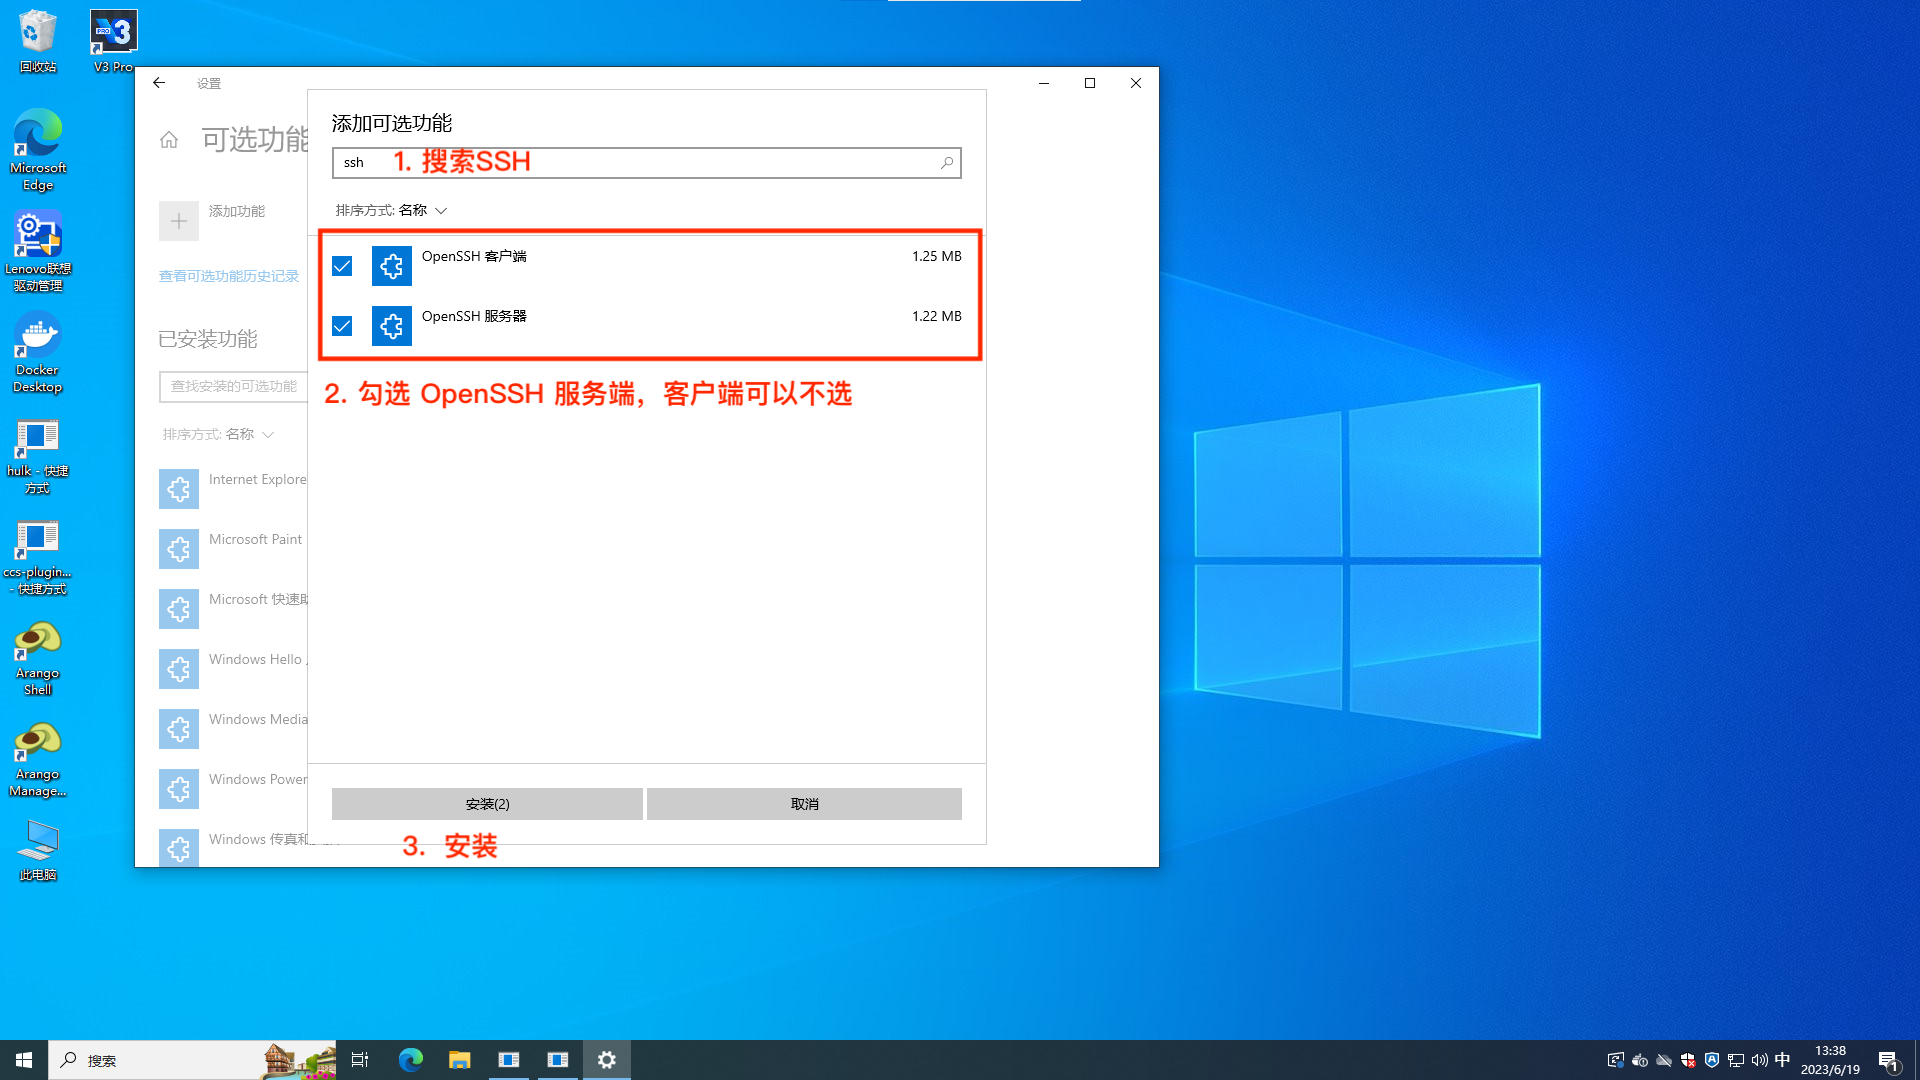
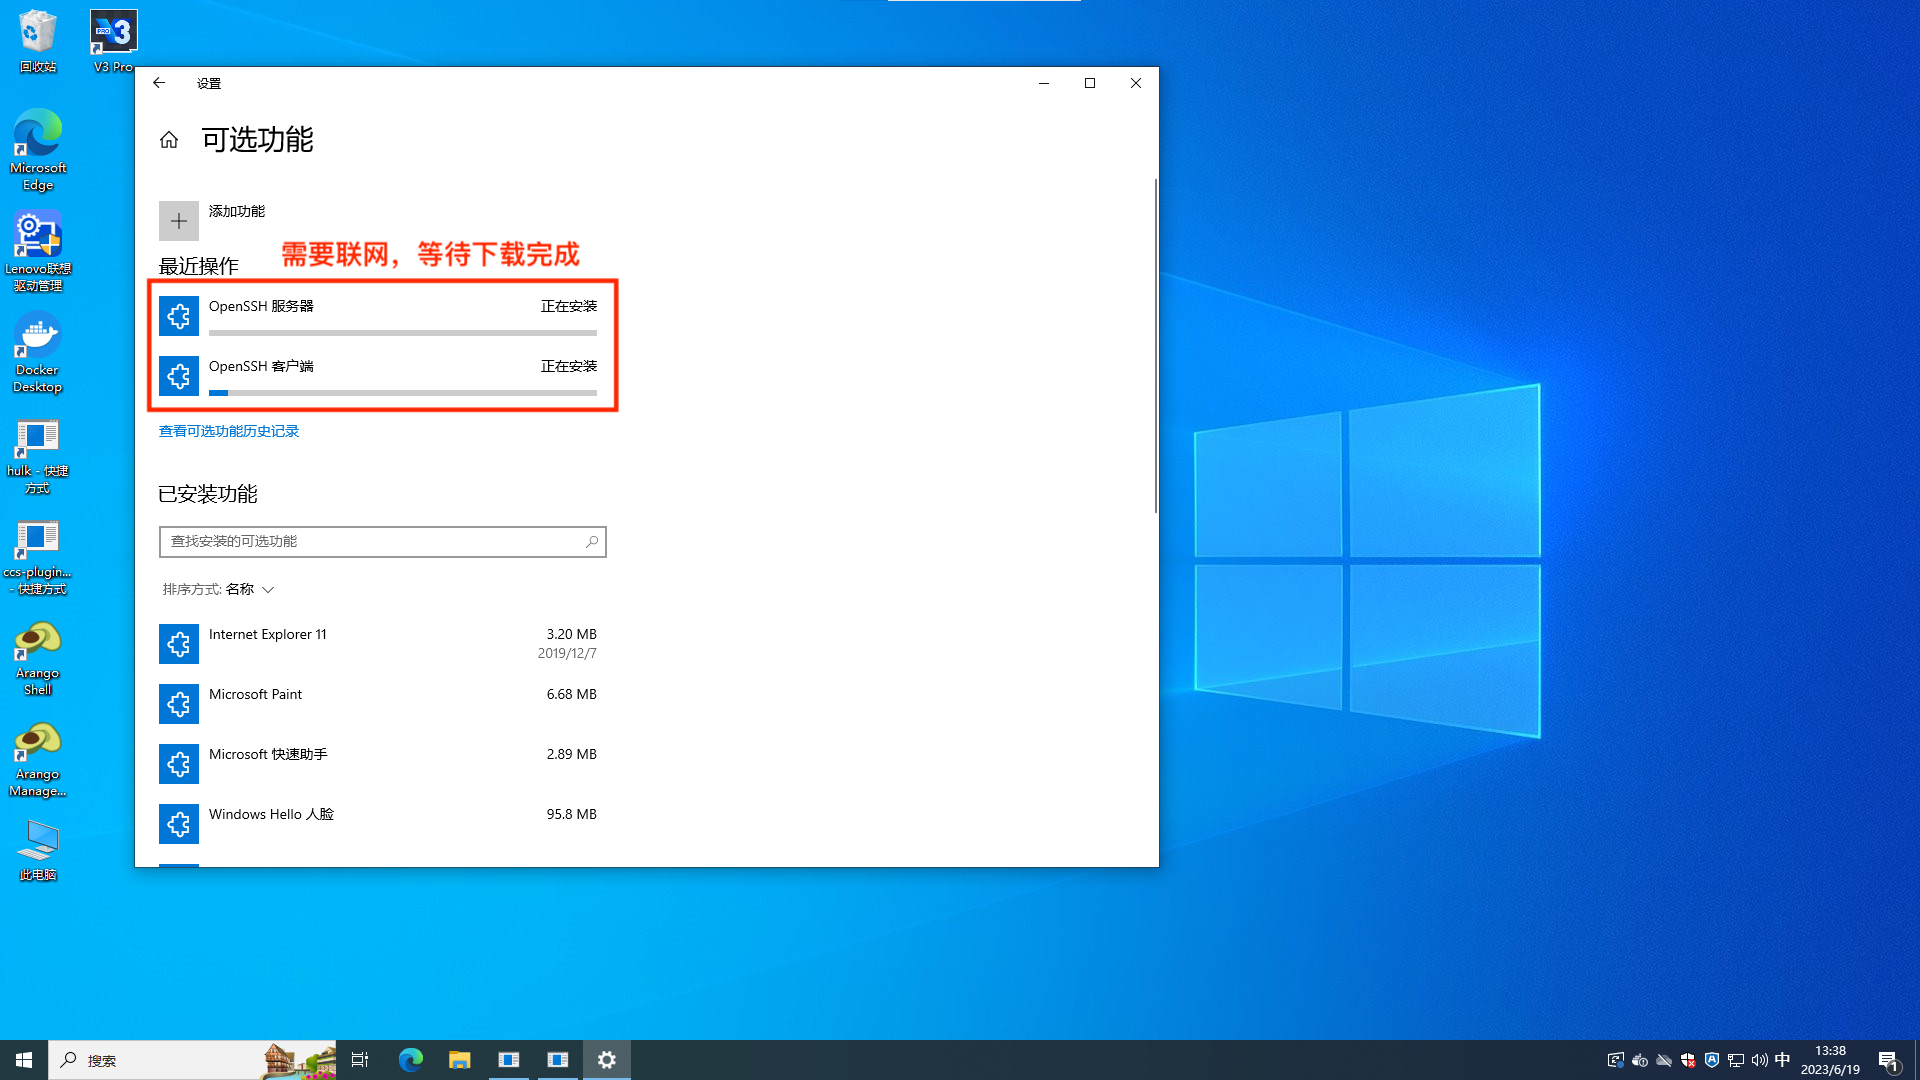
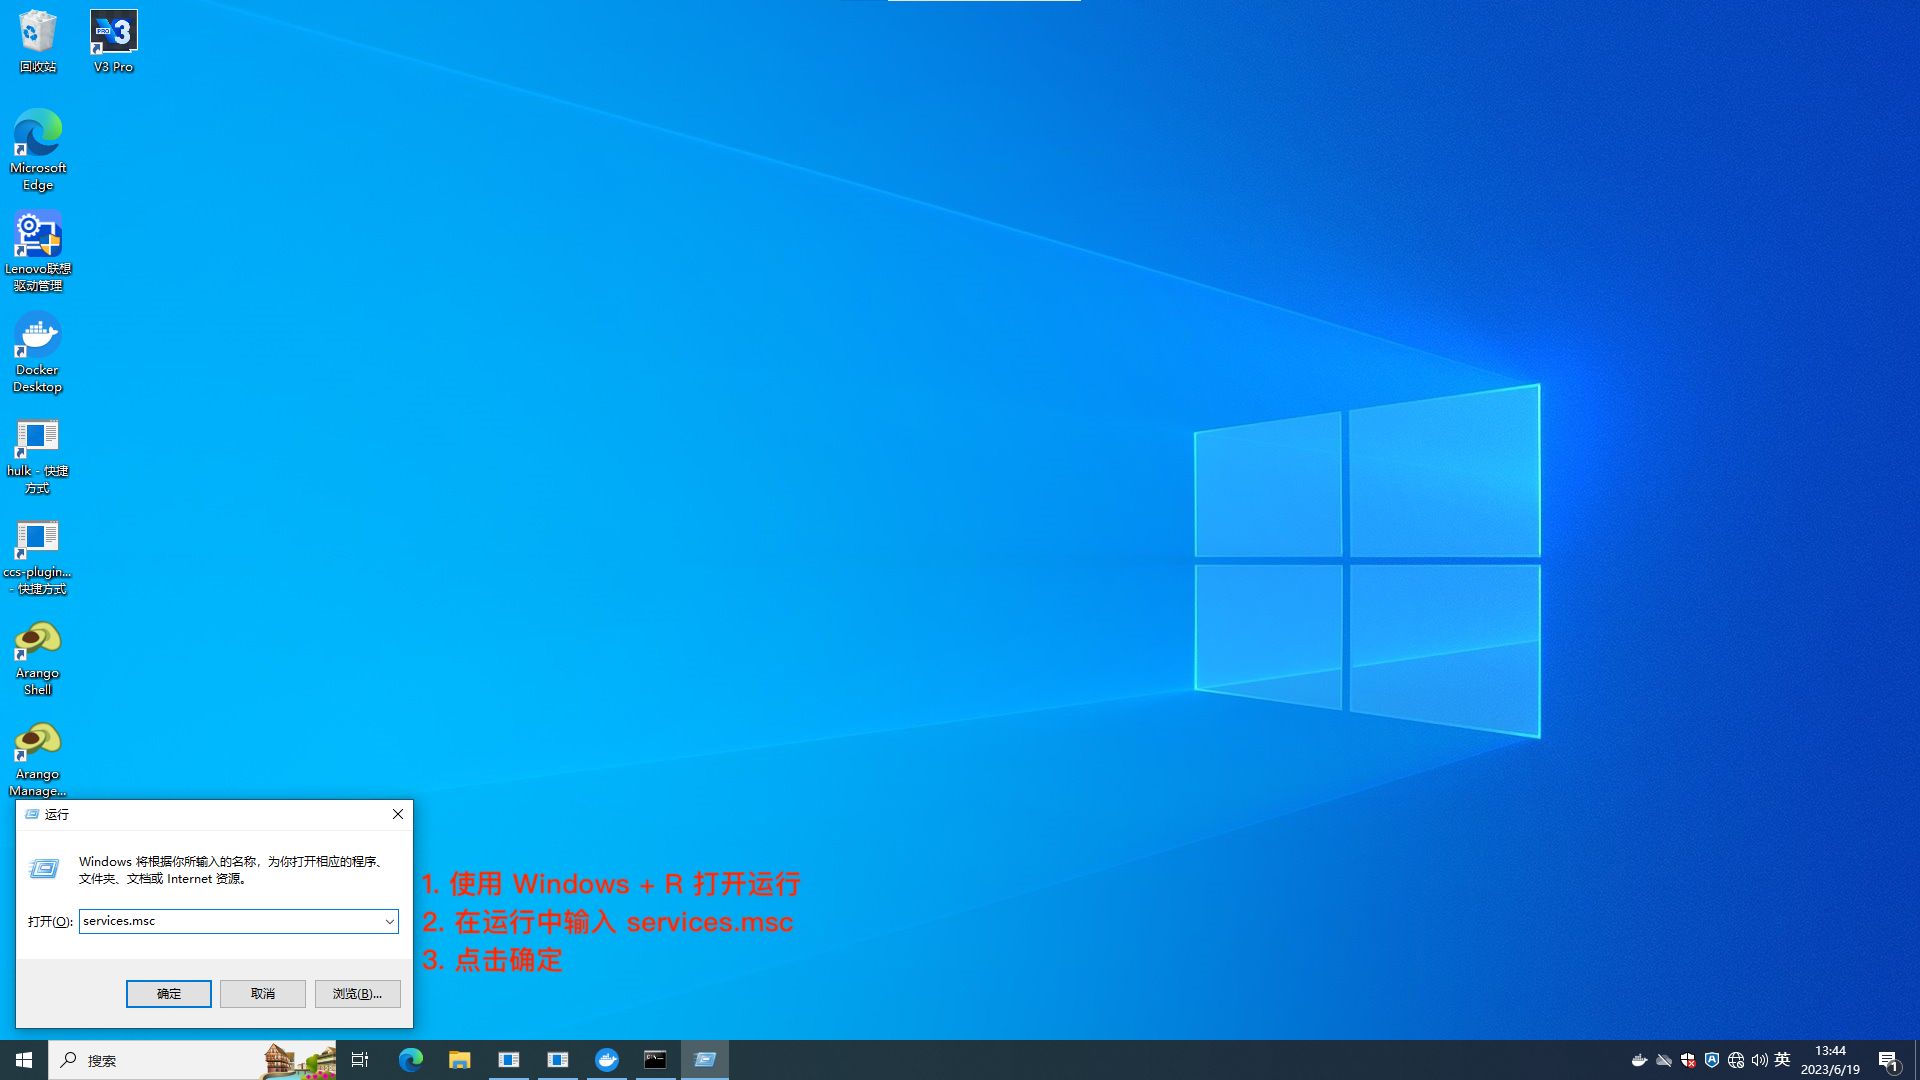
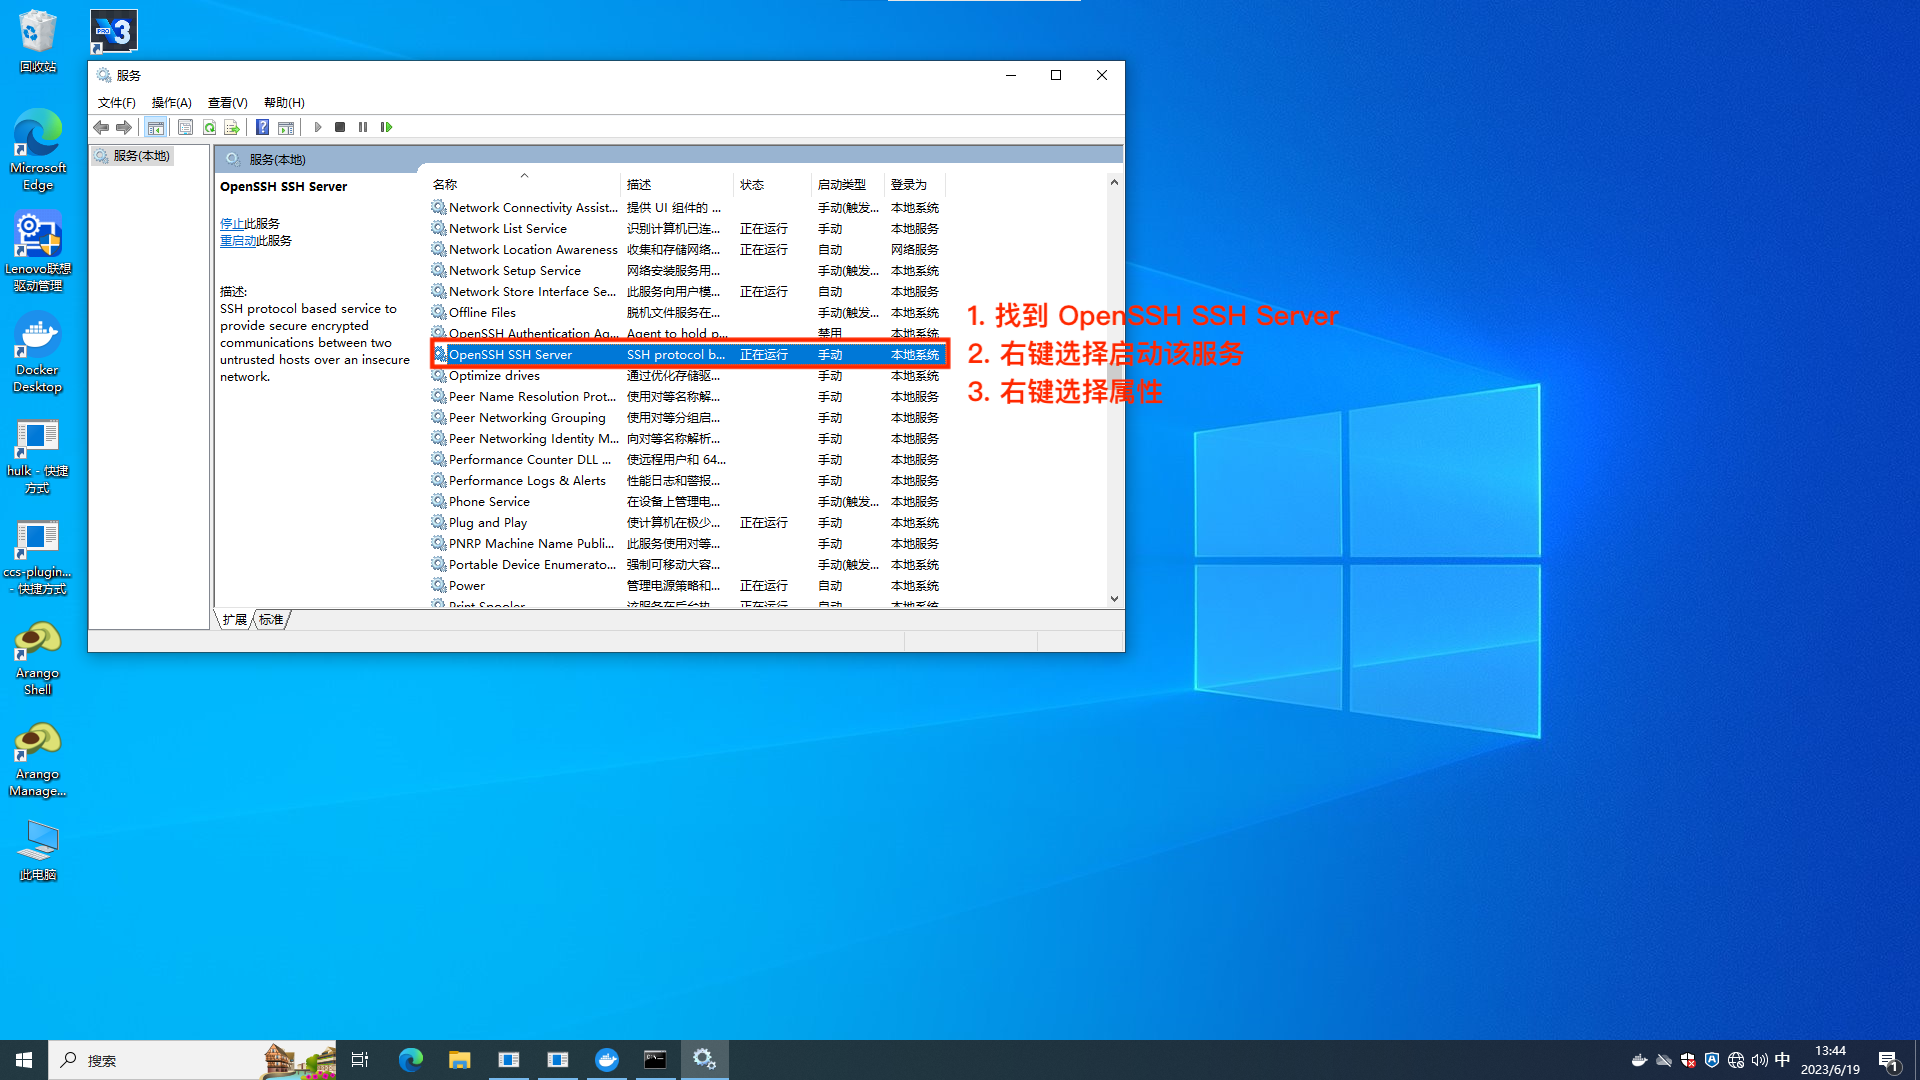
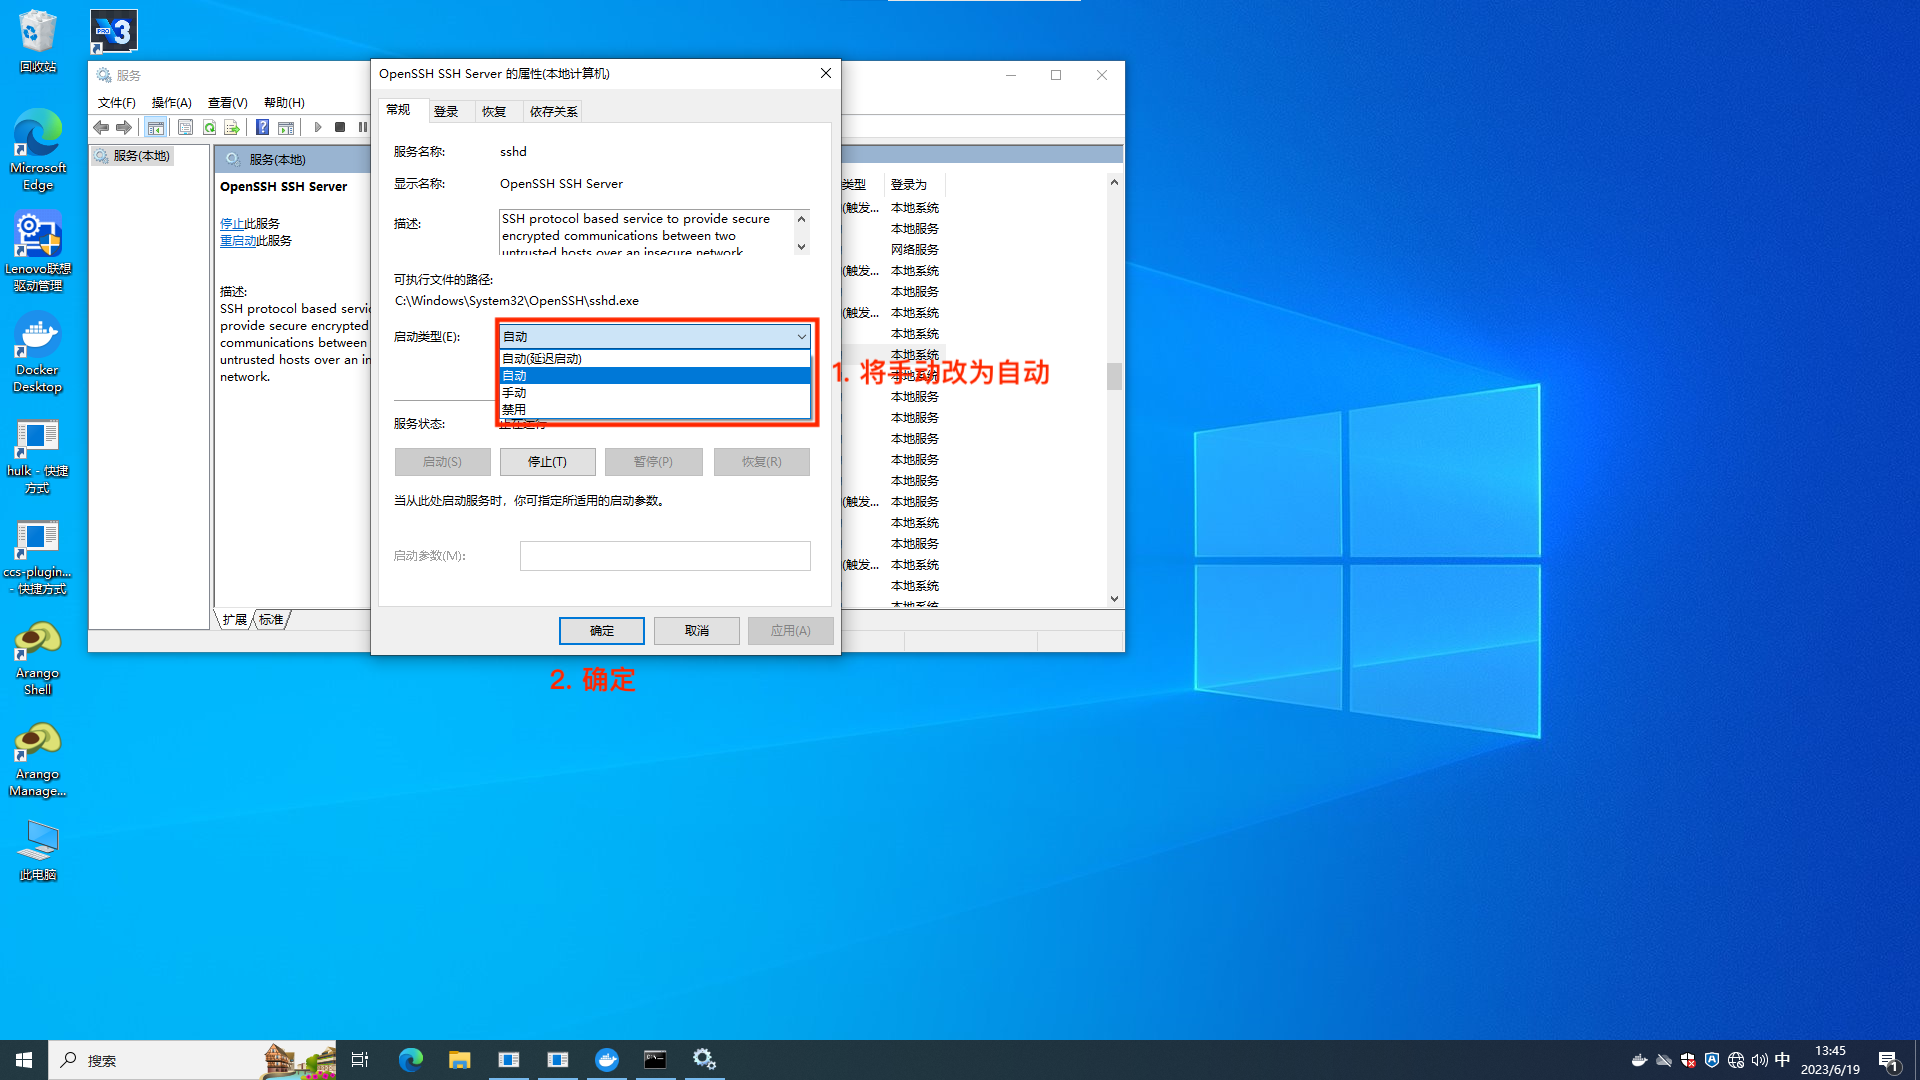
# Step 1: Enable OpenSSH
Remote shutdown based on SSH requires the SSH service to be enabled on the target device. The steps to enable it are as follows:

⚠️Note:
- Enabling the SSH service carries certain risks; please avoid exposing the target device to the public internet to prevent potential issues.
# Step 2: Adjust Firewall
You can choose to disable the firewall or adjust the firewall rules to allow communication on port 22 for OpenSSH.
Refer to this link for adjusting the firewall: Windows: Firewall Setting Rules (Open Ports/IP for SSH) (opens new window).
# Step 3: Verify SSH Login
Install an OpenSSH client on another device, open the terminal, and use the following command to log into the target device:
# ccc is the username; replace it with the target device's username, 192.168.1.99 is the target device's address.
ssh ccc@192.168.1.99
If this is your first connection, you will be prompted to save the public key; enter yes to proceed.
Under normal circumstances, the above command will prompt you for a password.
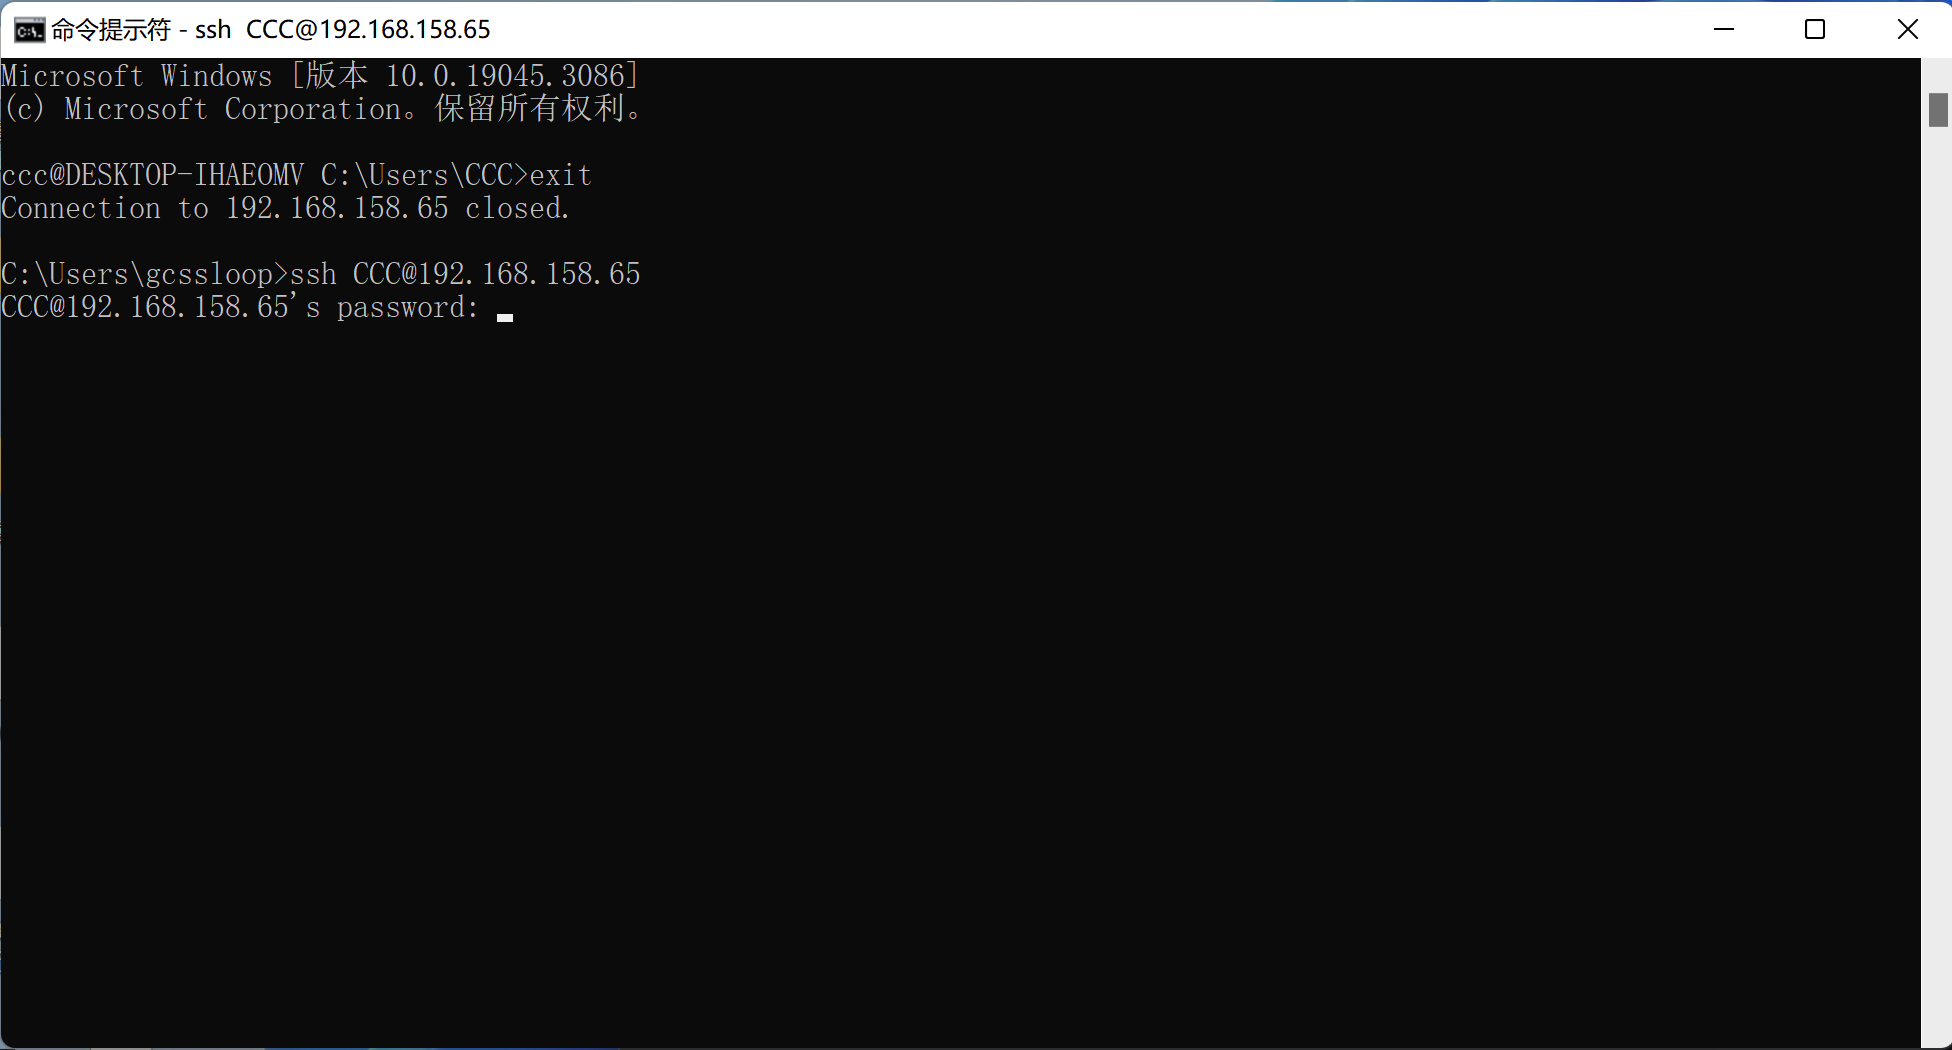
If you see the following interface after entering the password, it indicates that the login is successful.

# Step 4: Add Shutdown Button
Adding a shutdown button also has two methods: one is through a plugin, the other is through a script.
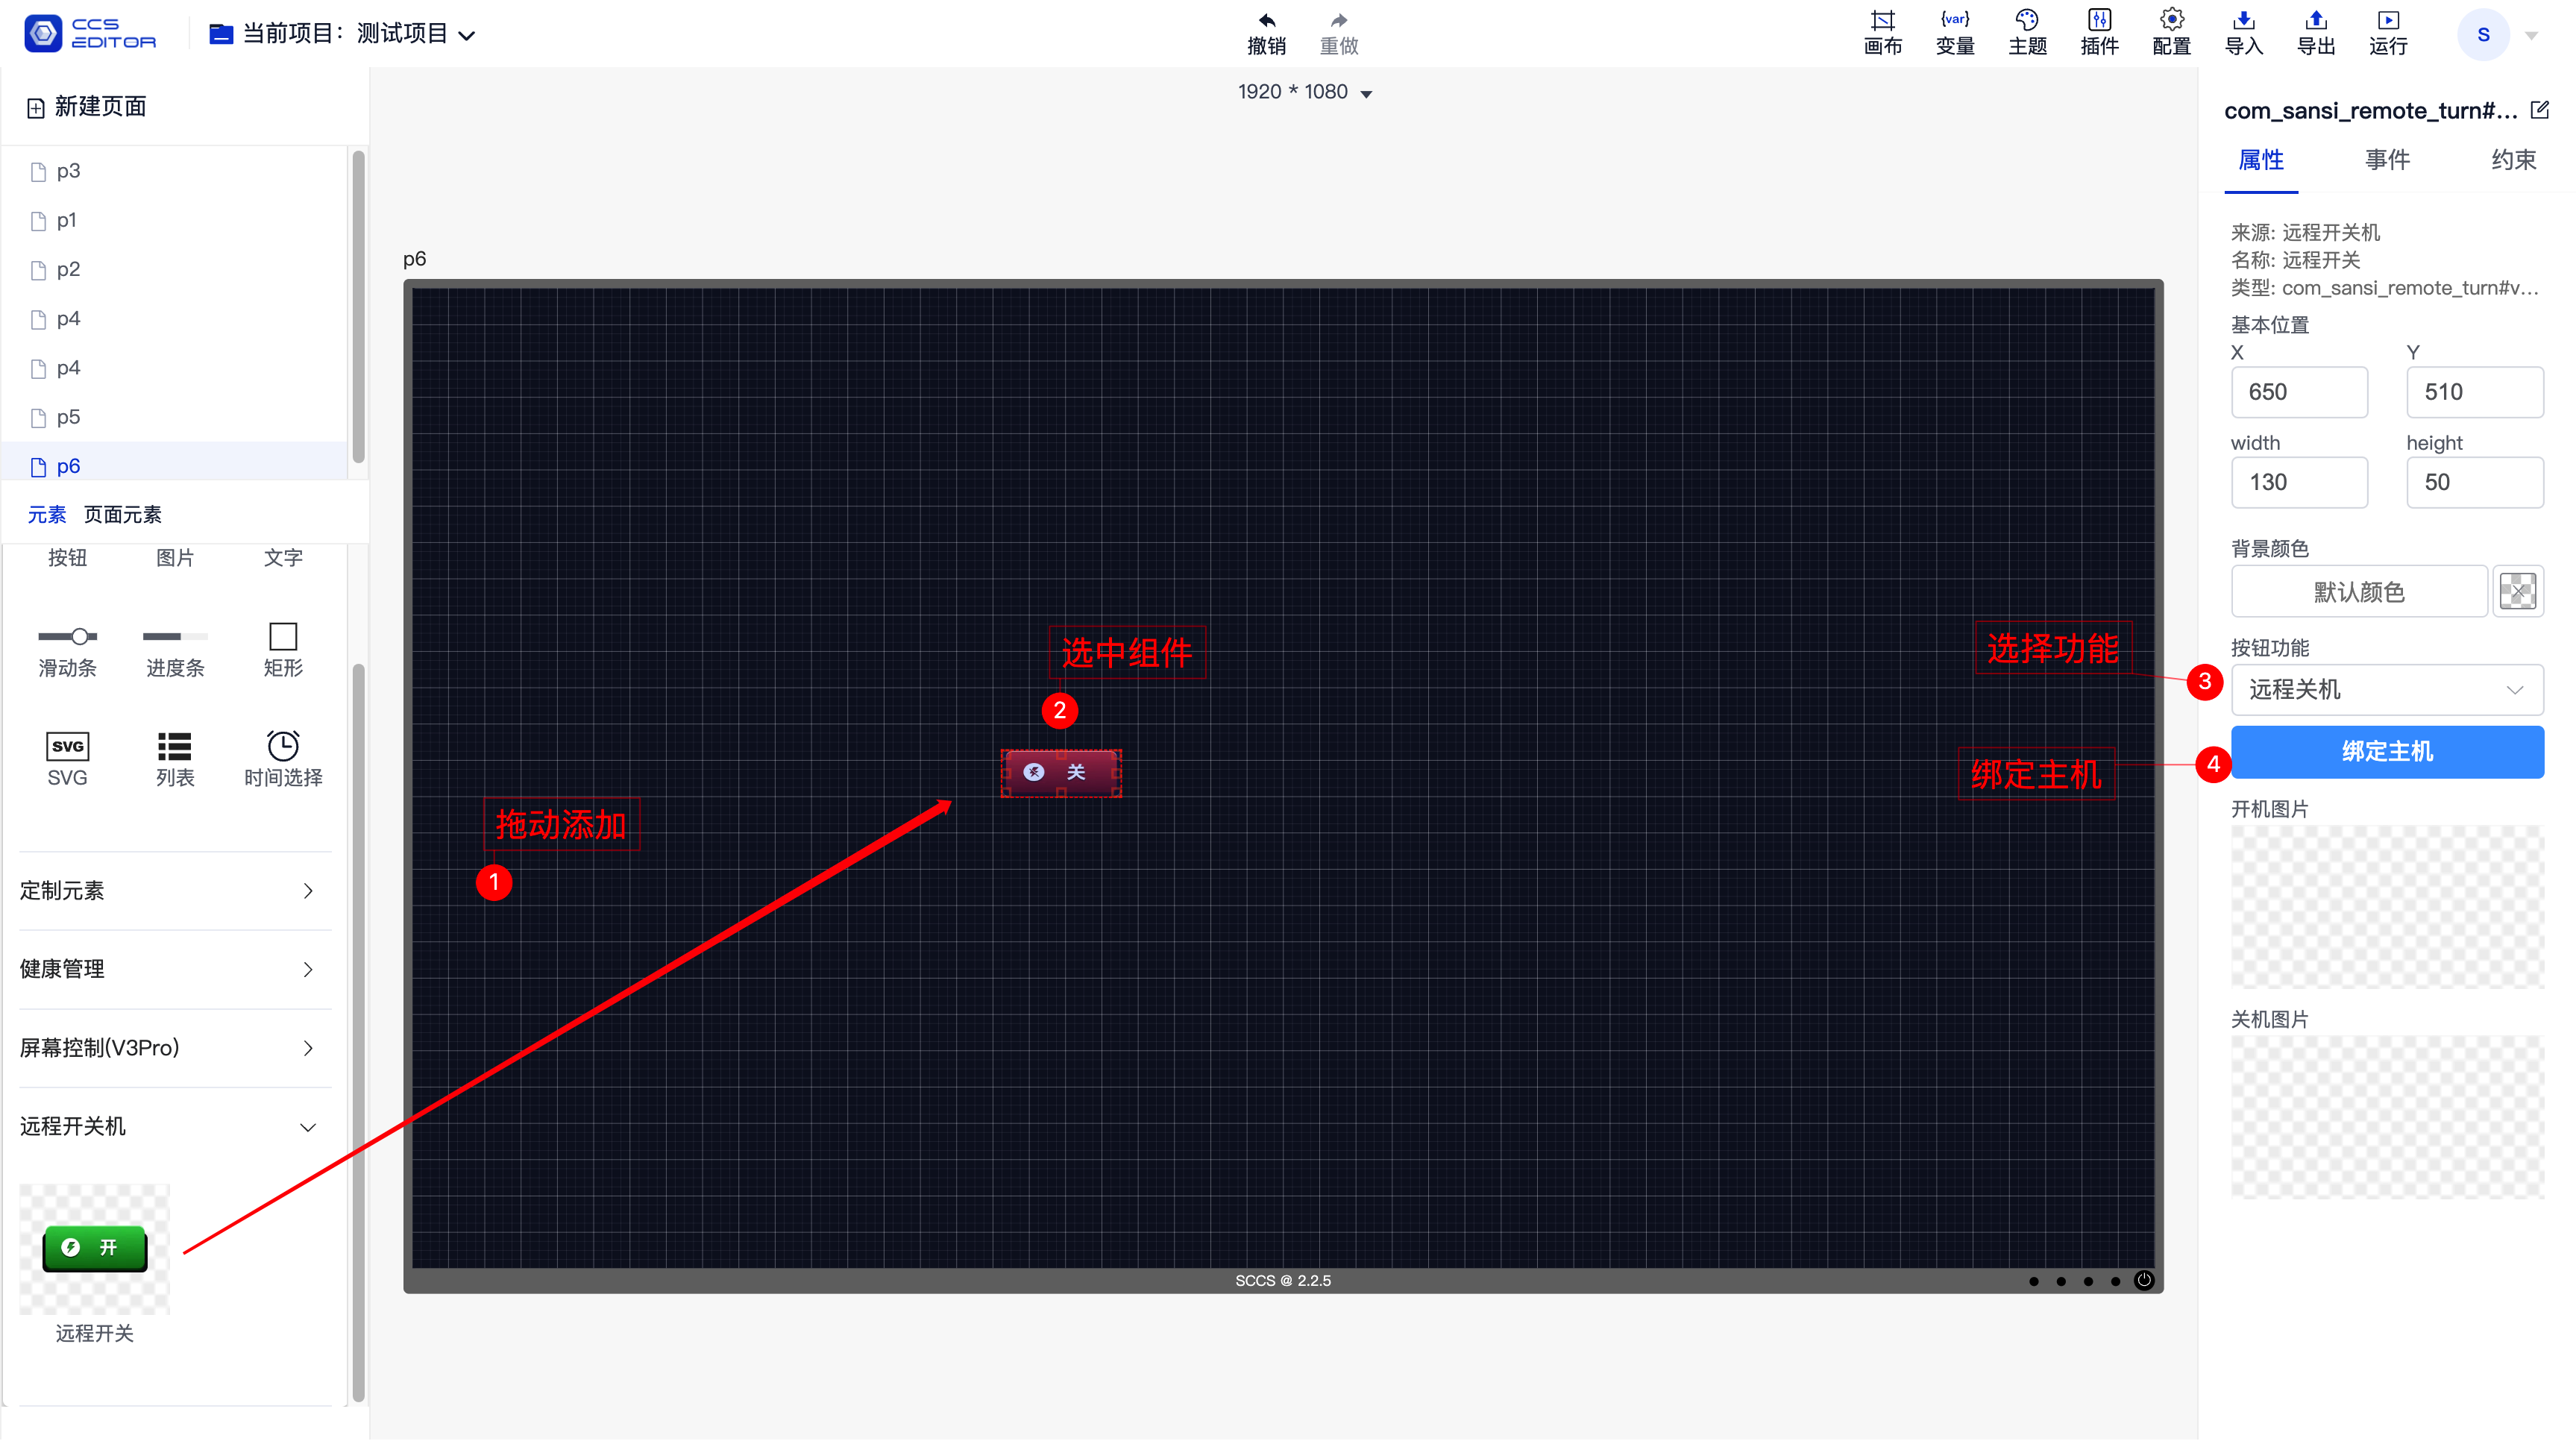
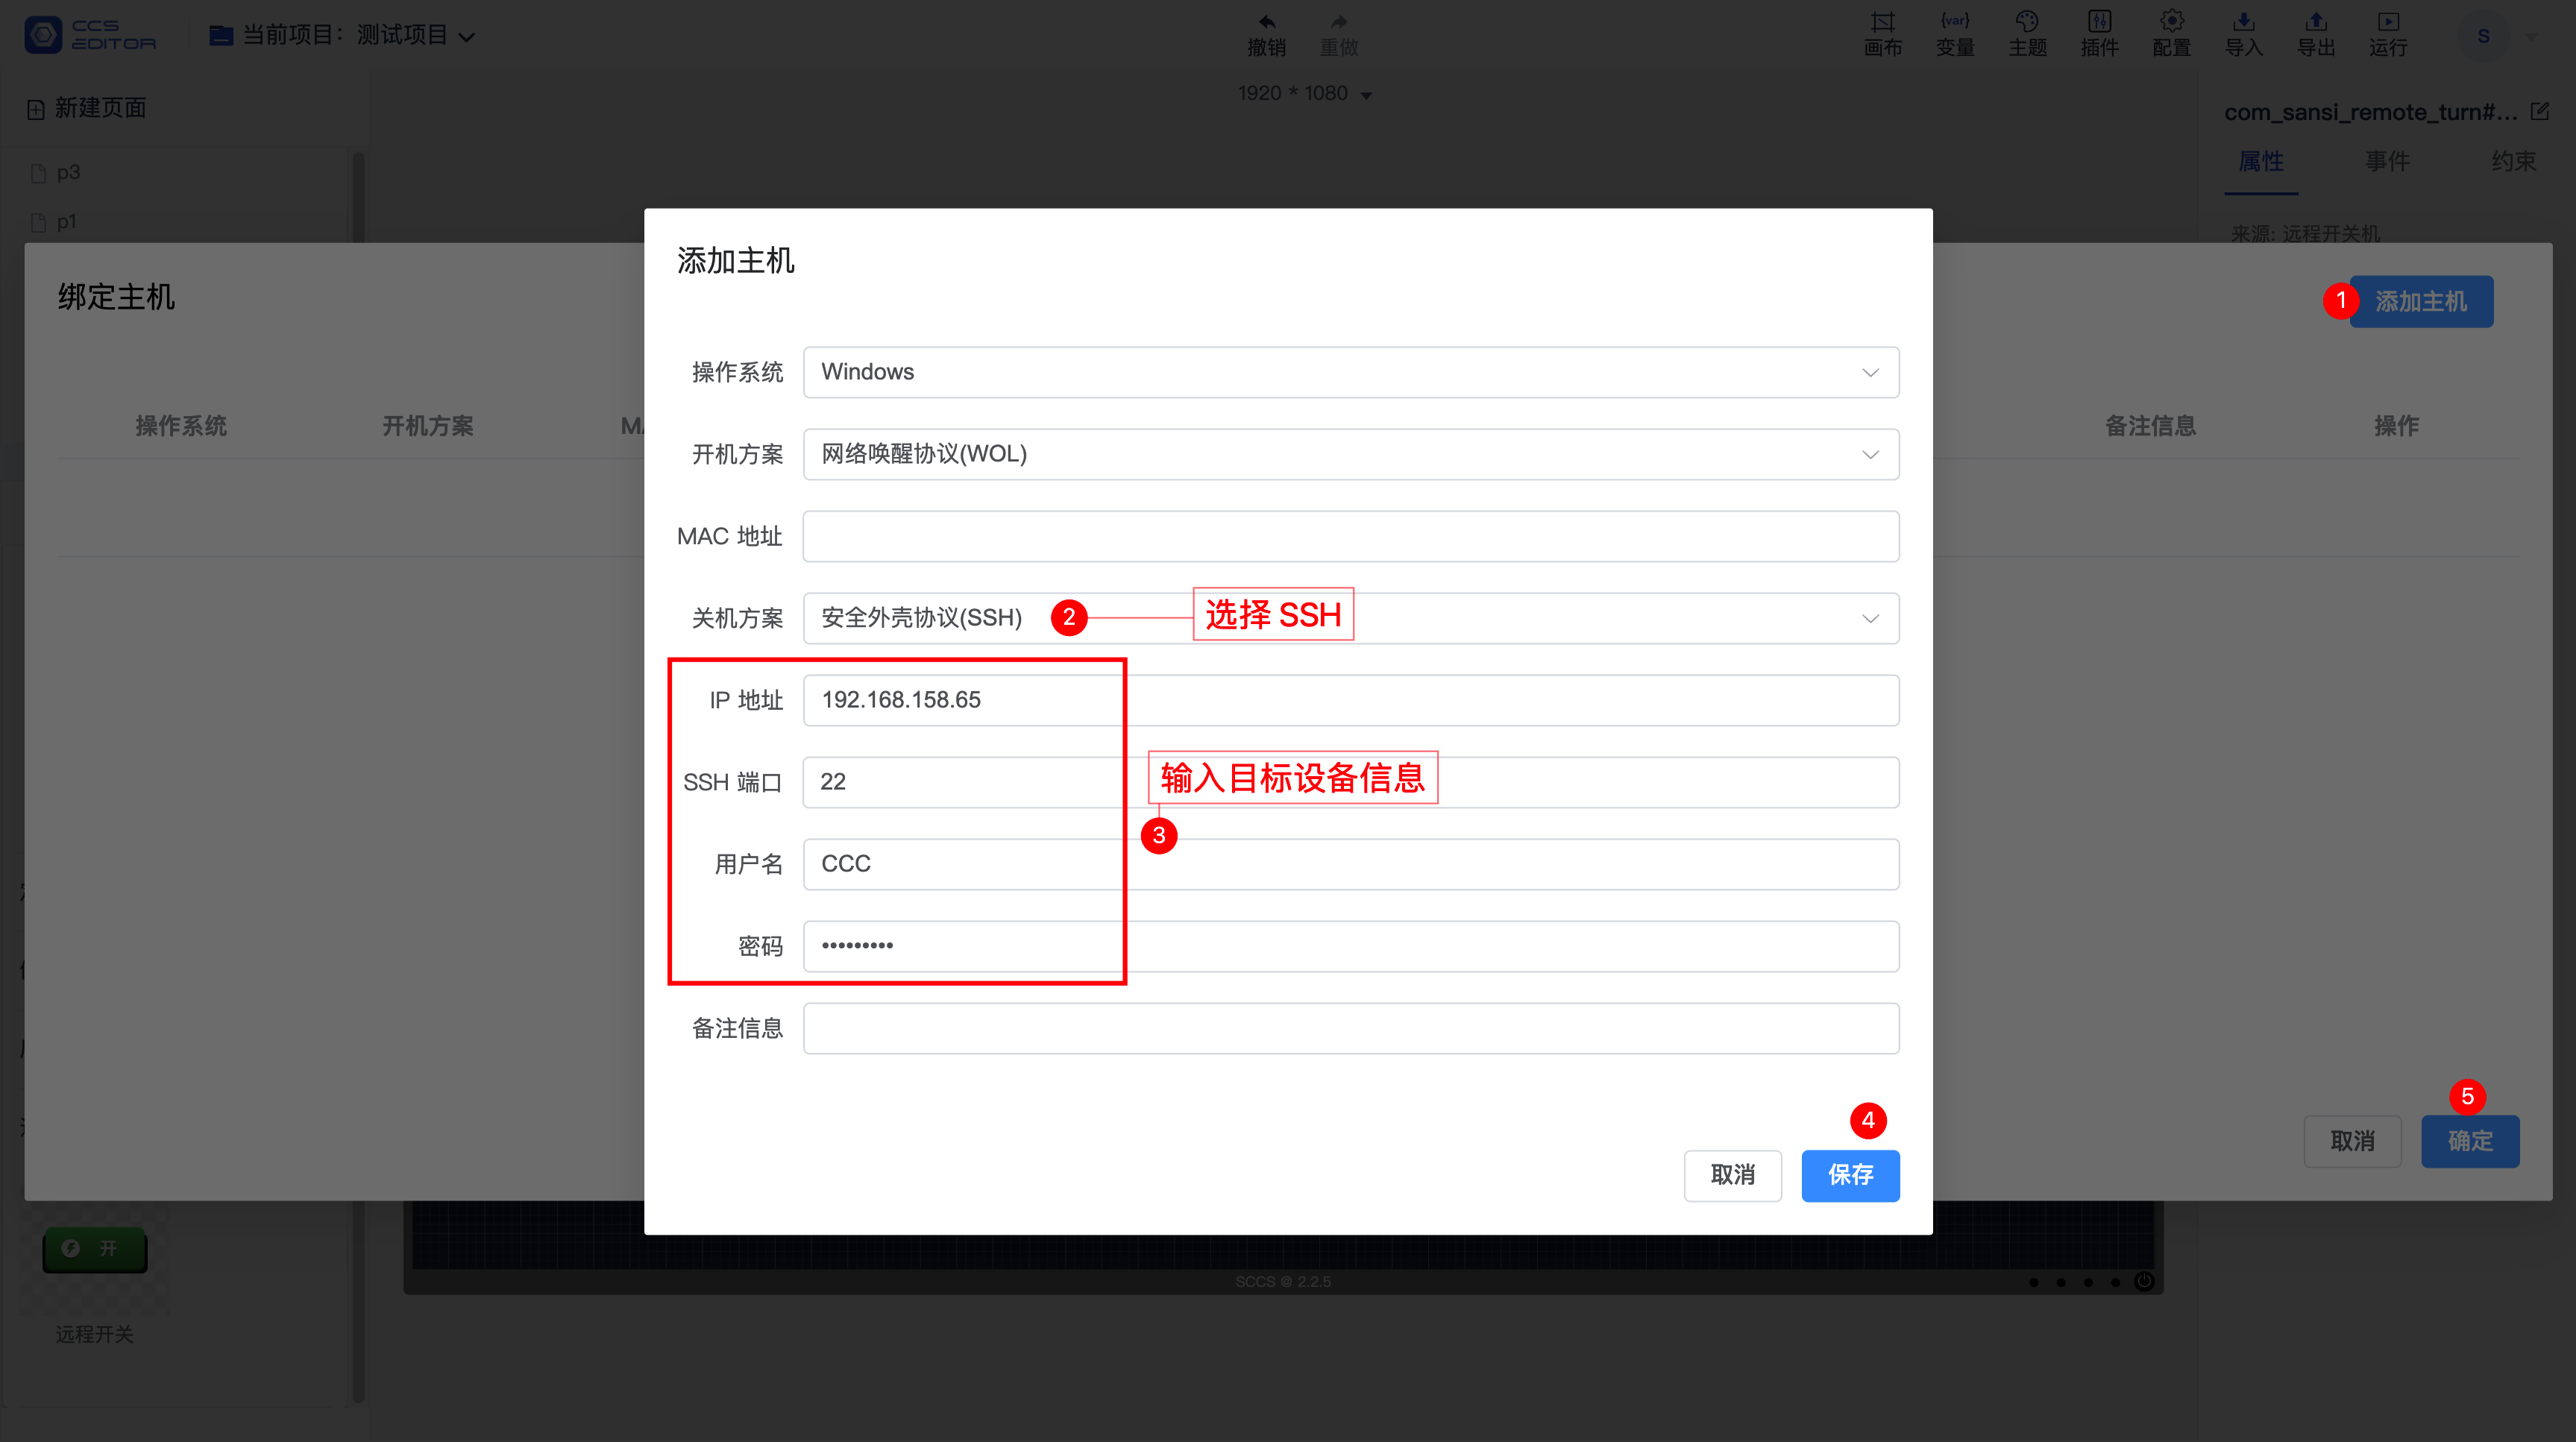
# 1. Using a Plugin
⚠️Note: Remote power management requires control panel version 2.2.6 or higher.
The plugin installation process is the same as for waking up the device. If it is already installed, you can skip this step.
Note to switch the button functionality to remote shutdown.
# 2. Using a Script
⚠️Note: Remote power management requires control panel version 2.2.6 or higher.
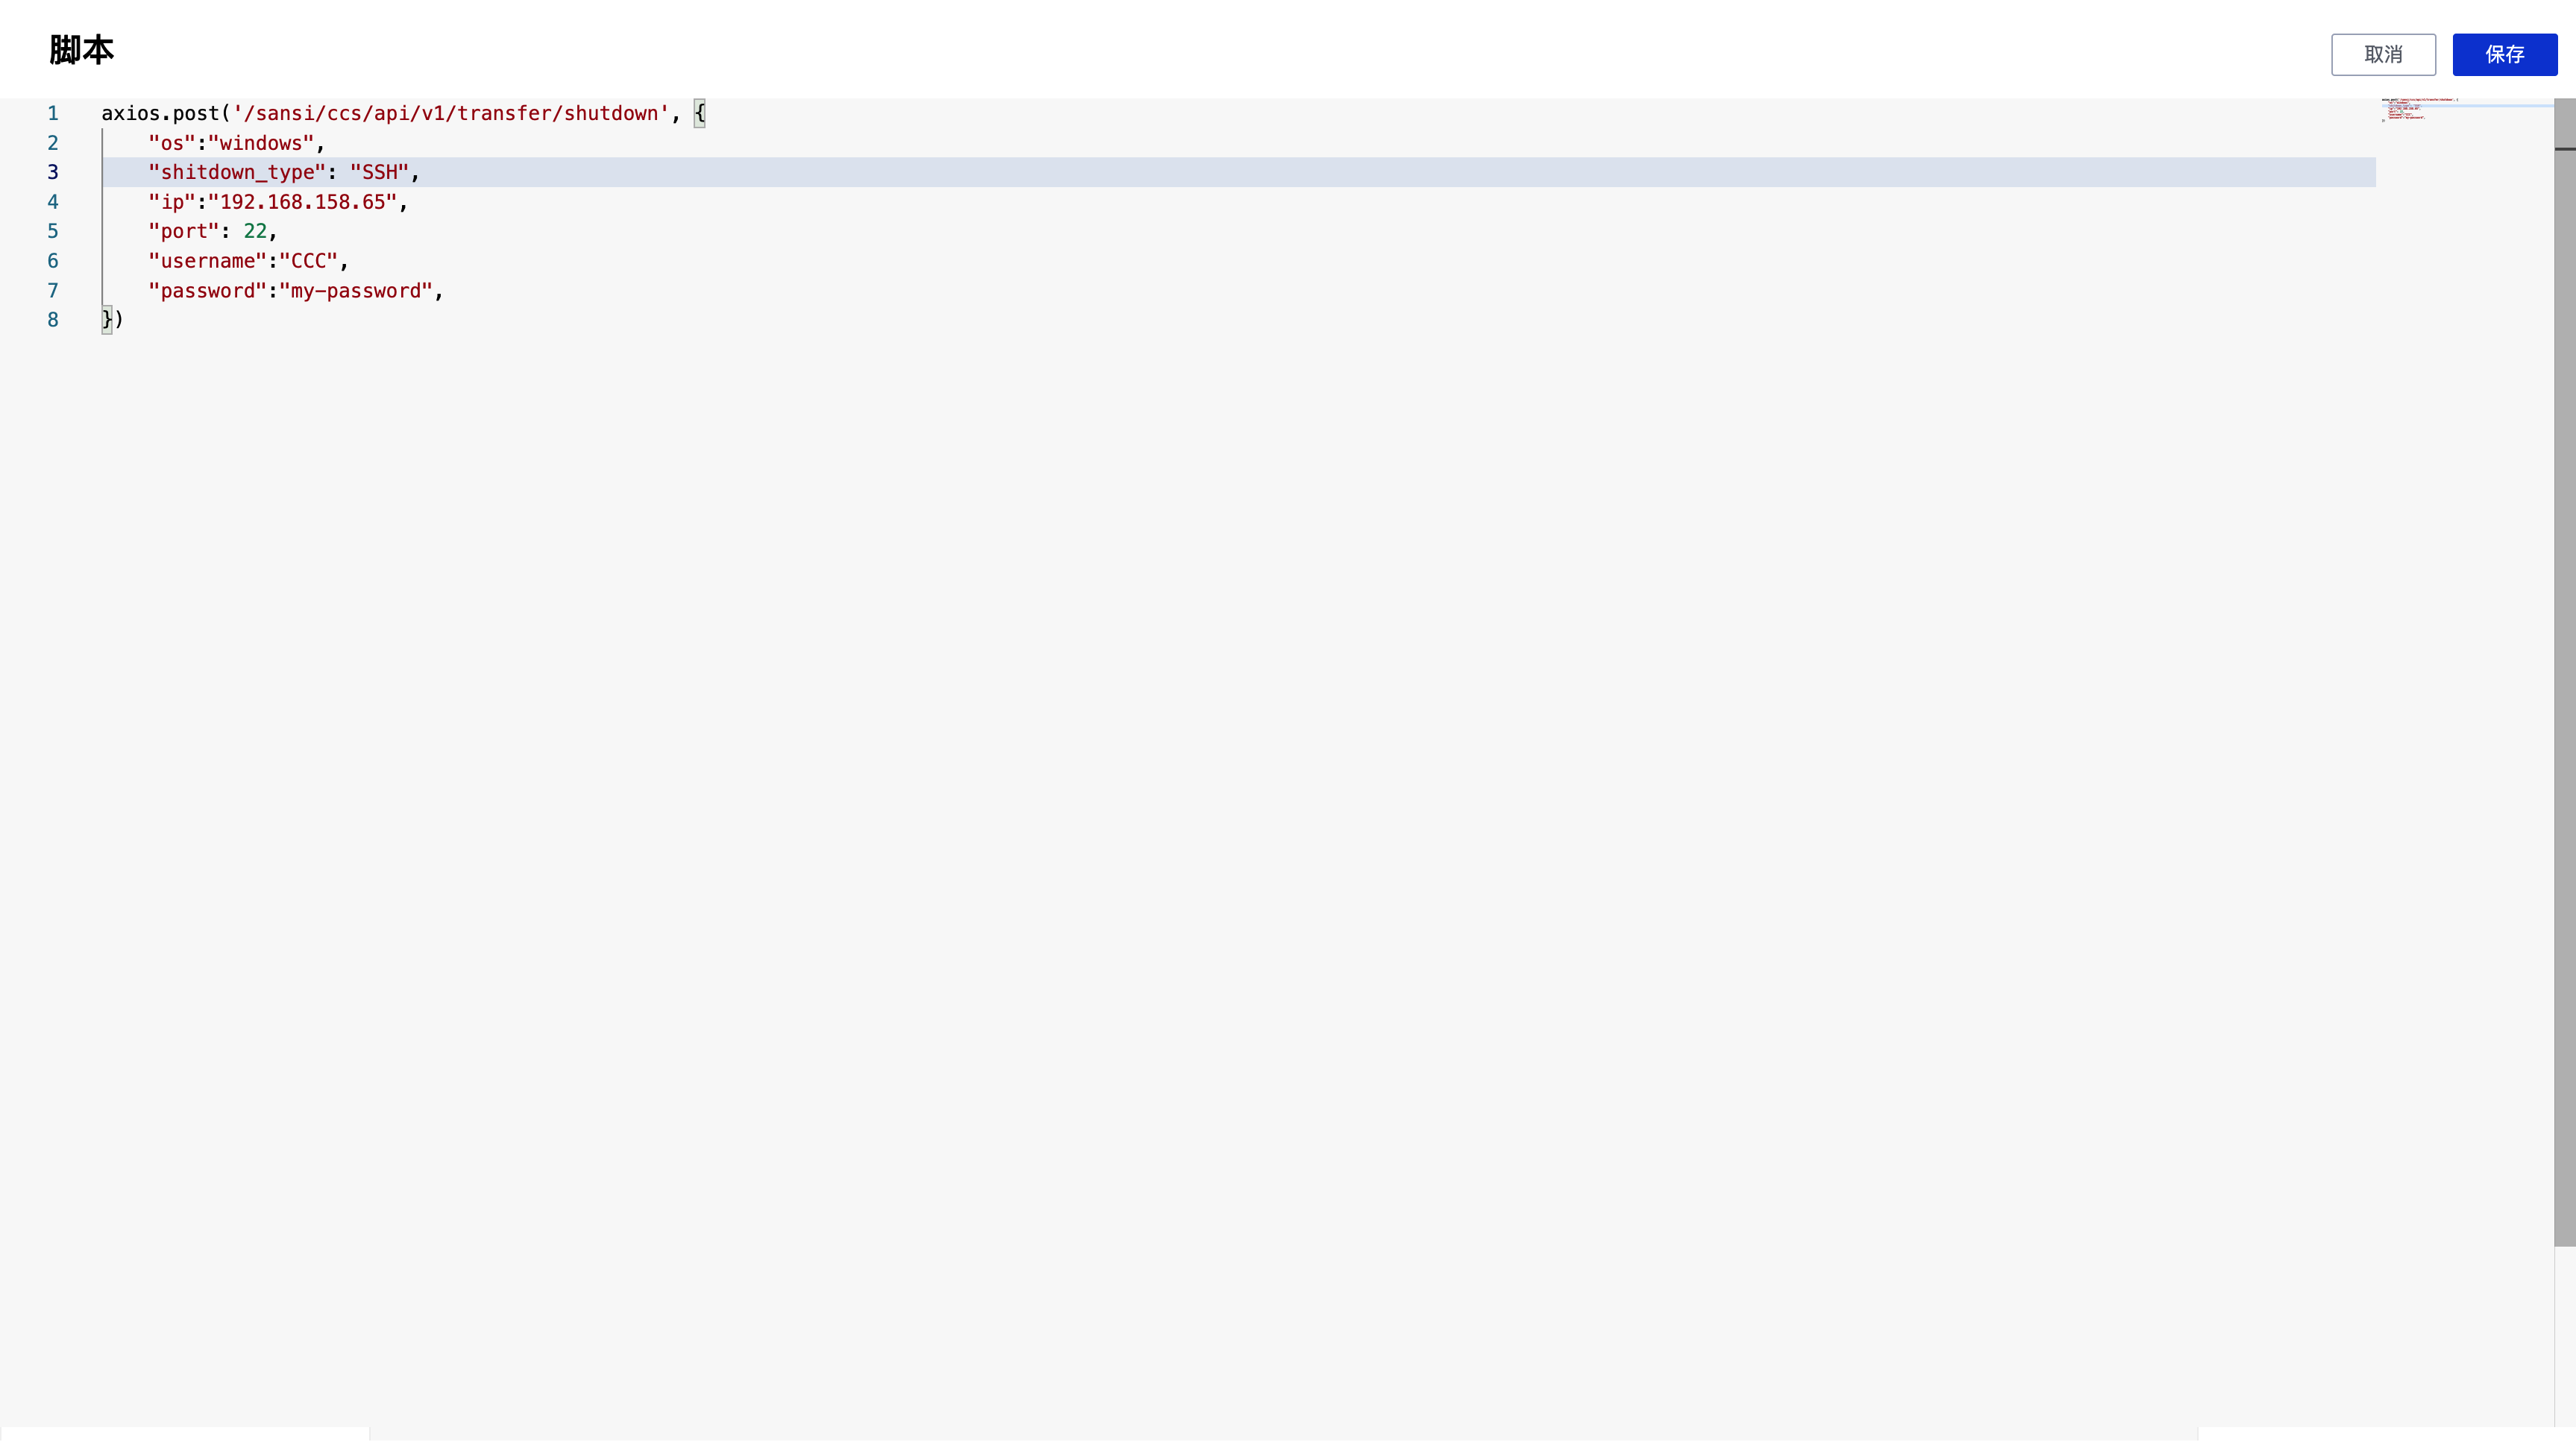
The script content is:
// Replace with the IP address of the target
axios.post('/sansi/ccs/api/v1/transfer/shutdown', {
    "os":"windows",
    "shitdown_type": "SSH",
    "ip":"192.168.158.65",
    "port": 22,
    "username":"CCC",
    "password":"my-password",
})
# 2.2 Remote Shutdown Based on SRS (Sansi Remote Shutdown)
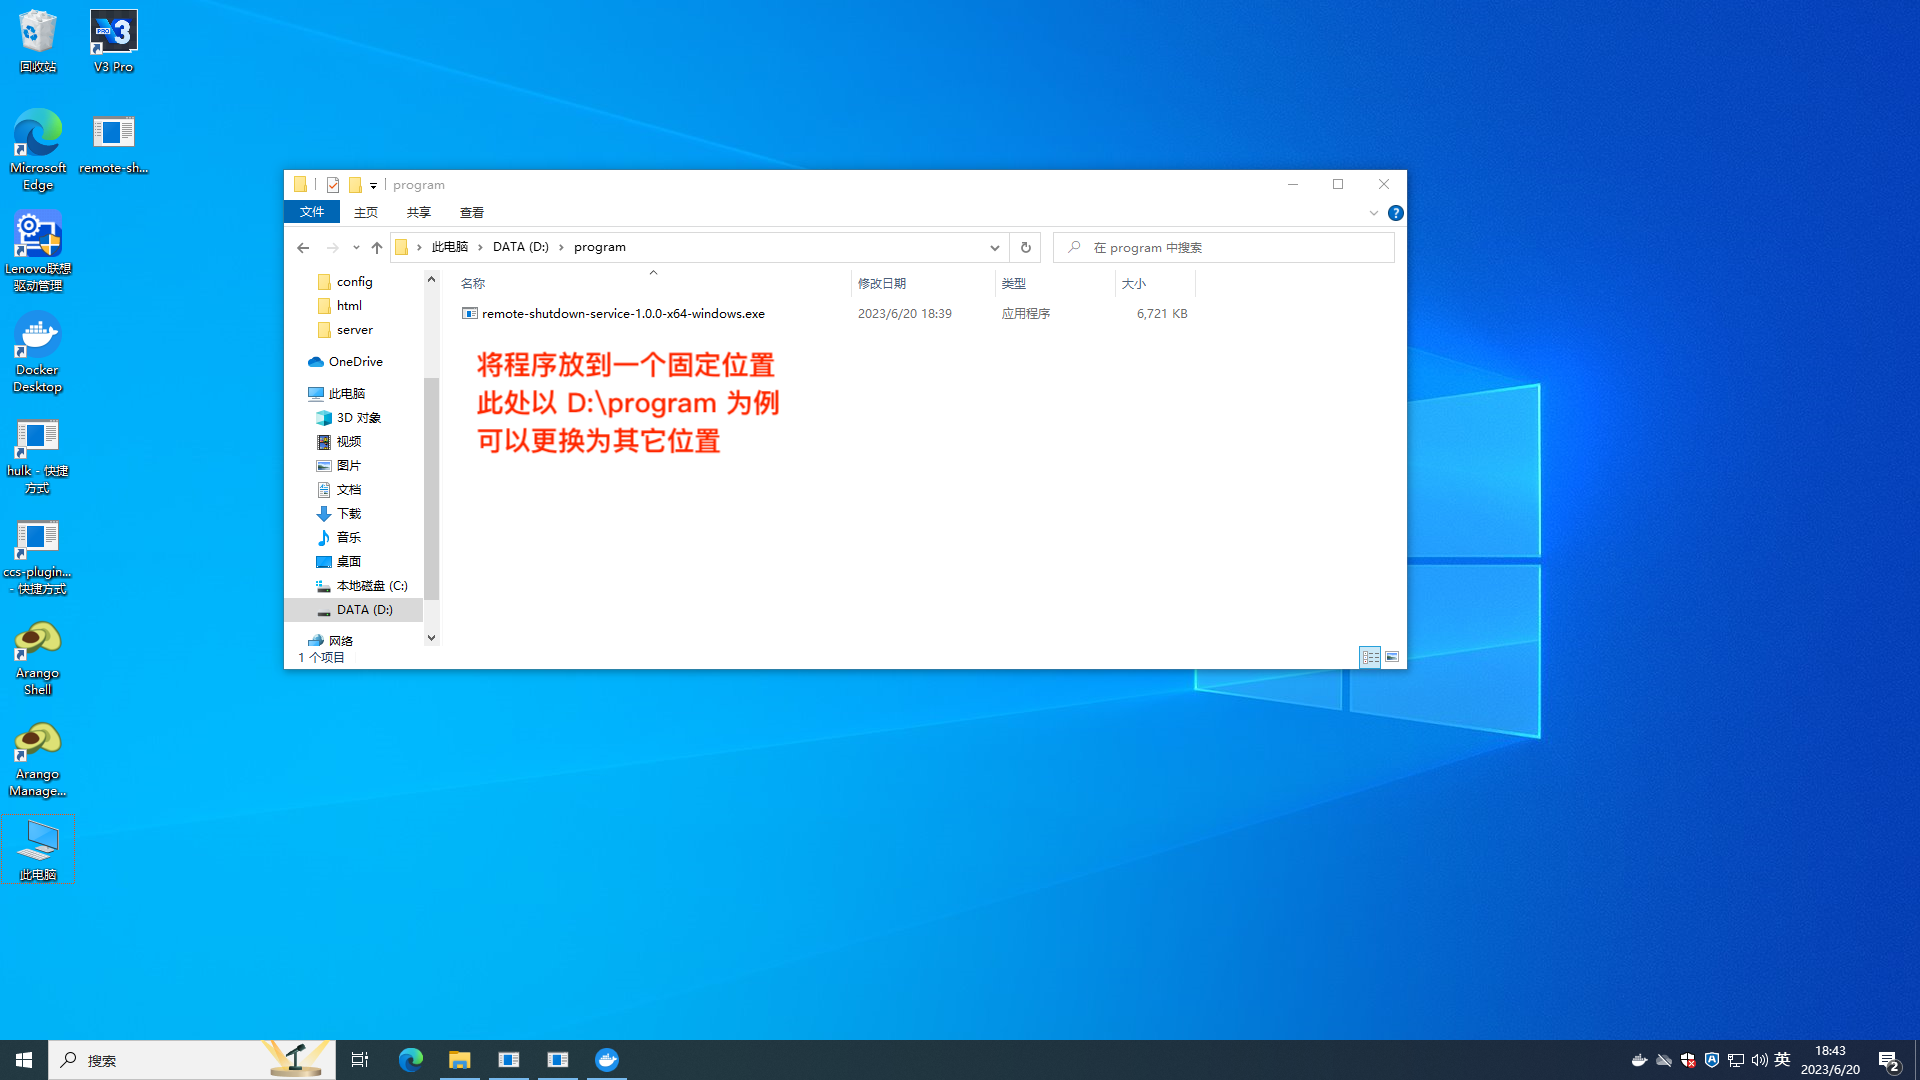
# Step 1: Download Program
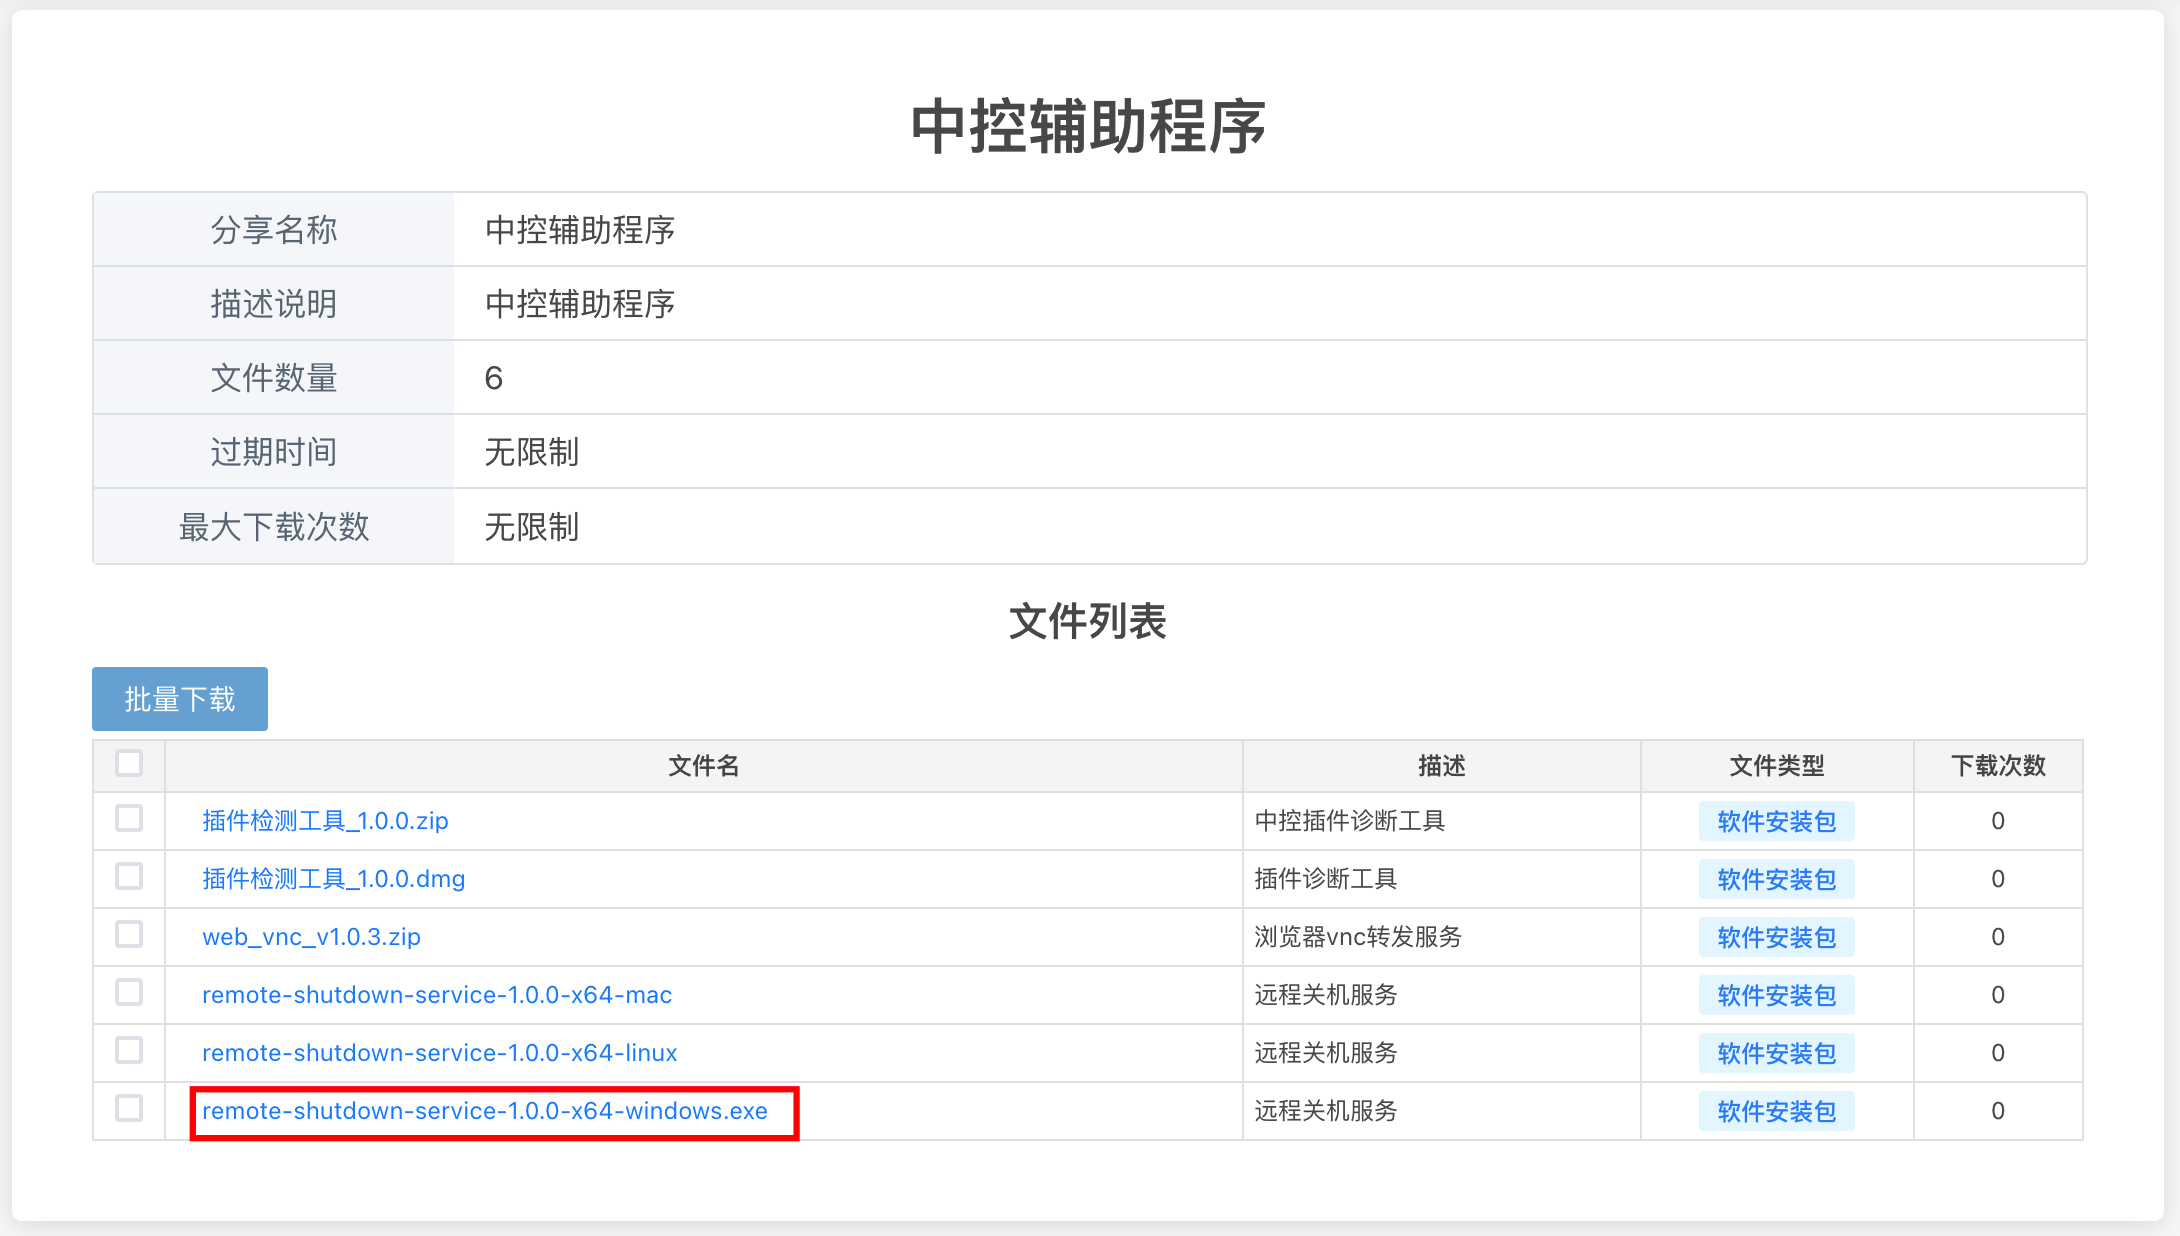
Download the corresponding platform's remote-shutdown-service-xxx program from the Central Control Auxiliary Program (opens new window). For Windows, the service with the suffix .exe should be downloaded, as shown in the image below.
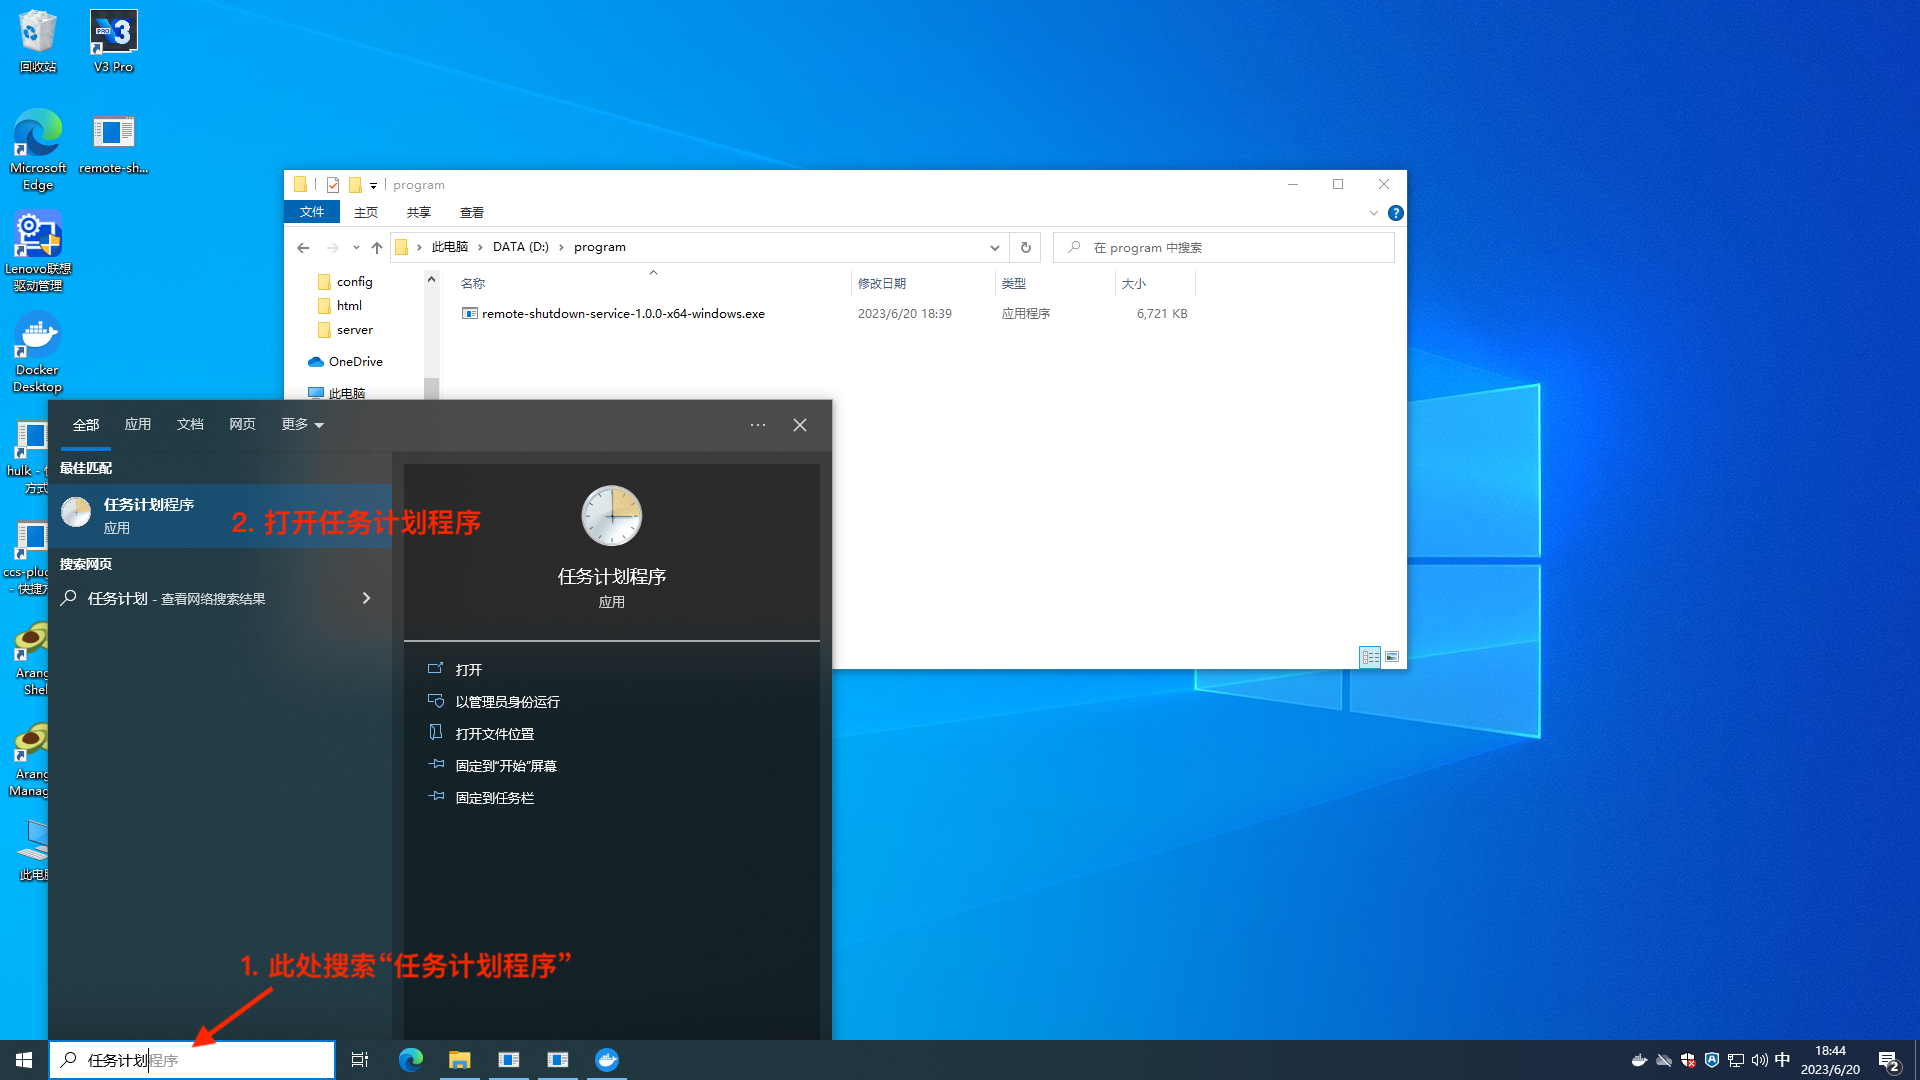
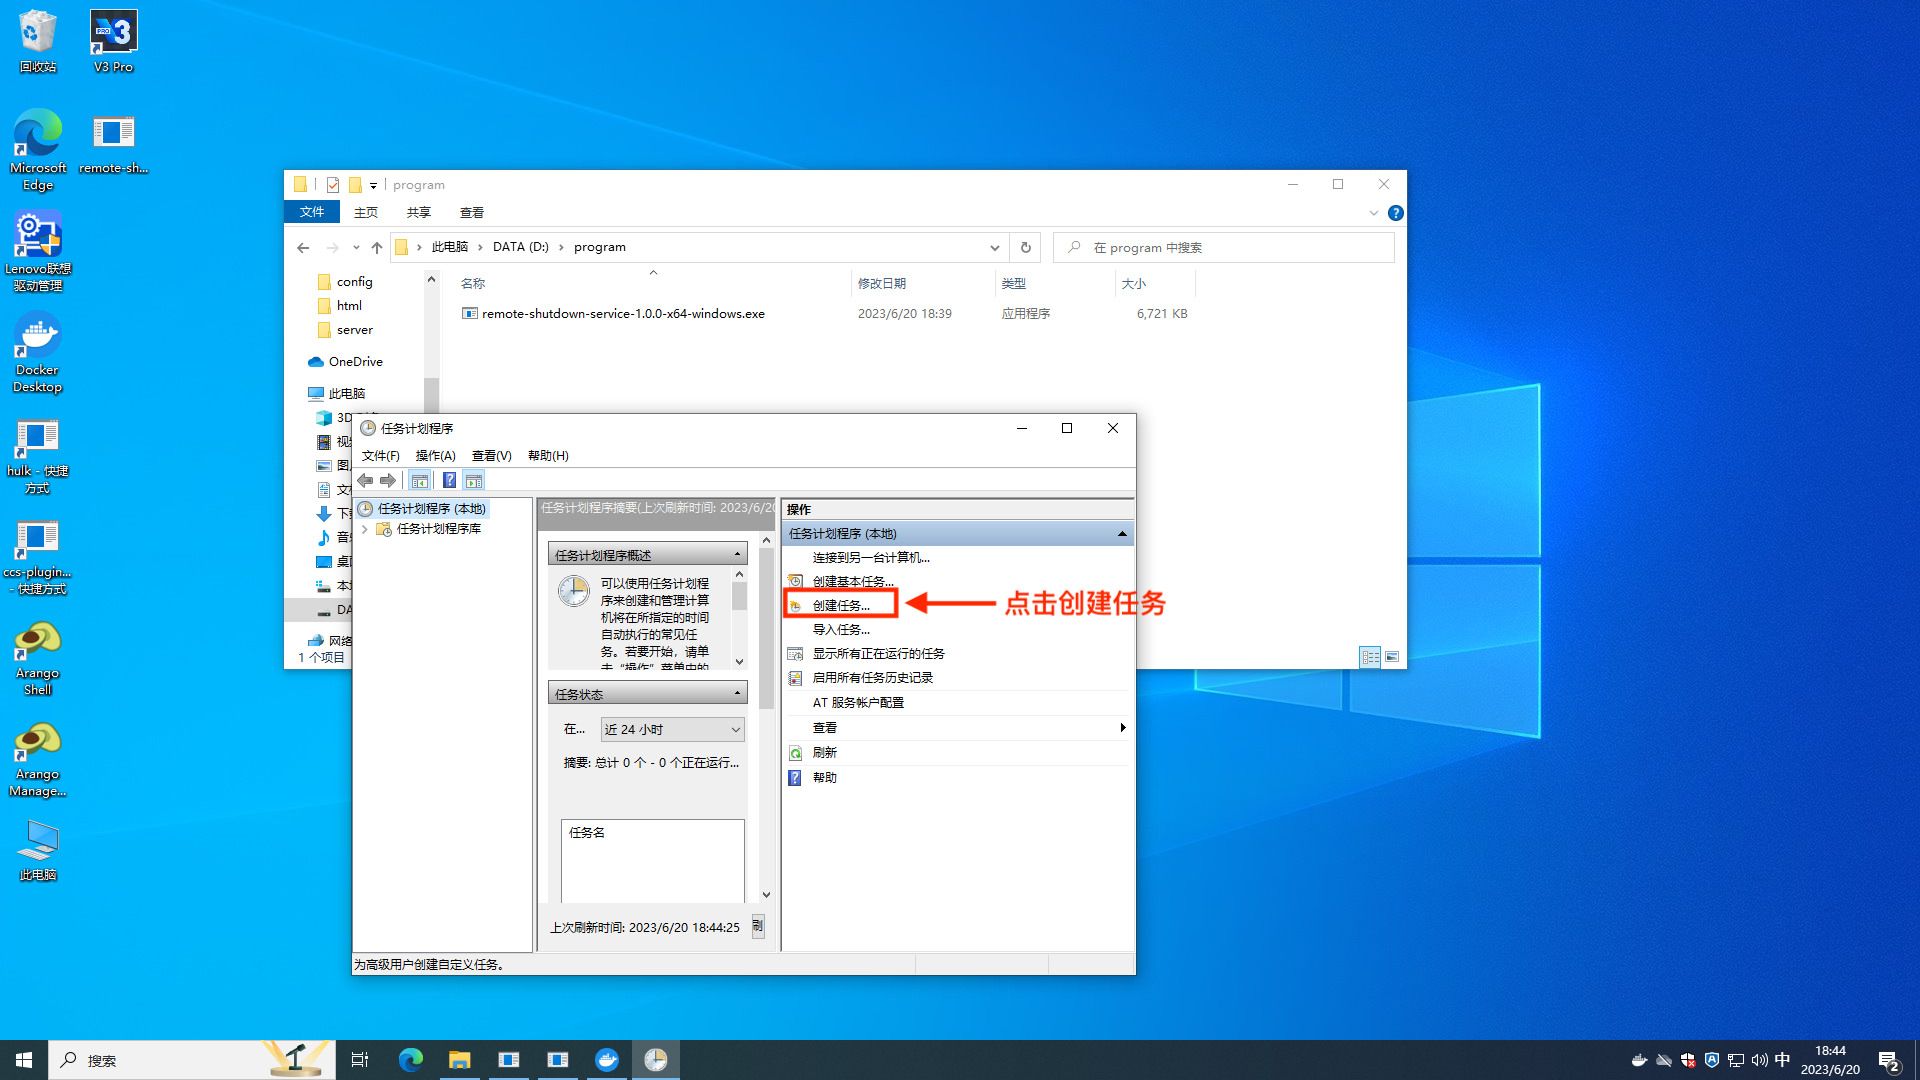
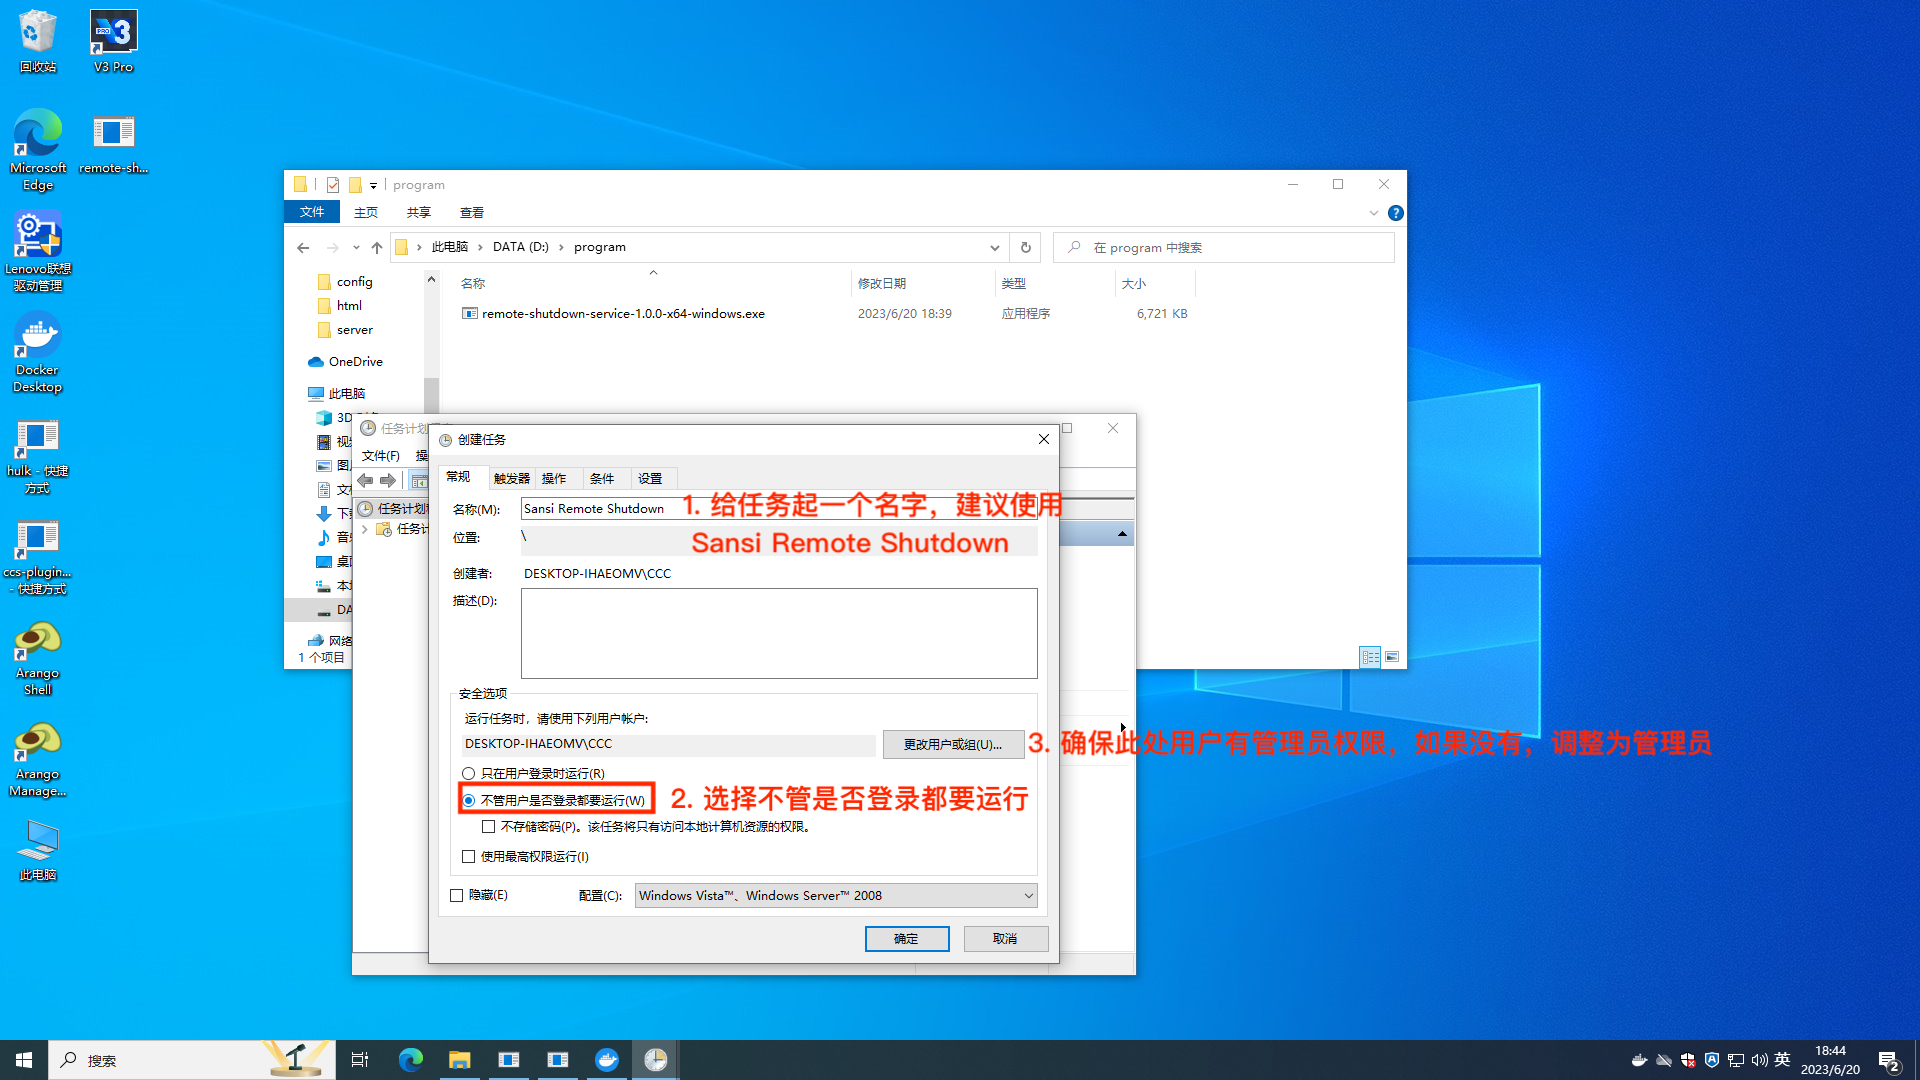
# Step 2: Configure Program
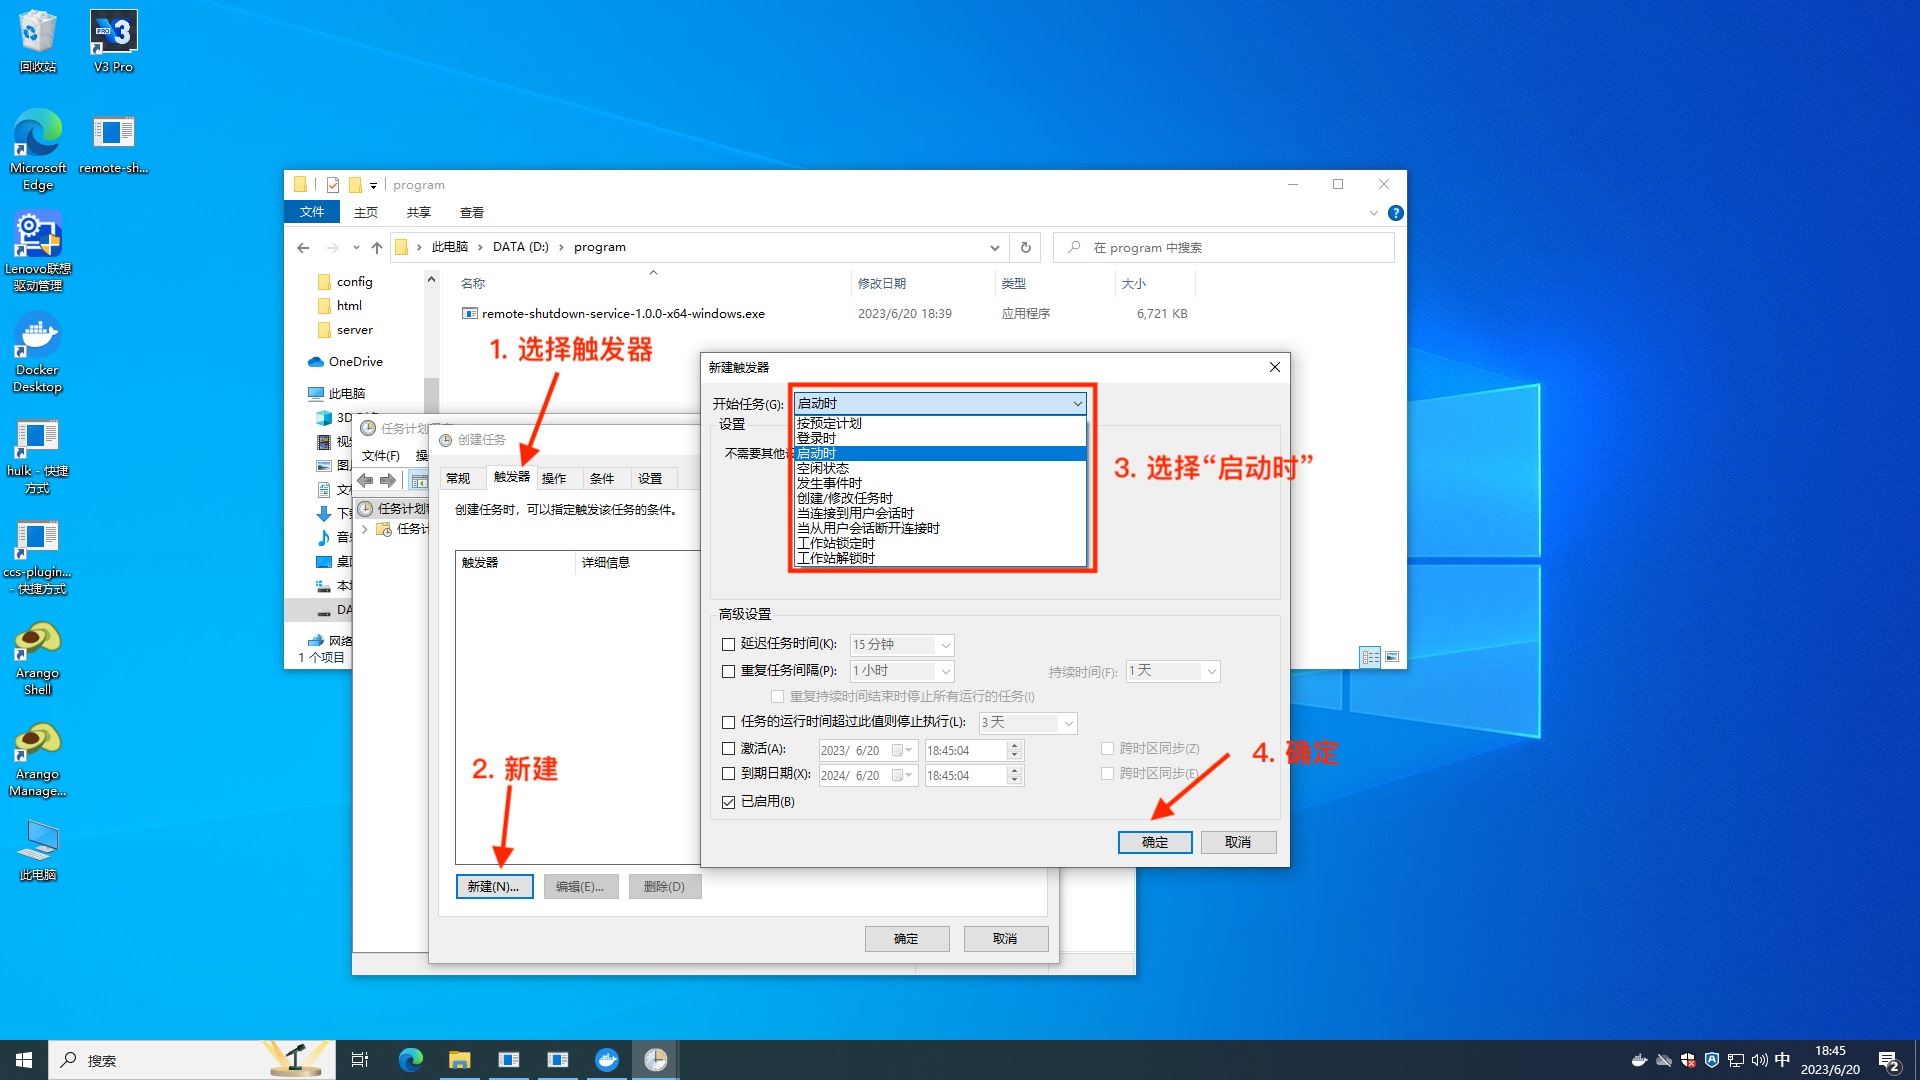
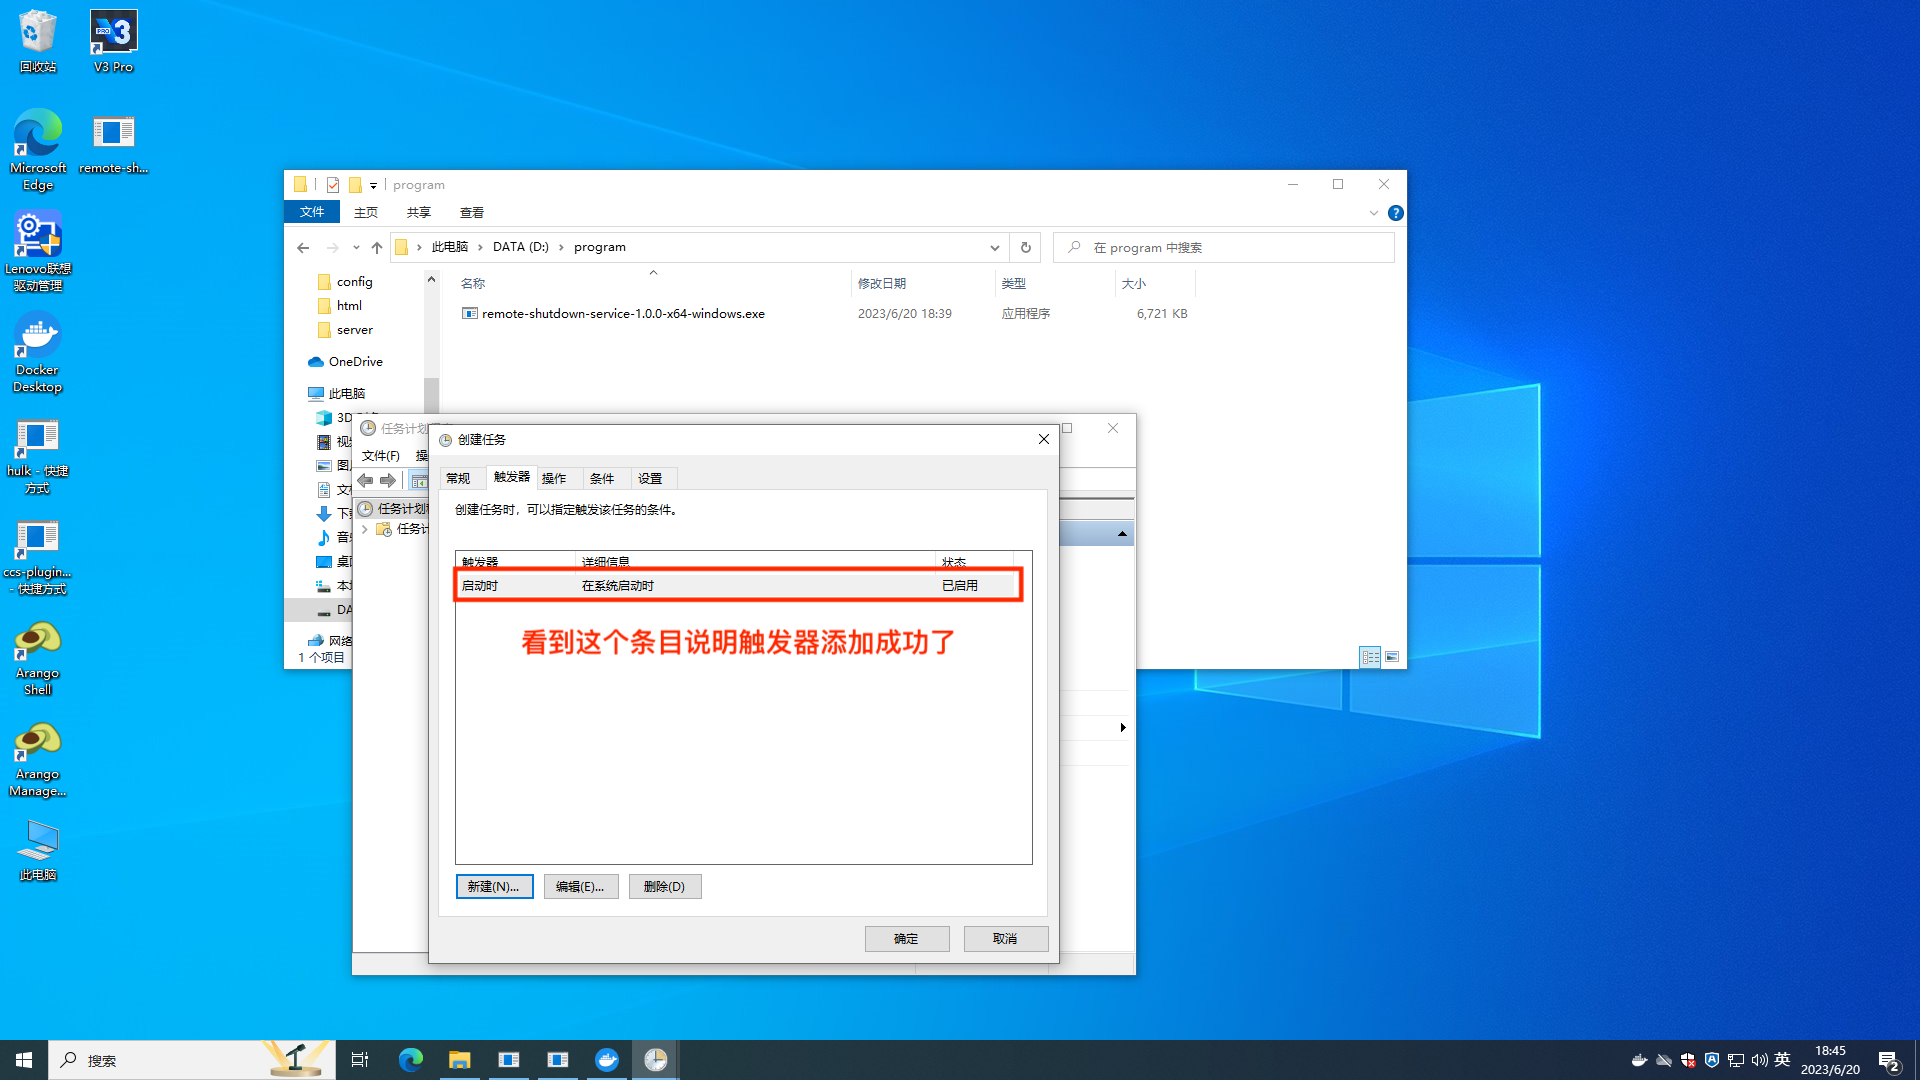
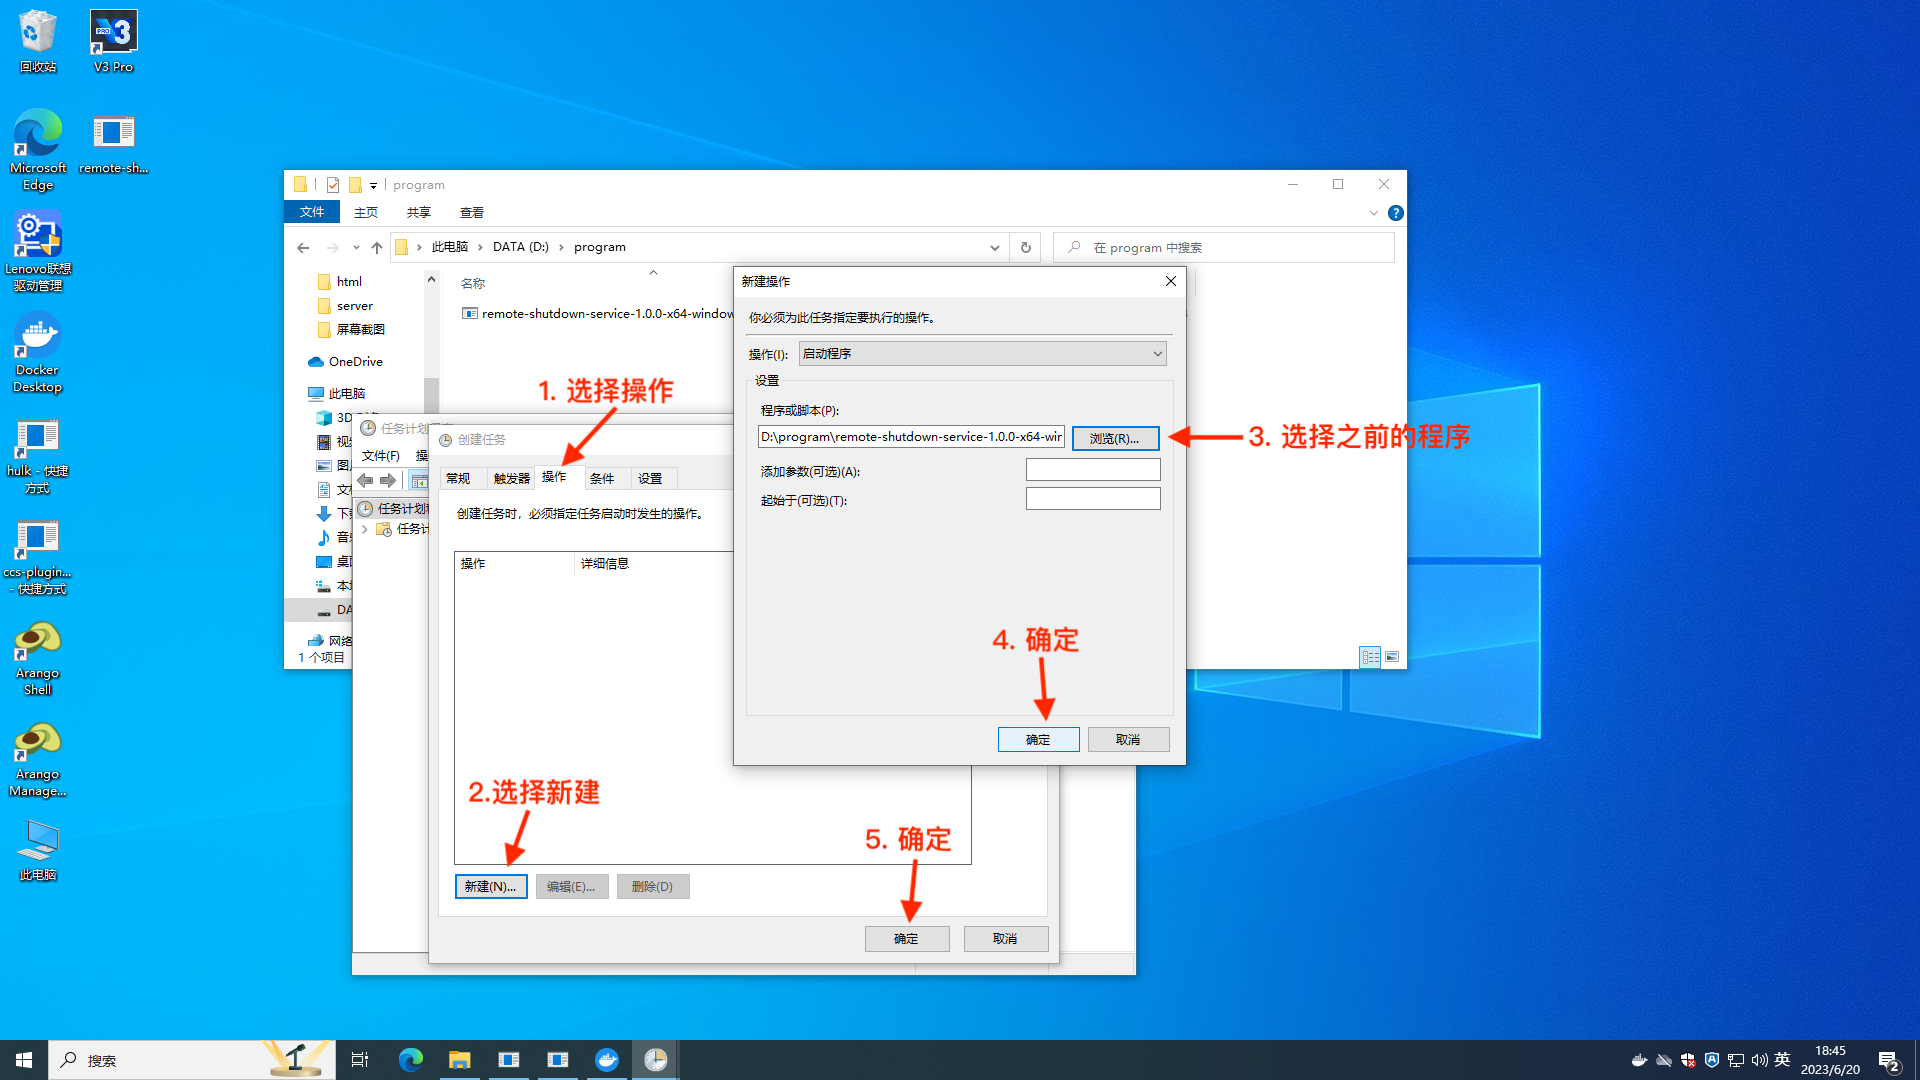
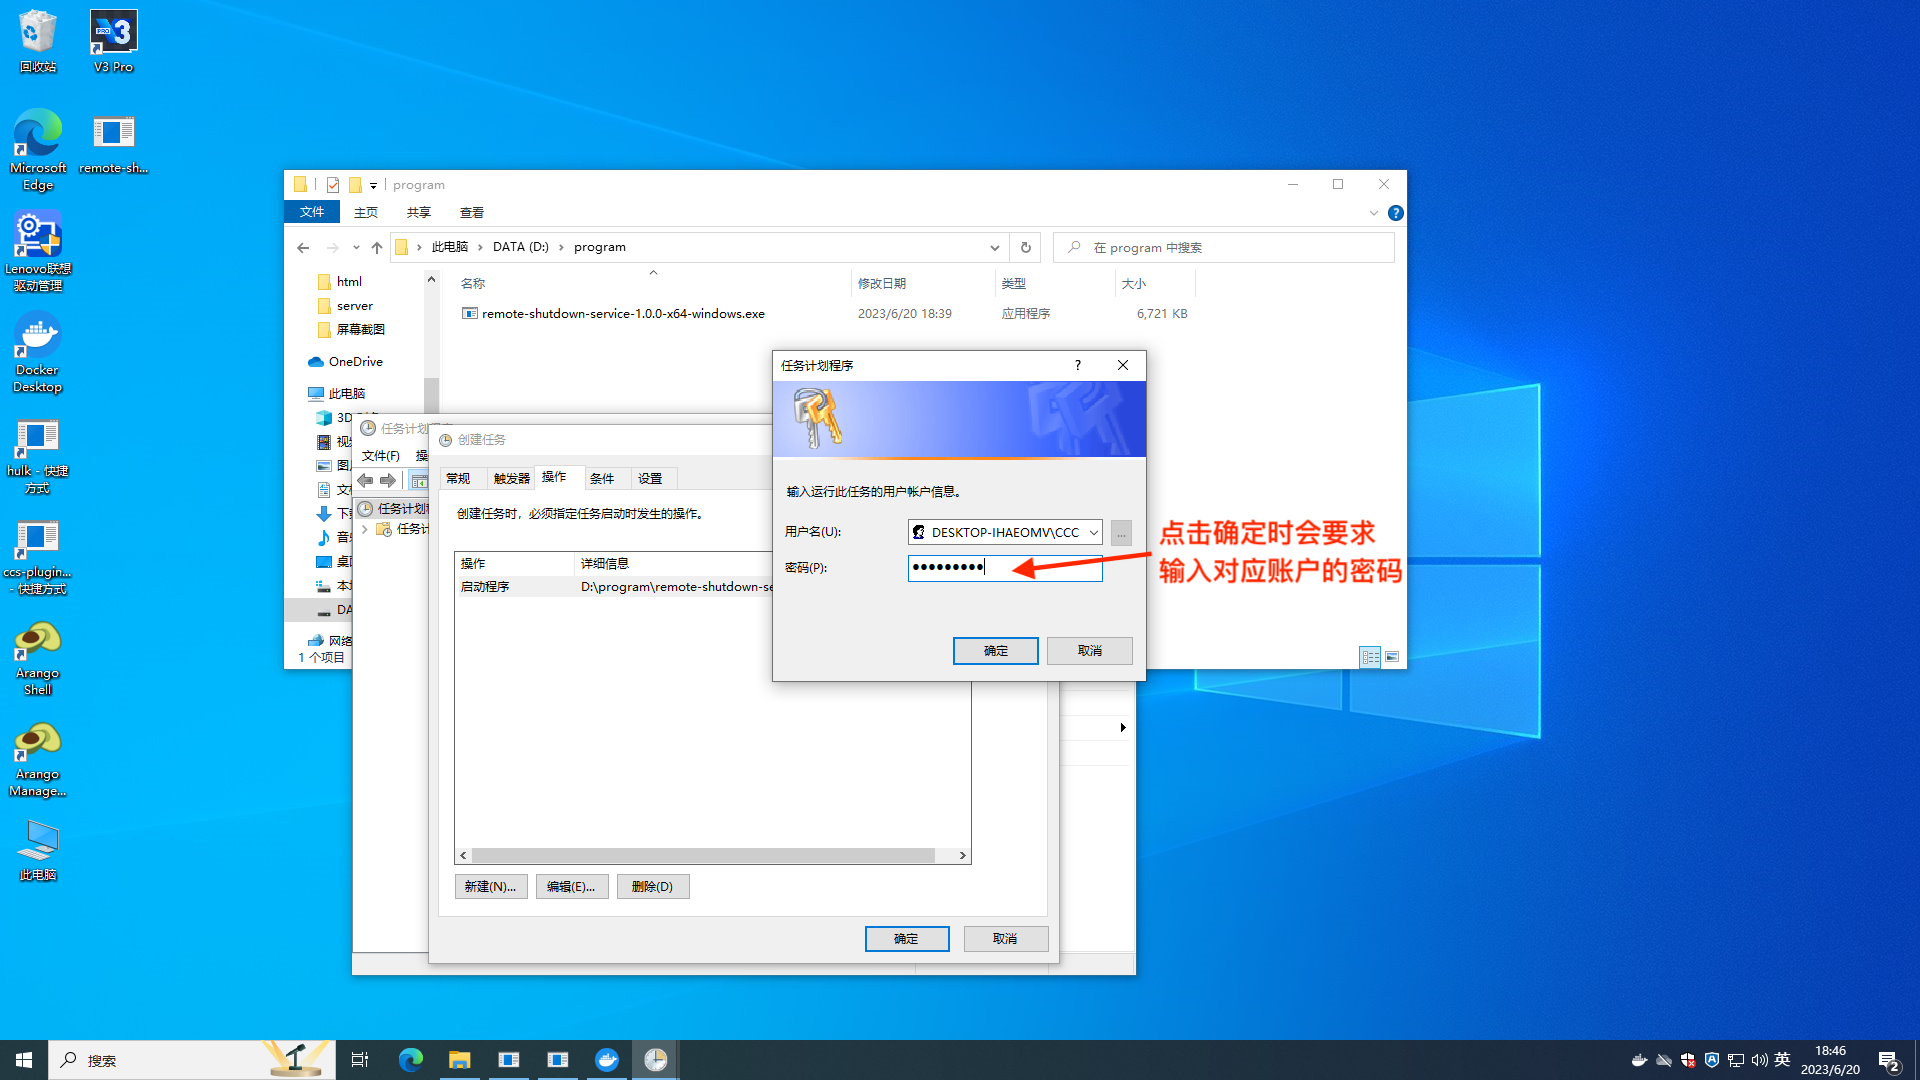
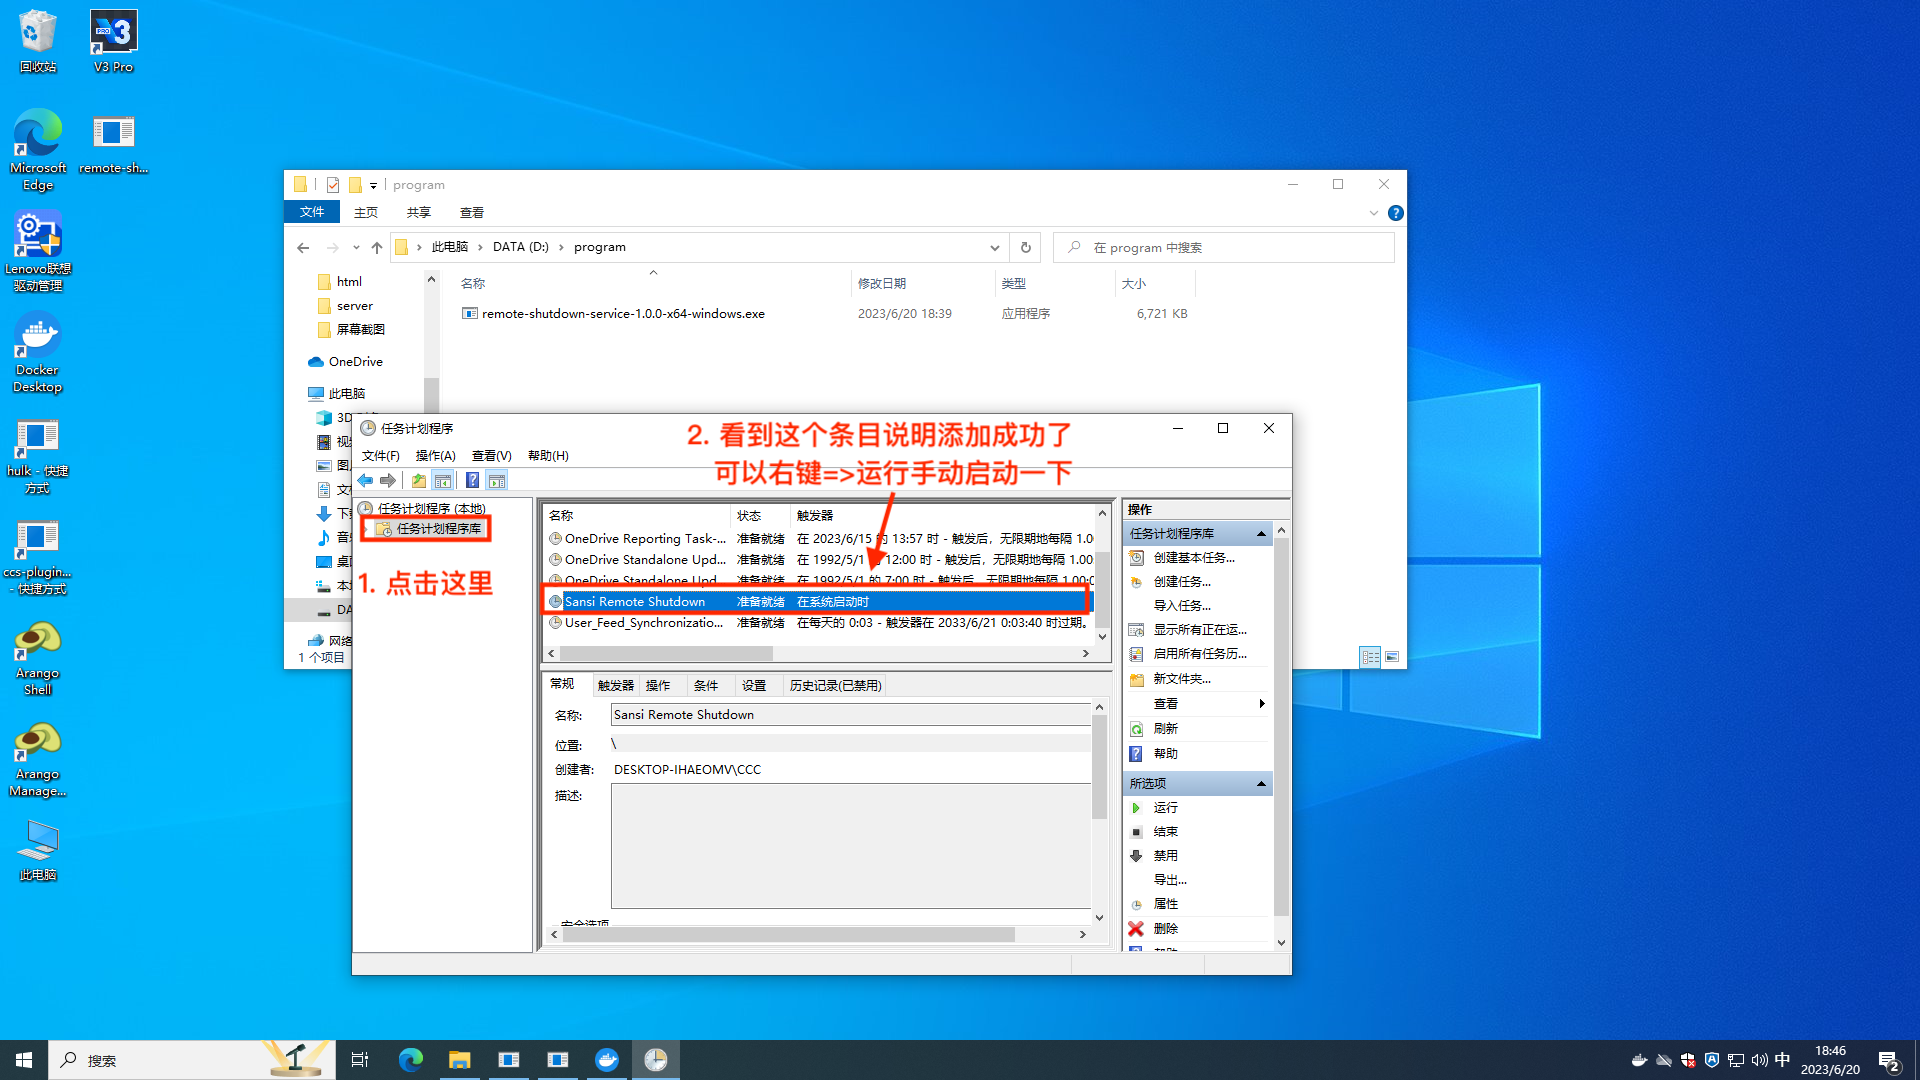
# Step 3: Verify Program
- Check the status of the corresponding task scheduler to ensure it is running.
- In the browser on the control panel computer, enter
http://127.0.0.1:3436/sansi/ccs/api/v1/transfer/power/shutdown/192.168.1.99, replacing the IP address with that of the target device. - Observe whether the target device shuts down; if it does, the functionality is normal.
# Step 4: Add Shutdown Button
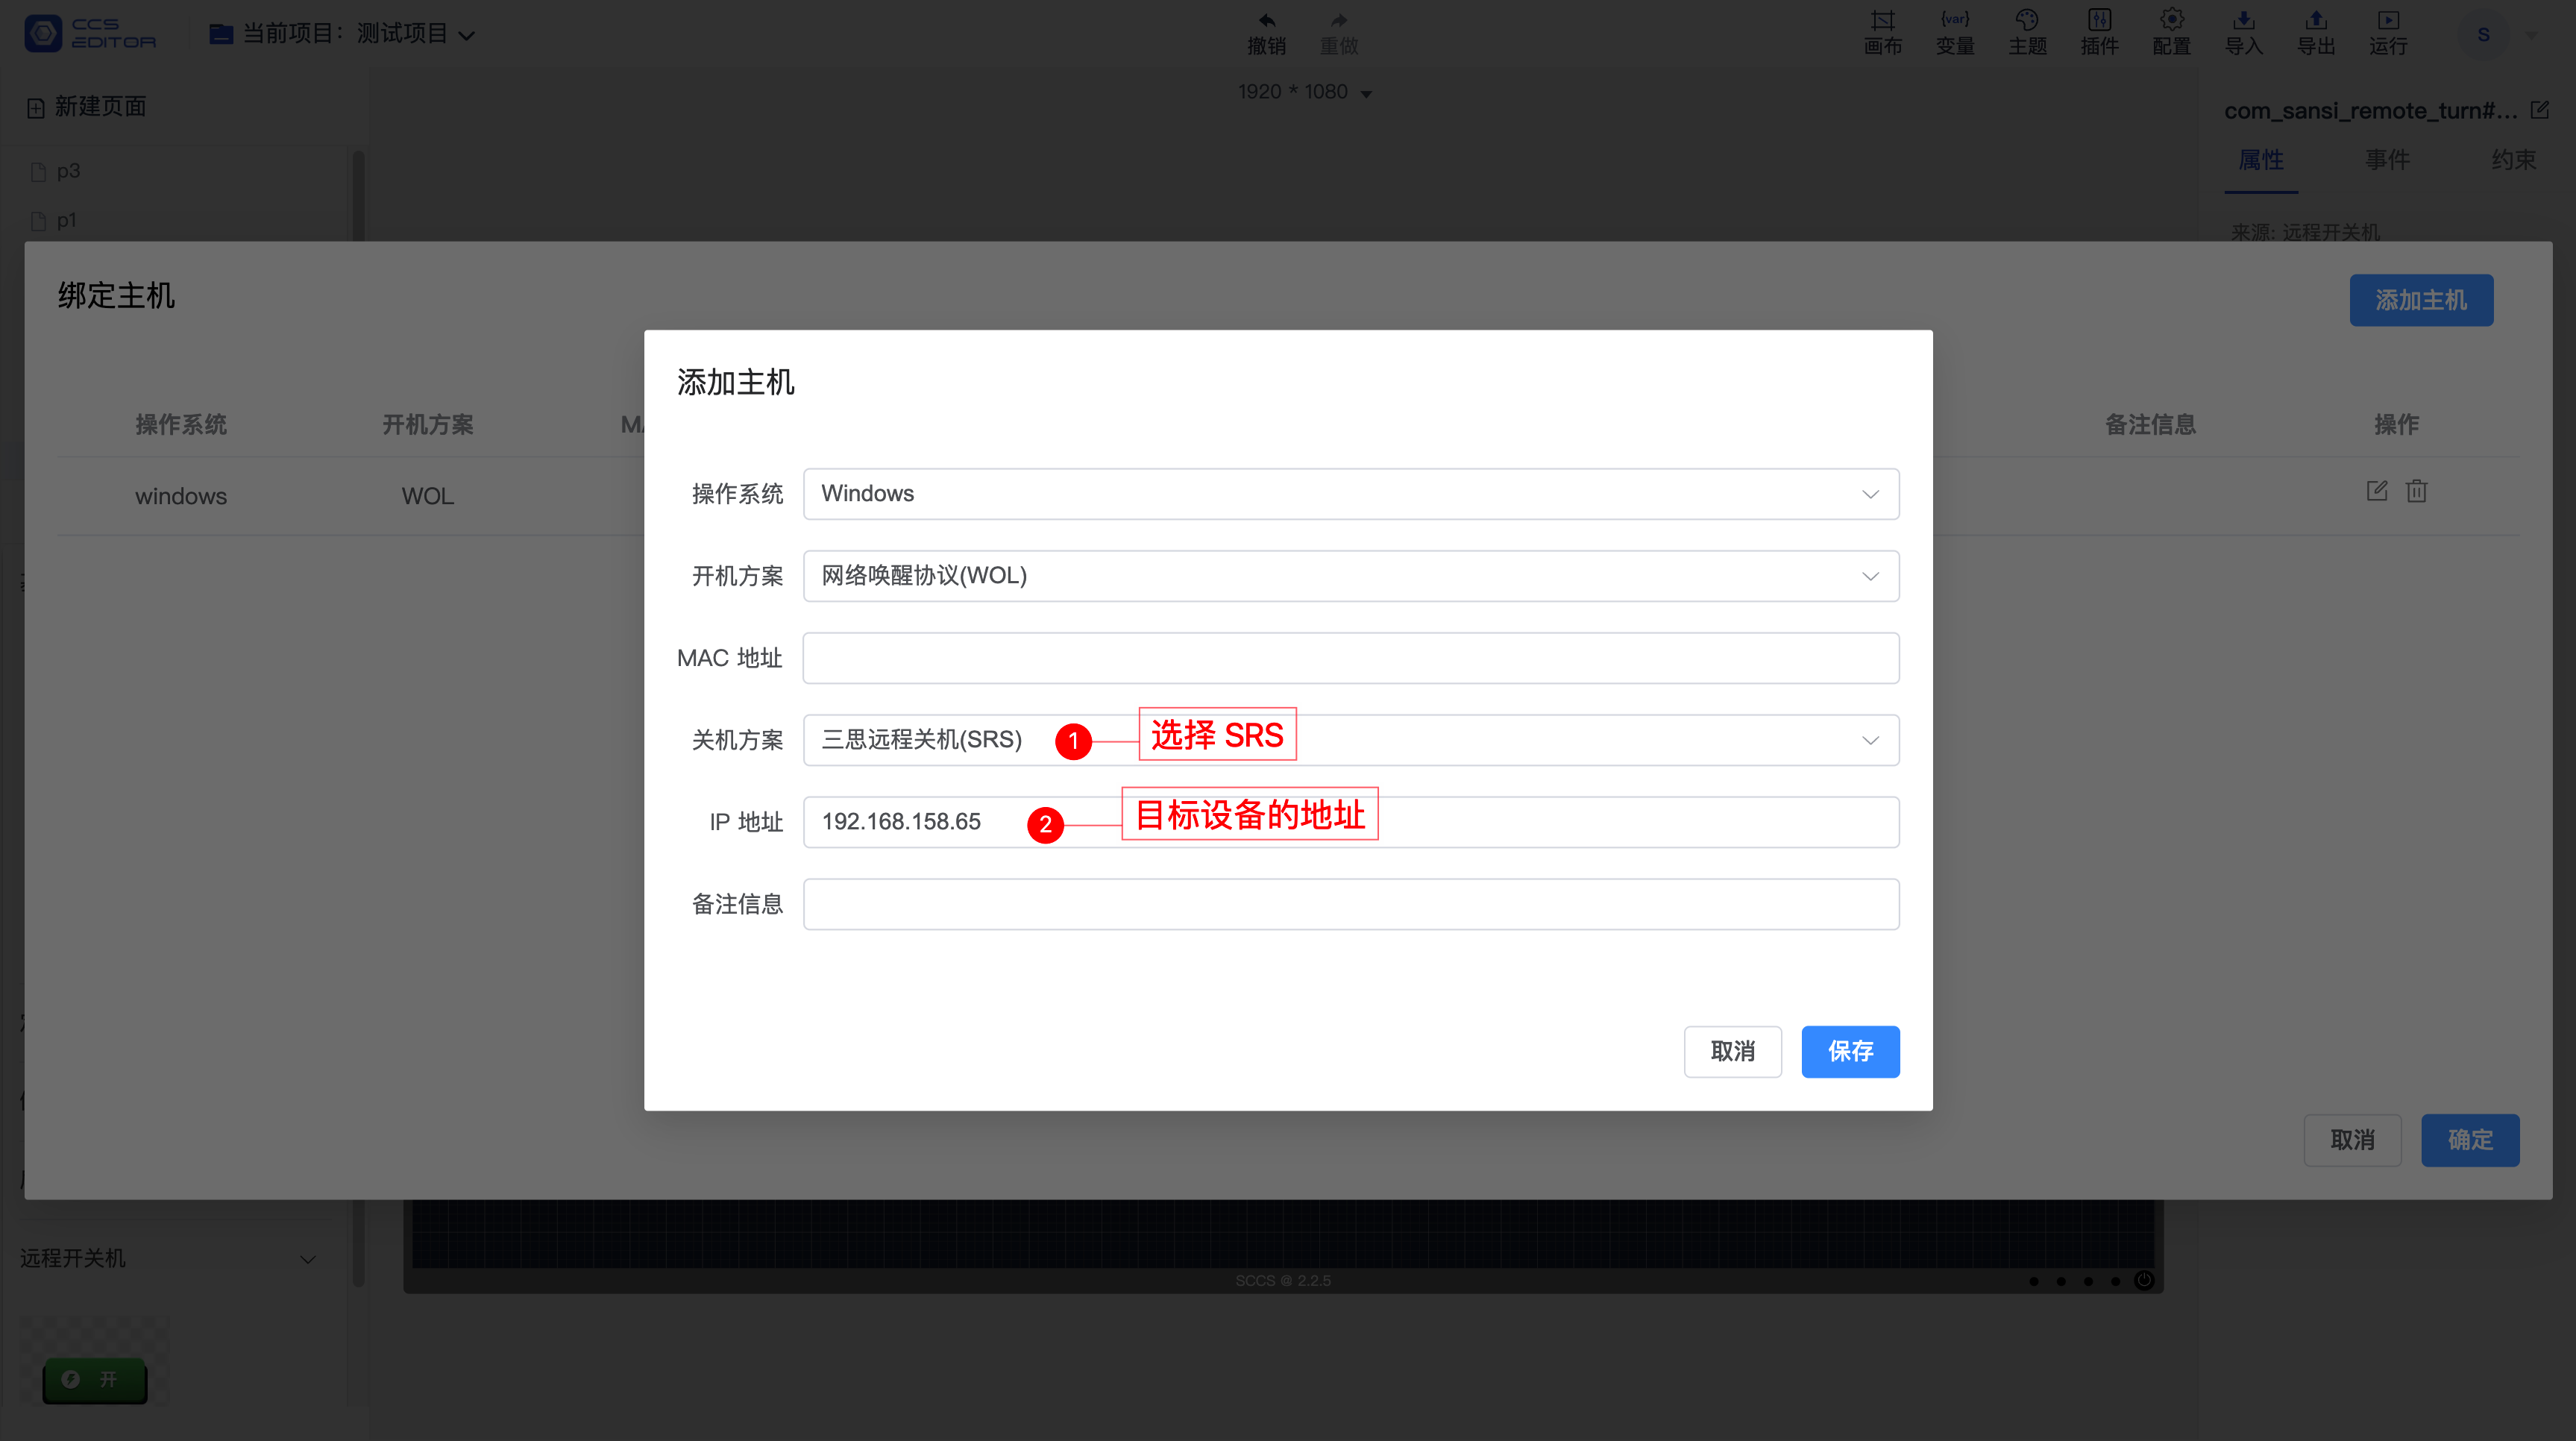
# 1. Using a Plugin
The installation and usage of the plugin are the same as above, with the only difference being the configuration information, as shown below:
# 2. Using a Script
The script addition method is consistent with the above. The script content is:
// Replace with the IP of the target device.
axios.get("/sansi/ccs/api/v1/transfer/power/shutdown/192.168.1.99")
# Other Issues
1. Why not use the remote-shutdown shortcut in shell:startup to start the program and instead use "Task Scheduler"?
Using a shortcut in shell:startup only allows the program to start after the user logs in. By using Task Scheduler, the program can start even before the user logs in; thus, the program will start as soon as the device is powered on, even on the user login screen. This avoids the need for user login to perform remote shutdown.
2. No return value or effect after accessing the interface
- Check whether the task scheduler is running.
- Access
http://127.0.0.1:3435/sansi/remote/shutdownon the device that needs to be remotely shut down to see if it shuts down. - If the local access cannot shut down, check whether the service is started, the permissions of the account in the task scheduler, and whether port 3435 is occupied.
- If local access can shut down but other devices cannot, check firewall settings, routers, ping, etc.
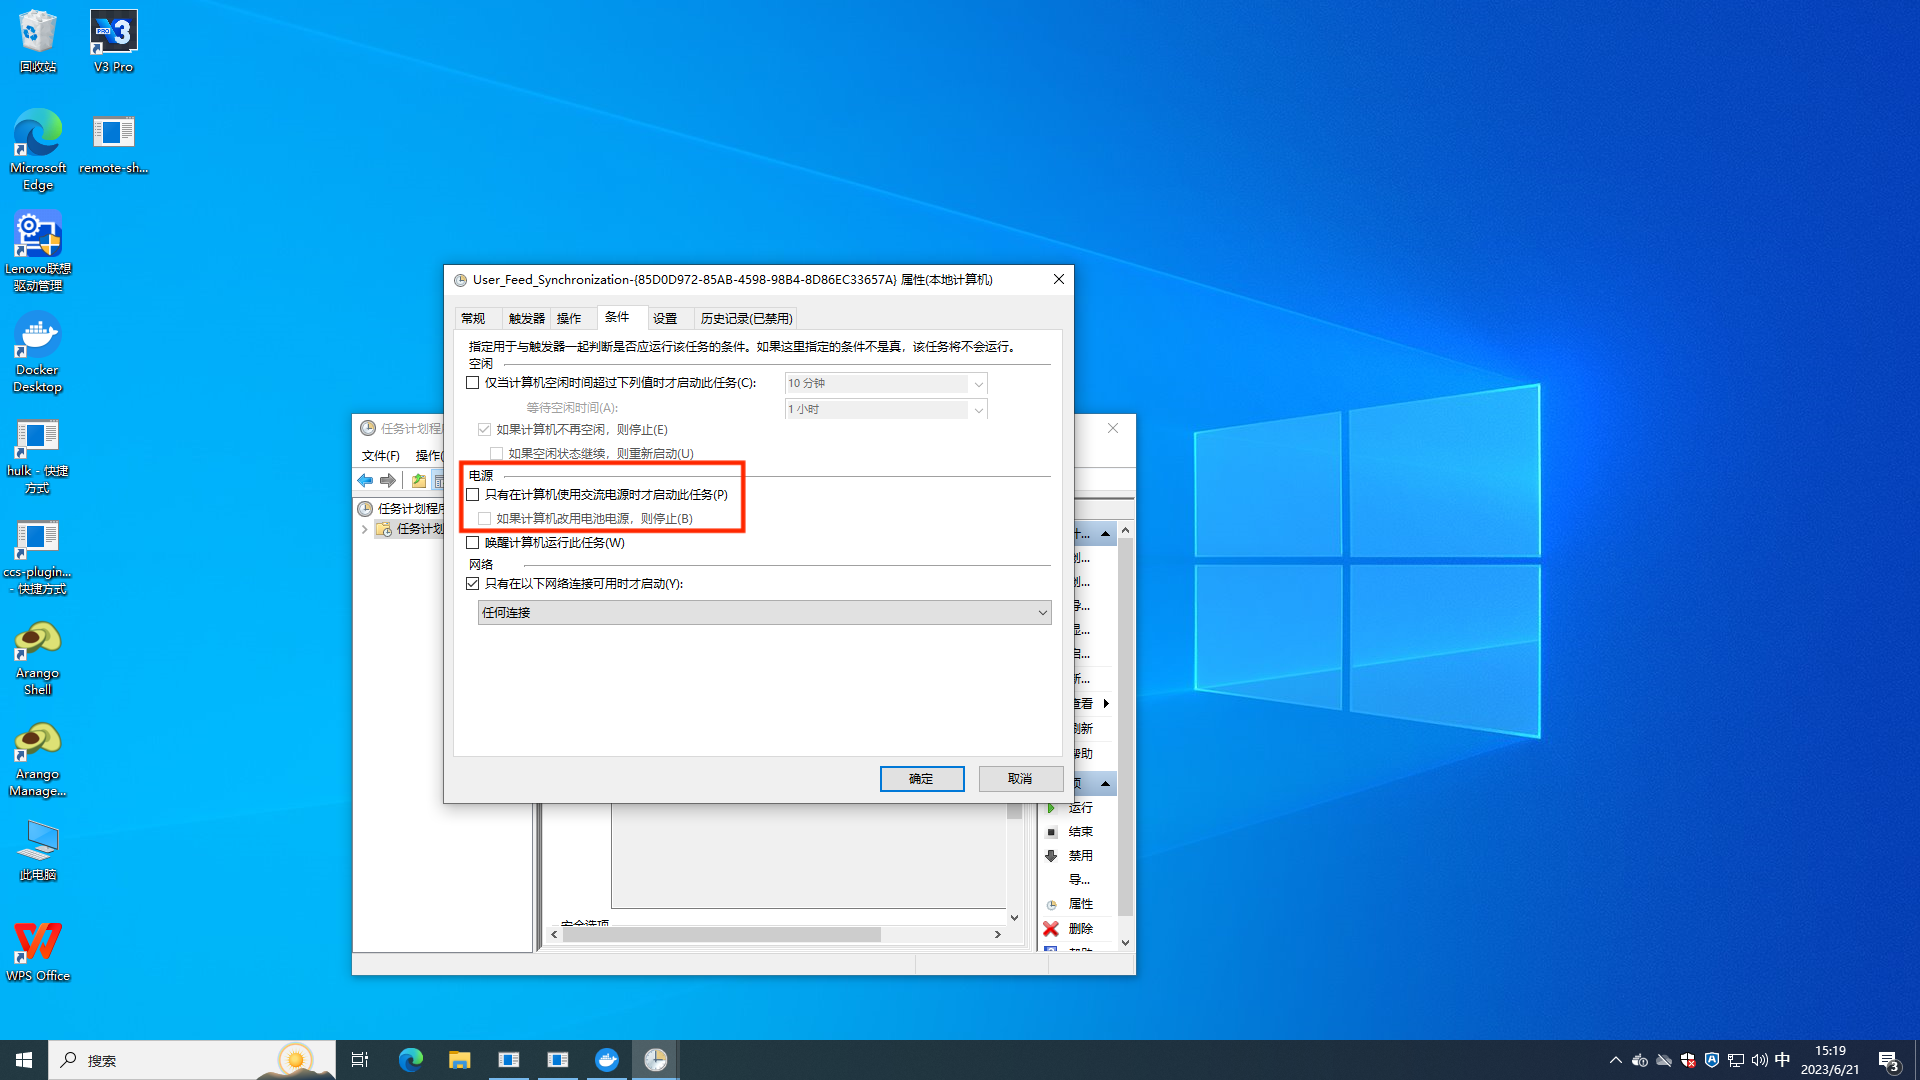
3. If the controlled device is a laptop, it may occasionally not be controllable
If the controlled device is a laptop, and it sometimes cannot be controlled, please check the conditions in the Task Scheduler and ensure that the content highlighted in red is not checked. If it is checked, the service will automatically stop when the laptop is not plugged in, resulting in an inability to control it.