# Frequently Asked Questions
| Document Version | Content Revision | Reviser | Revision Date |
|---|---|---|---|
| V1.0 | Official Release | Wang Yao | 2021-02-05 |
| V1.1 | Added closure of user authentication, reconnected to the database | Wang Yao | 2021-02-22 |
| V1.2 | Added method for updating keys | Wang Yao | 2021-03-23 |
| V1.3 | Added explanation of certificate function and how to configure port certificates on Windows 10 | Wang Yao | 2021-03-23 |
| V1.4 | Multi-window display issue | Zhang Yu | 2021-04-27 |
| V1.5 | Cross-domain configuration, popup shielding time setting | Wang Yao | 2021-08-08 |
# How to Obtain the Software?
Download link: Shanghai Sansi Universal Central Control (opens new window)
The above link allows you to download various system versions of the Xuandao Intelligent Control software (cyberhub). Please download the software suitable for your target device, extract it and install. It is compatible with 64-bit general operating systems on x86 and arm architectures. If you need special versions for MIPS/LoongArch architecture or adaptations for special operating systems, please contact the R&D team for assistance.
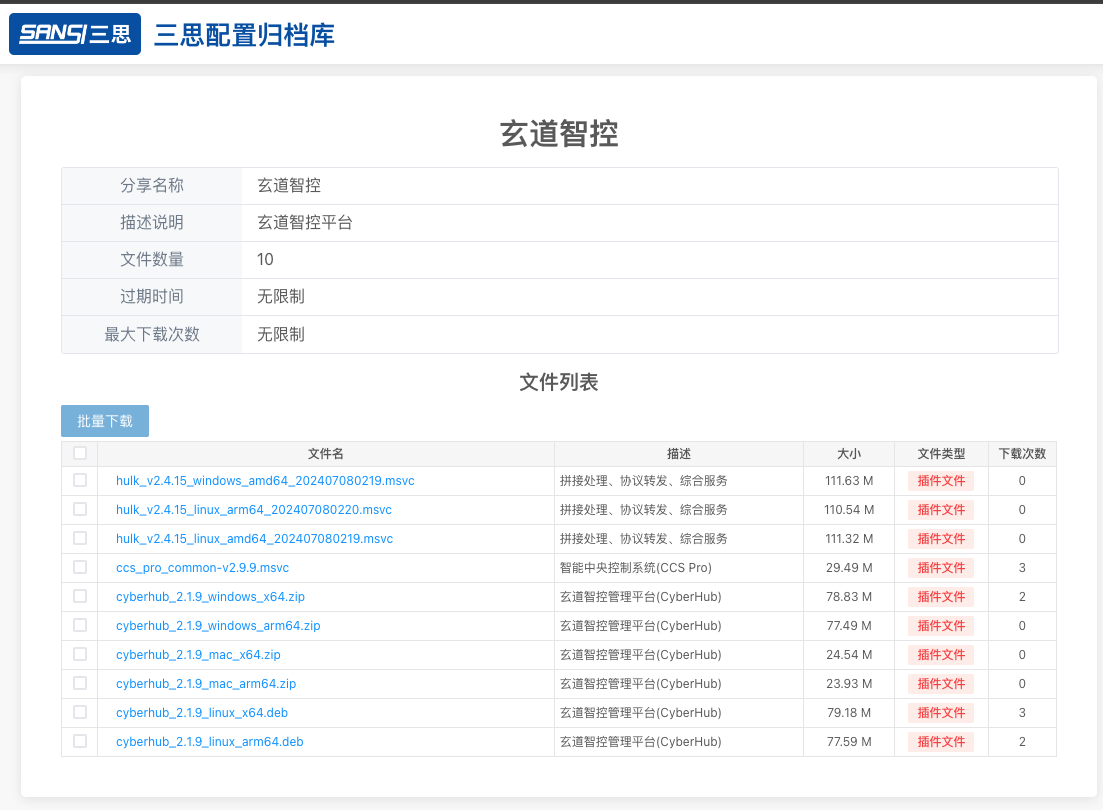
| Program Name | Architecture | Applicable Operating Systems |
|---|---|---|
| cyberhub_x.x.x_windows_x64.zip | x64 | Windows 10 and above |
| cyberhub_x.x.x_windows_arm64.zip | arm64 | Windows 10 and above |
| cyberhub_x.x.x_mac_x64.zip | x64 | MacOS (Intel version) |
| cyberhub_x.x.x_mac_arm64.zip | arm64 | MacOS (M1, M2 versions) |
| cyberhub_x.x.x_linux_x64.deb | x64 | Ubuntu, CentOS, Zhongbiao Kylin, UOS, etc. |
| cyberhub_x.x.x_linux_arm64.deb | arm64 | Ubuntu, CentOS, Zhongbiao Kylin, UOS, etc. |
# Unable to Log In?
If you logged into the system with HTTPS authentication enabled, and then logged in after disabling HTTPS, you may find that you are unable to log in. Please re-enable HTTPS or follow the steps below: 
Reason for the issue: Since the user's sid was previously set in the Cookie under HTTPS, when switching to HTTP mode, the browser read the data set in HTTPS, refused to reset the new Cookie data, resulting in an inability to complete the authentication process normally. Clearing the Cookie data or re-enabling HTTPS authentication can resolve this issue.
Related link:Browsers ignore Set-Cookie response header if we try to set a cookie which was Secure before (opens new window)
# Unable to Add Web Page to Desktop?
On Android tablets, you may not be able to add a webpage to the desktop in Chrome. This could be due to insufficient permissions; you need to enable the permission to add to the desktop by following these steps:
Settings => Permission Management => Google Chrome => Send to Desktop => Enable Send to Desktop Permission
# How to Disable User Authentication Mode?
Check the configuration file located at Sansi/CCS-Platform/config/ccs-server.json in your user directory.
Change true to false to disable user authentication mode. Then restart the software to disable user permission authentication.

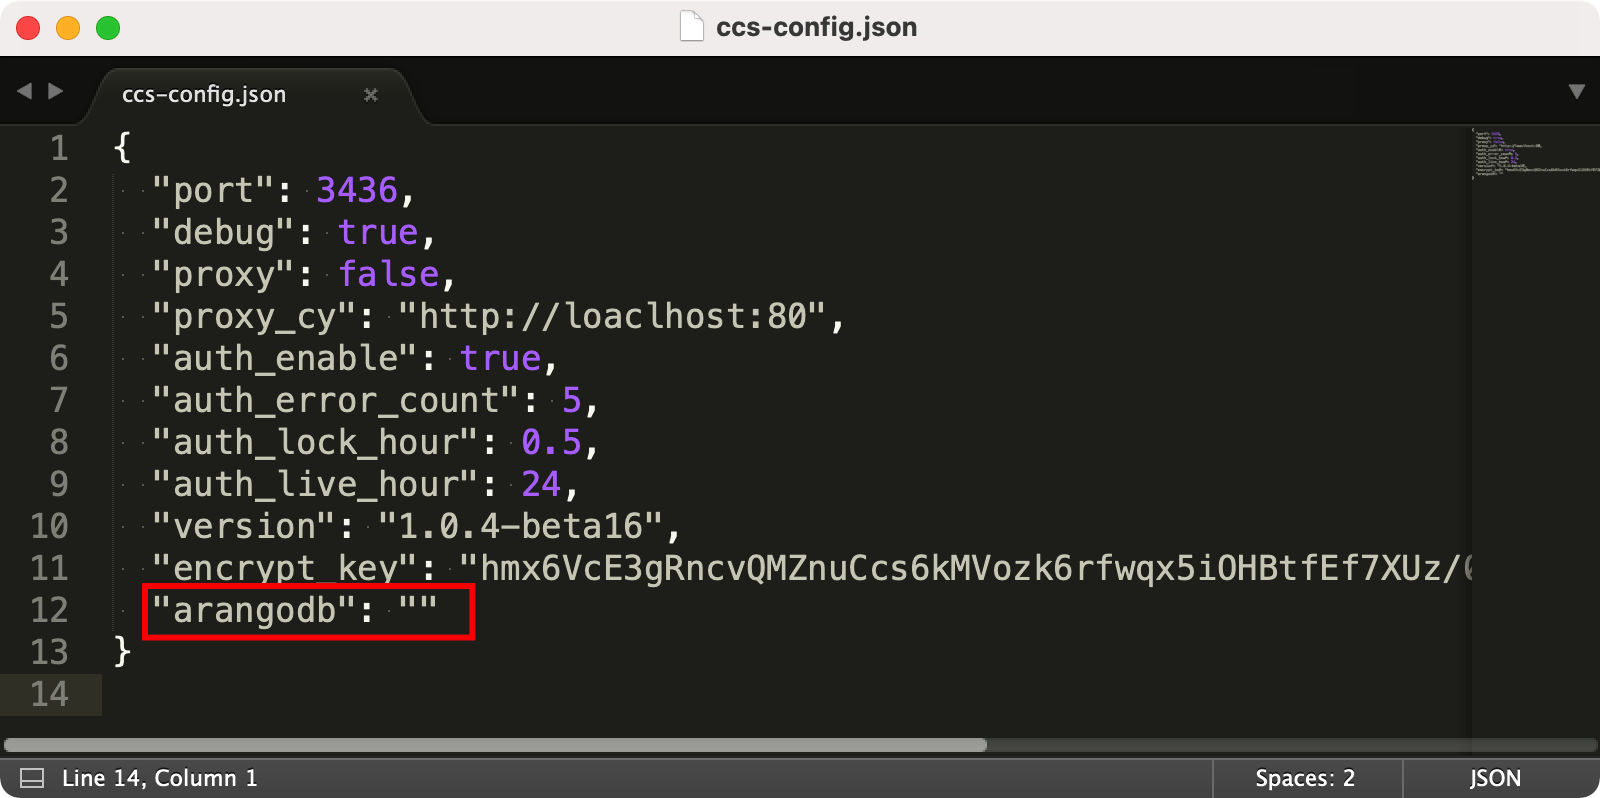
# How to Connect to a New Database?
Check the configuration file located at Sansi/CCS-Platform/config/ccs-server.json in your user directory.
Delete the content next to the arangodb field, adjust it as shown below, and restart the software to re-specify the database.
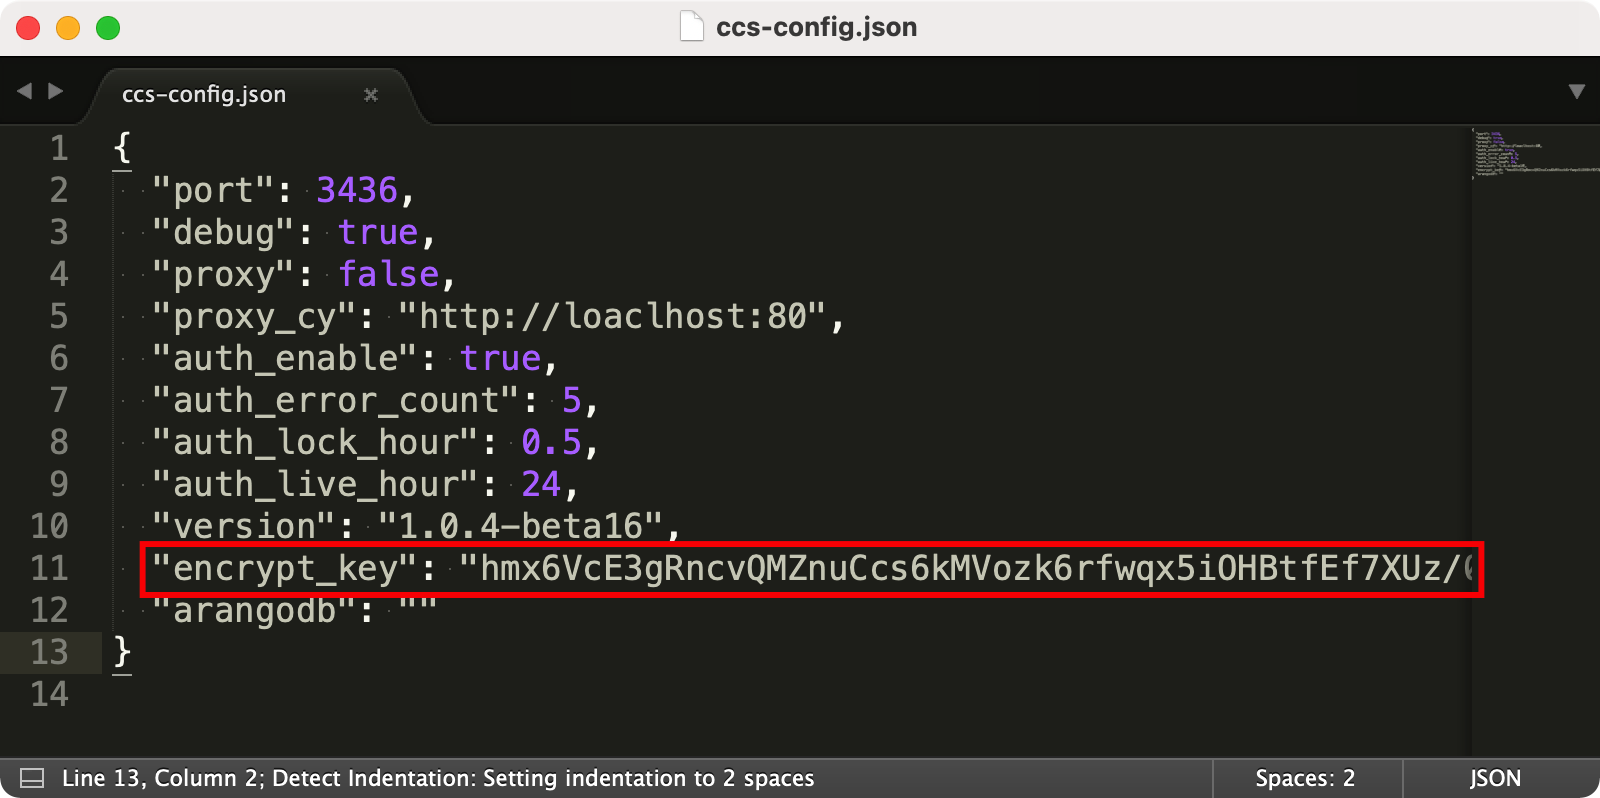
# How to Update User Root Key?
here is an encrypt_key attribute in the configuration file, which is used to generate the encryption key. If you need to adjust the encryption information, simply modify this attribute.
You can set this attribute to any string, or leave it empty. When this attribute is empty, a random string will be automatically generated to fill this attribute.
Note:After updating the user key, you need to re-place the certificate file; otherwise, the certificate may not decrypt properly and could lead to program exceptions.
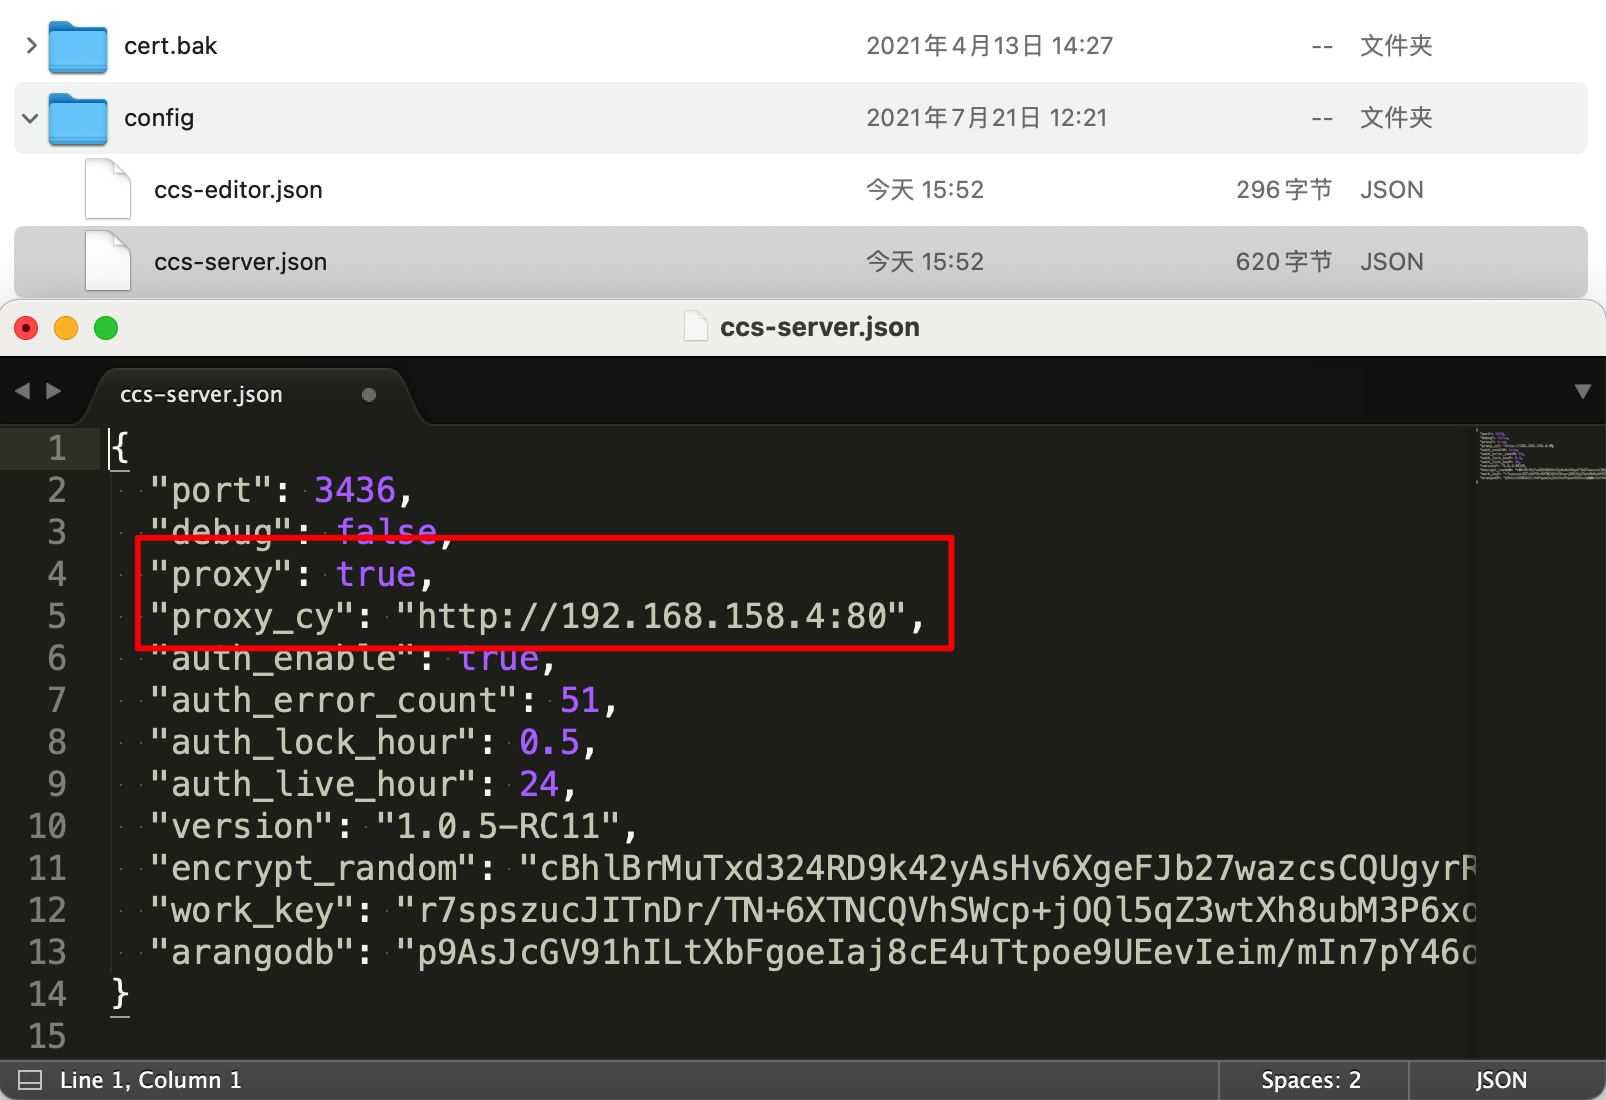
# How to Enable Cross-Domain for Pin Control Services
Check the configuration file located at Sansi/CCS-Platform/config/ccs-server.json in your user directory.
Set proxy to true and specify the address of the pin control service in proxy_cy.
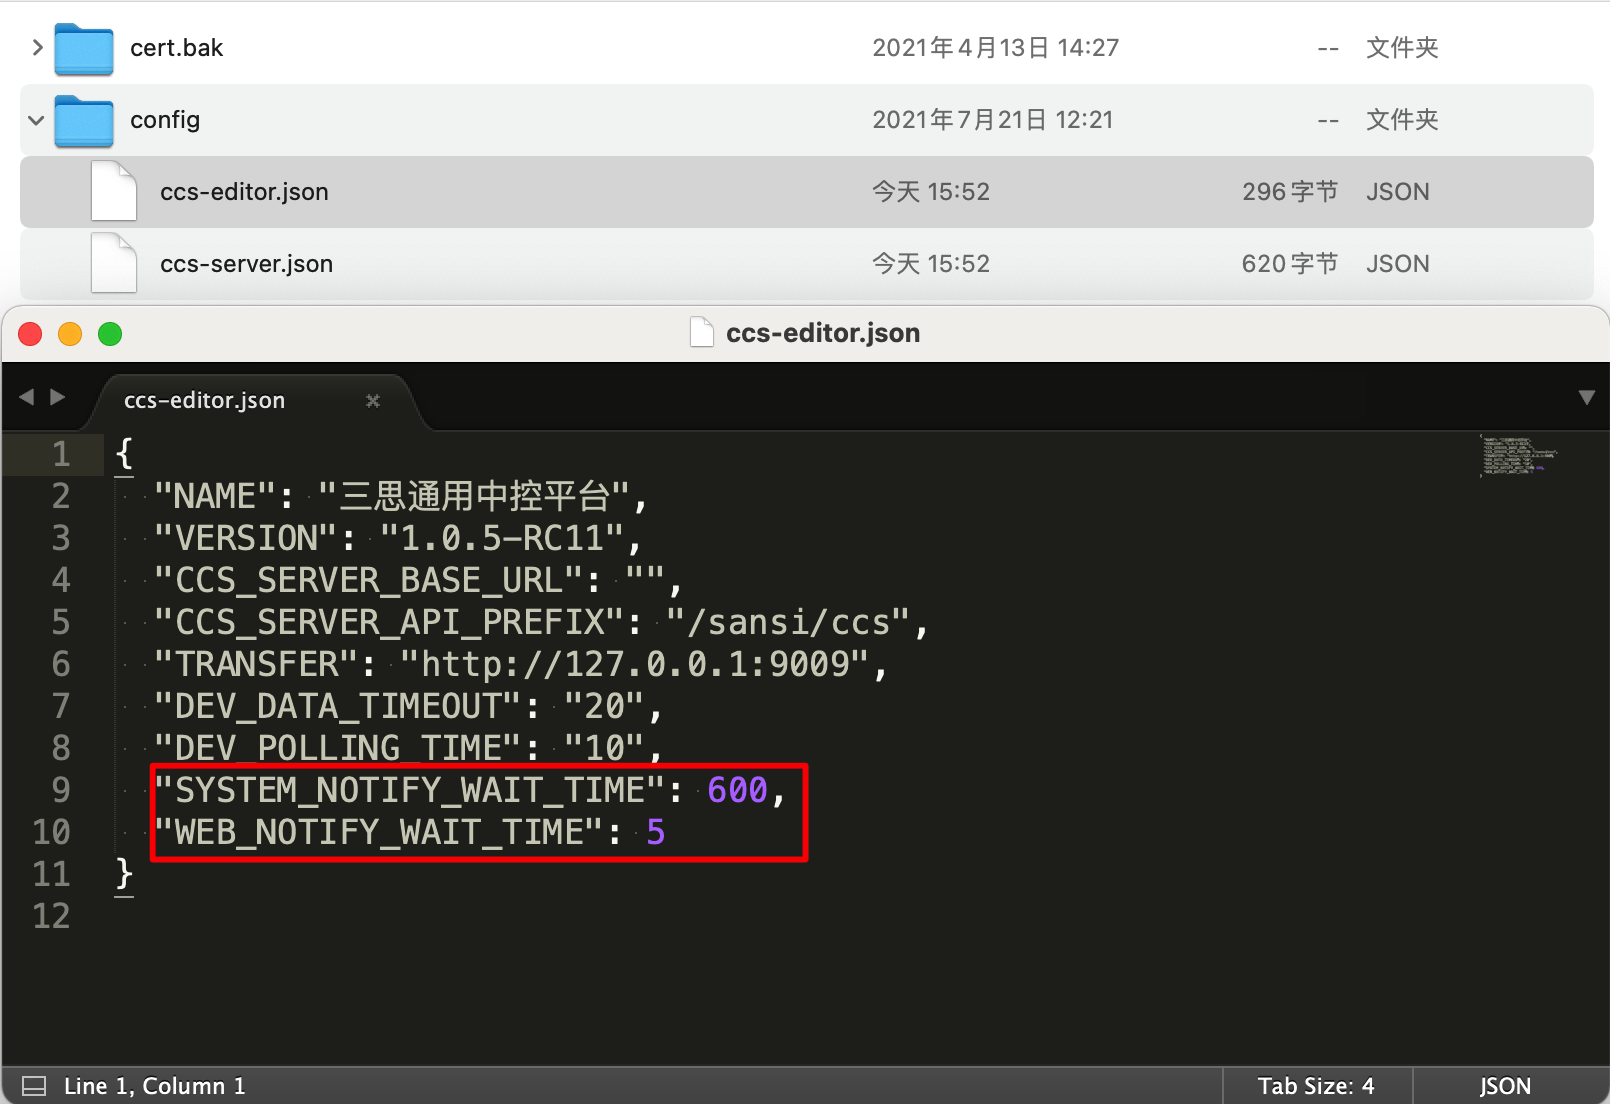
# Modify Popup Shielding Time
Check the configuration file located at Sansi/CCS-Platform/config/ccs-editor.json in your user directory.
When a device fails, users will receive a popup alert. Each time a check is made, a prompt will be issued. If users feel that the prompts are too frequent, they can limit the frequency of popup alerts by setting the popup shielding duration. There are two parameters that can be adjusted:
| Parameter Name | Parameter Type | Parameter Description |
|---|---|---|
| SYSTEM_NOTIFY_WAIT_TIME | number | System-level popup alert frequency, default is 600 seconds, i.e., 10 minutes |
| WEB_NOTIFY_WAIT_TIME | number | WEB webpage popup alert frequency, default is 5 seconds |
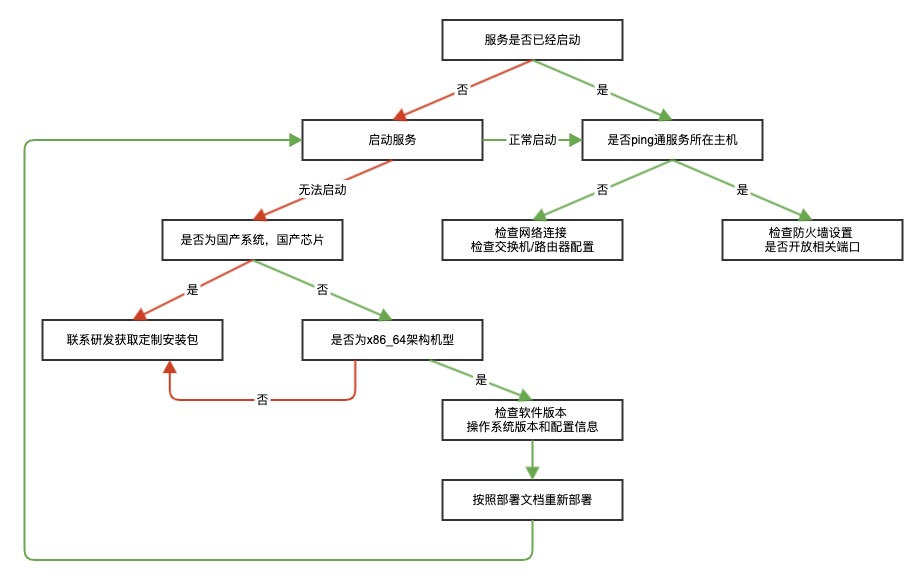
# Unable to Access Services?
If you are unable to access the services, please follow these steps to check:
# SSL Certificate Generation and Usage
# Certificate generation script
# Supports one-click generation of certificates bound to IP, generated in the following formats:
# pfx: Transfer server certificate
# crt + key: Central control server certificate
# pem: ArangoDB server certificate
#
# cer or crt: Client certificate

psw=Sansi@1280
if [ ! -d cert ]; then
  mkdir cert
fi
function makeSSL() {
  NAME=$1
  DNS=$2
  IP=$3
  echo $NAME $DNS $IP
  if [ ! -d "cert/$IP" ]; then
    mkdir "cert/$IP"
  fi
  openssl req -x509 -newkey rsa:4096 -sha256 -days 3650 -nodes -keyout "cert/$IP/$NAME.key" \
    -out "cert/$IP/$NAME.crt" -subj "/CN=$NAME-$IP" -addext "subjectAltName=DNS:$DNS,IP:$IP"

  cat "cert/$IP/$NAME.crt" "cert/$IP/$NAME.key" >"cert/$IP/$NAME.pem"

  openssl x509 -in "cert/$IP/$NAME.crt" -out "cert/$IP/$NAME.cer" -outform der
  openssl pkcs12 -export -inkey "cert/$IP/$NAME.key" -in "cert/$IP/$NAME.crt" -passout pass:"$psw" -out "cert/$IP/$NAME.pfx"
  echo "end ssl"
}

echo -n "Please enter the specified IP address (default is localhost):"
read ip
echo "ip = $ip"
if [ "$ip" = "localhost" ]; then
  makeSSL localhost localhost 127.0.0.1
elif [ "$ip" = "127.0.0.1" ]; then
  makeSSL localhost localhost 127.0.0.1
elif [ "$ip" = "" ]; then
  makeSSL localhost localhost 127.0.0.1
else
  makeSSL SANSI_CCS ccs.sansi.com "$ip"
fi
# Windows 10 Configure Port Certificate
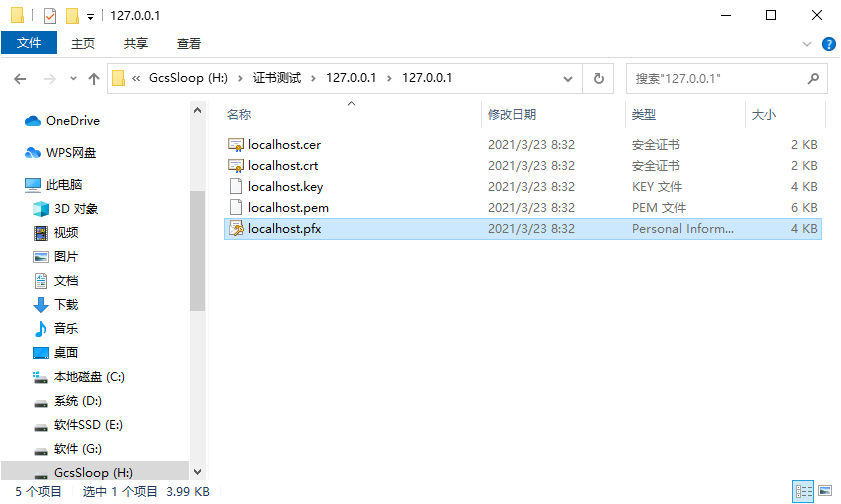
To install a certificate for the Windows service port, the installation file must carry the certificate and private key. Here the process is illustrated using a pfx format certificate.
Note:The CCS_Transfer service configuration SSL needs to be bound via the service port.
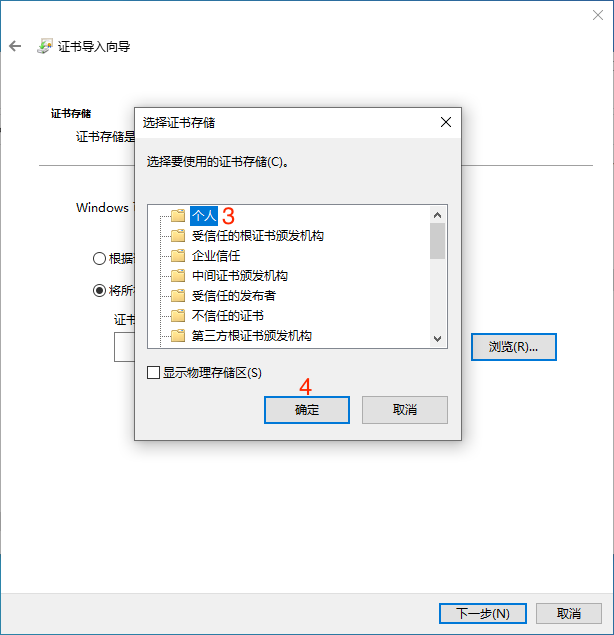
If you encounter SSL certificate addition failed, error: 1312 The specified login session does not exist. (opens new window) during installation, please check if the certificate installation location is in Local Computer -> Personal.
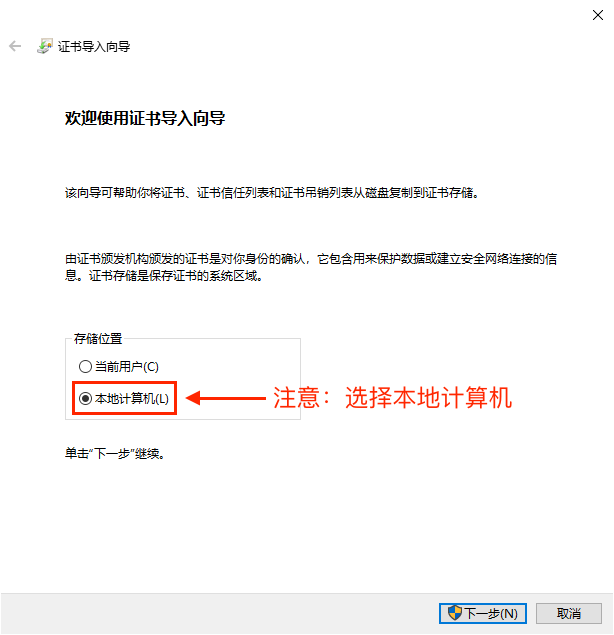
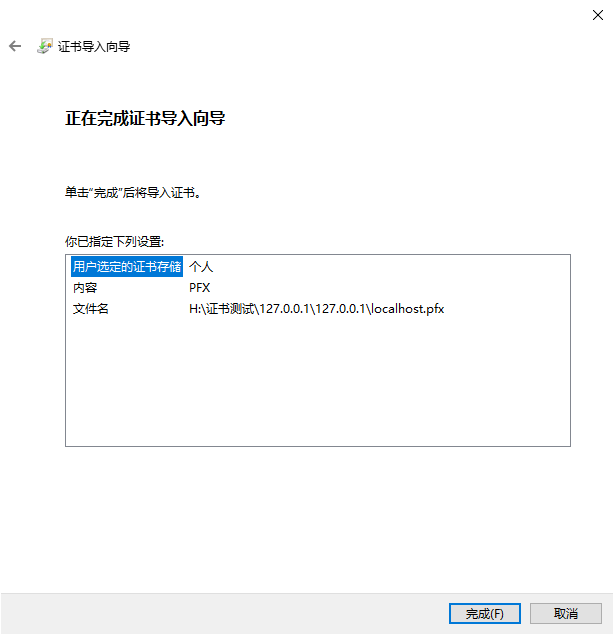
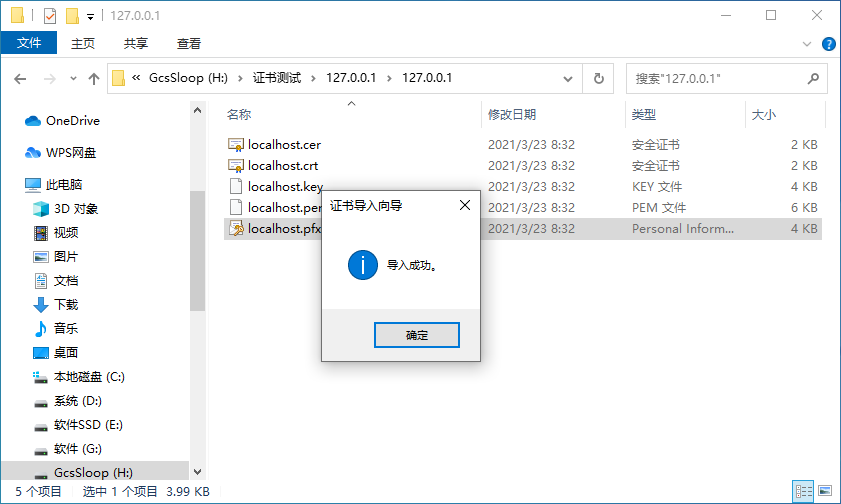
# 1. Install Certificate
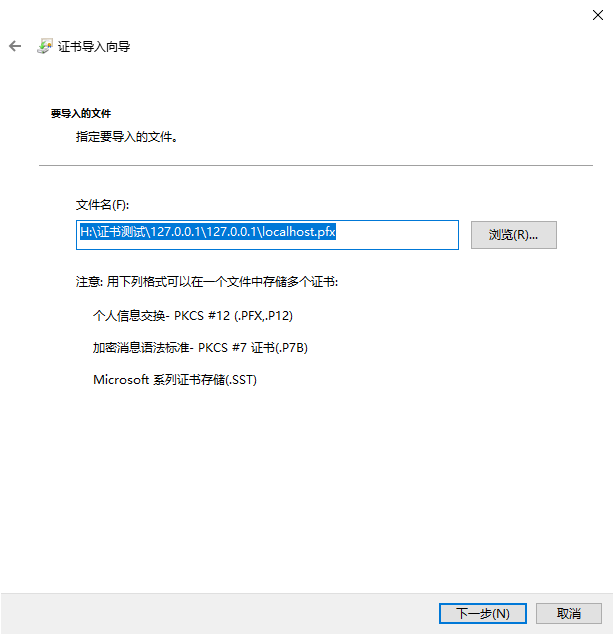
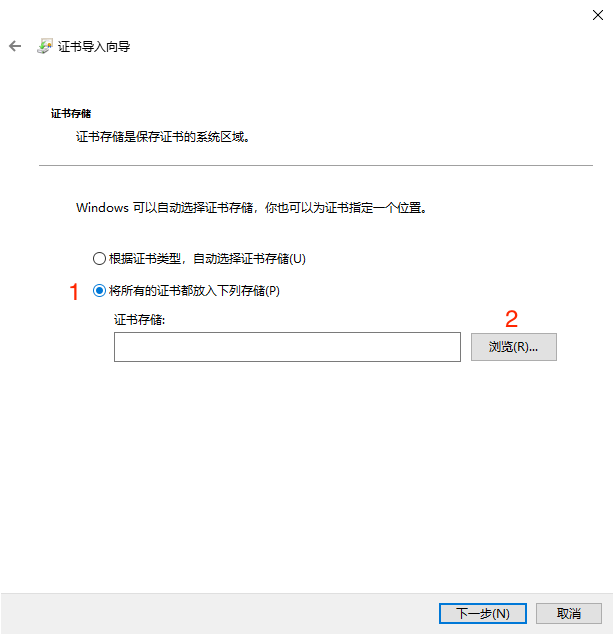
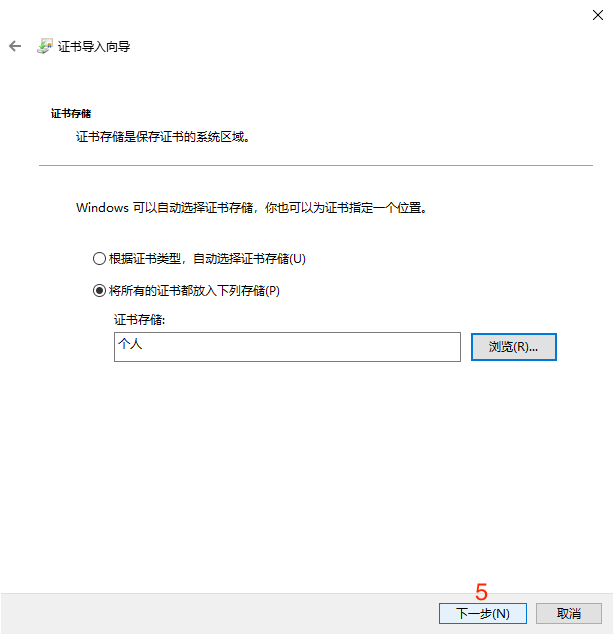
Double-click the pfx file to enter the installation program, and then follow the installation steps.
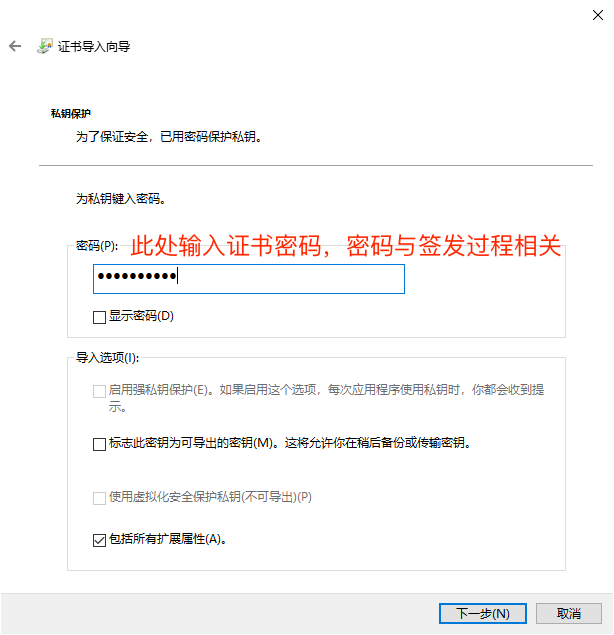
The default password for the certificate issued by Sansi is Sansi@1280。
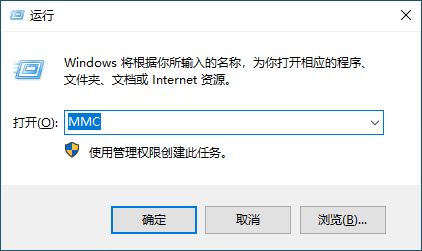
# 2. View Certificate Fingerprint
Next, to check the certificate fingerprint and see if the certificate has been installed in the correct location.
First, use the shortcut key Win + R o open the Run window, enter MMC to open the console management program.
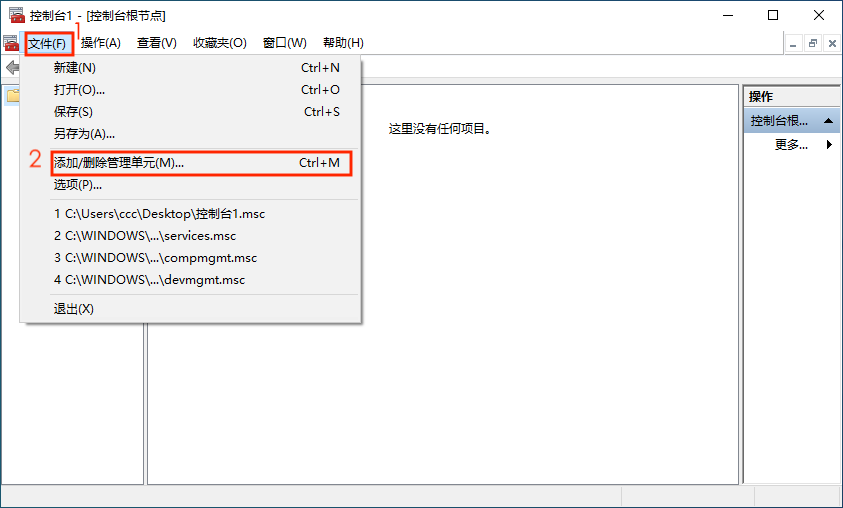
After opening the console management program, go to the top right corner and select File -> Add/Remove Snap-in

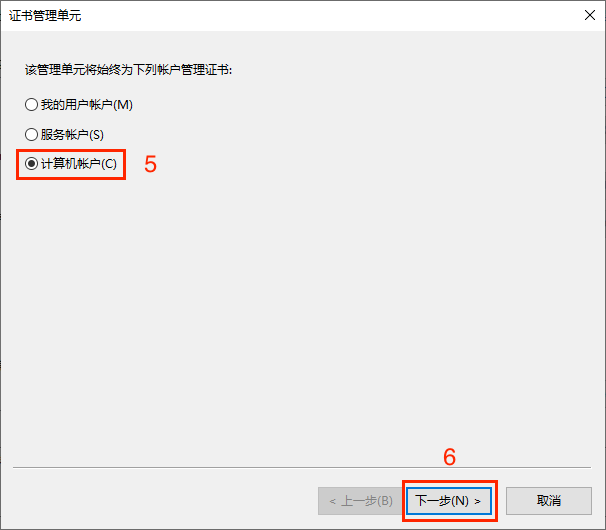
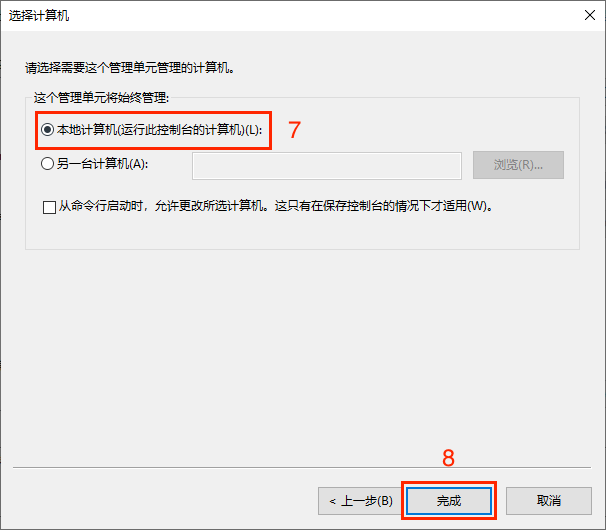
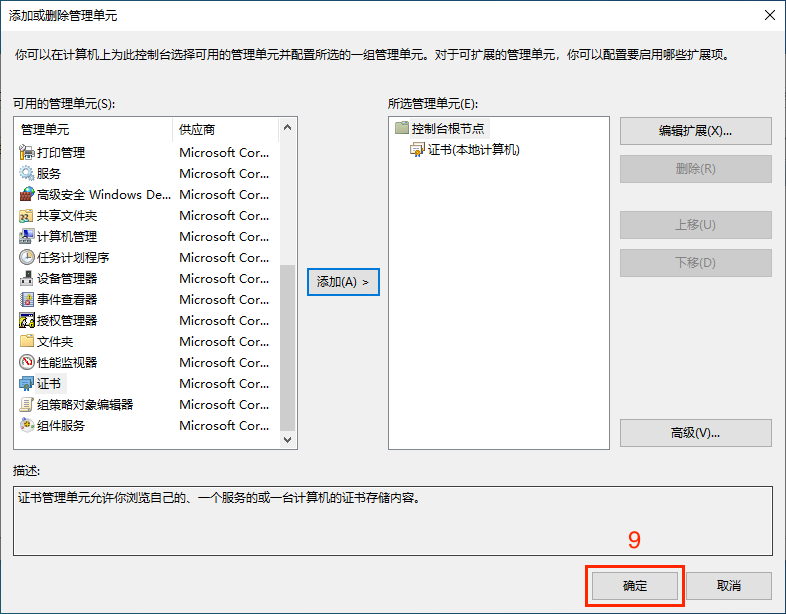
After adding the certificate snap-in, check if the certificate has been installed in the corresponding directory. Select Certificates -> Personal -> Certificates to view, as shown in the figure below it indicates that the certificate has been installed correctly. Double-click the certificate to view the certificate details.
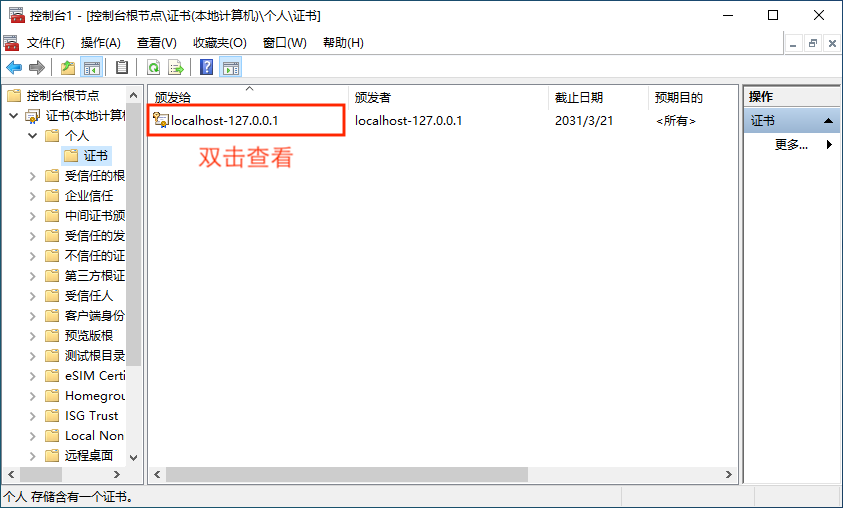
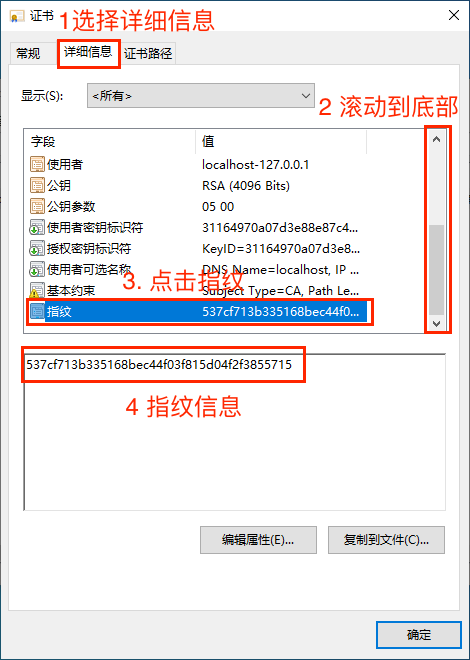
Record the fingerprint information for later use.
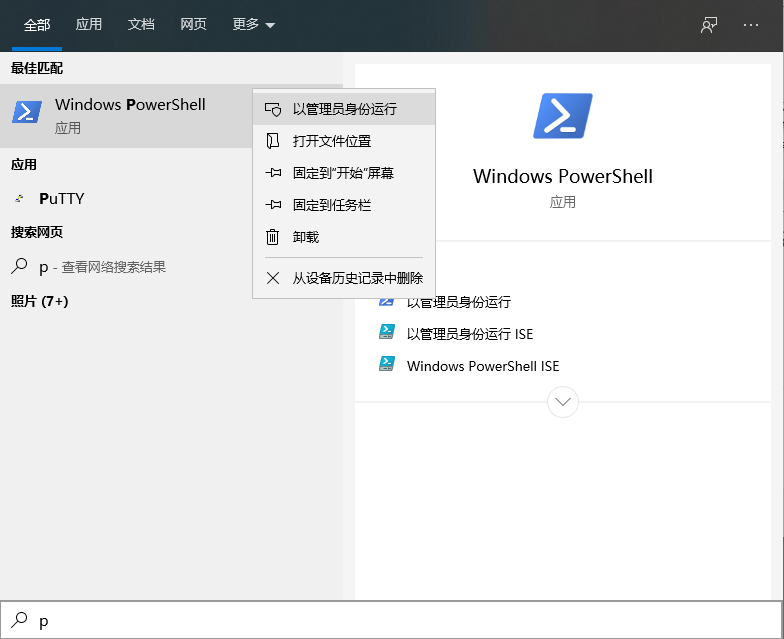
# 3. Certificate Binding
Run PowerShell with administrator privileges.
Then use commands in PowerShell to bind or unbind the port. The process is as follows.
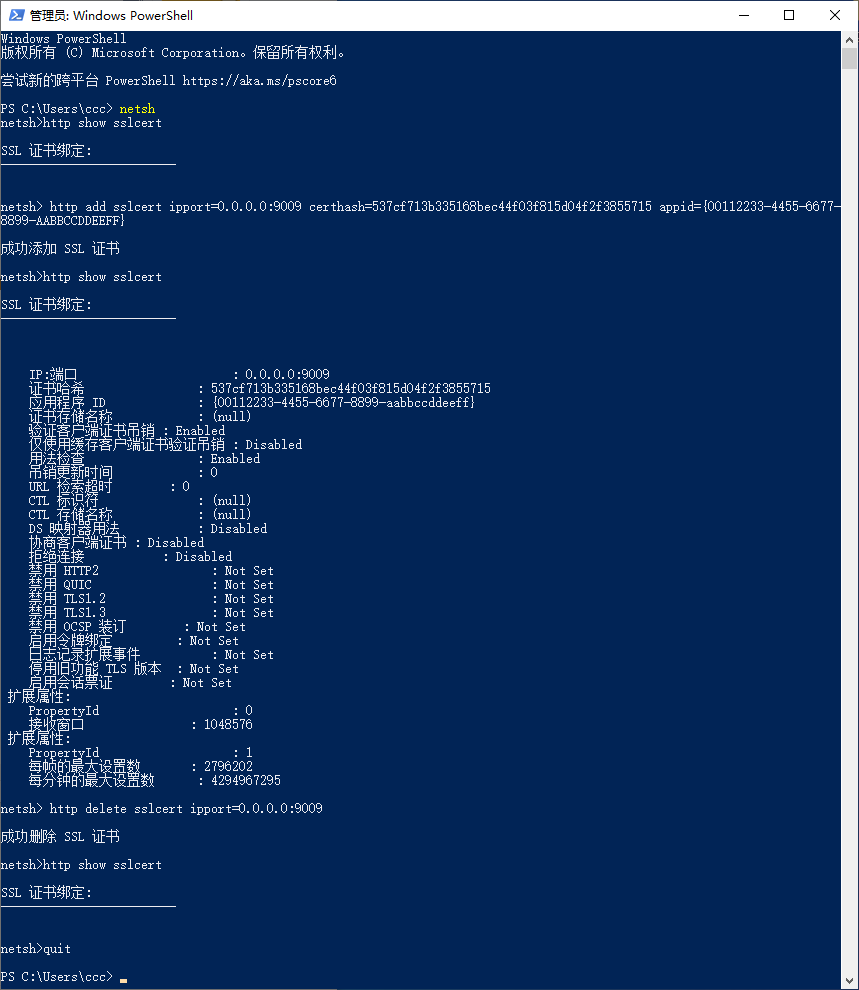
Relevant commands:
PS C:\Users\ccc> netsh 													# Enter network configuration
netsh> http show sslcert												# View port binding status
netsh> http add sslcert ipport=0.0.0.0:9009 certhash=537cf713b335168bec44f03f815d04f2f3855715 appid={00112233-4455-6677-8899-AABBCCDDEEFF} 										# Bind port, remember to replace certhash with the certificate fingerprint
netsh> http delete sslcert ipport=0.0.0.0:9009 	# Unbind
netsh> quit																			# Exit network configuration
# Multi-window Display Issue
Some models of centralized splicing processors support a maximum of 8 windows for single output signals, and multiple windows may not display.
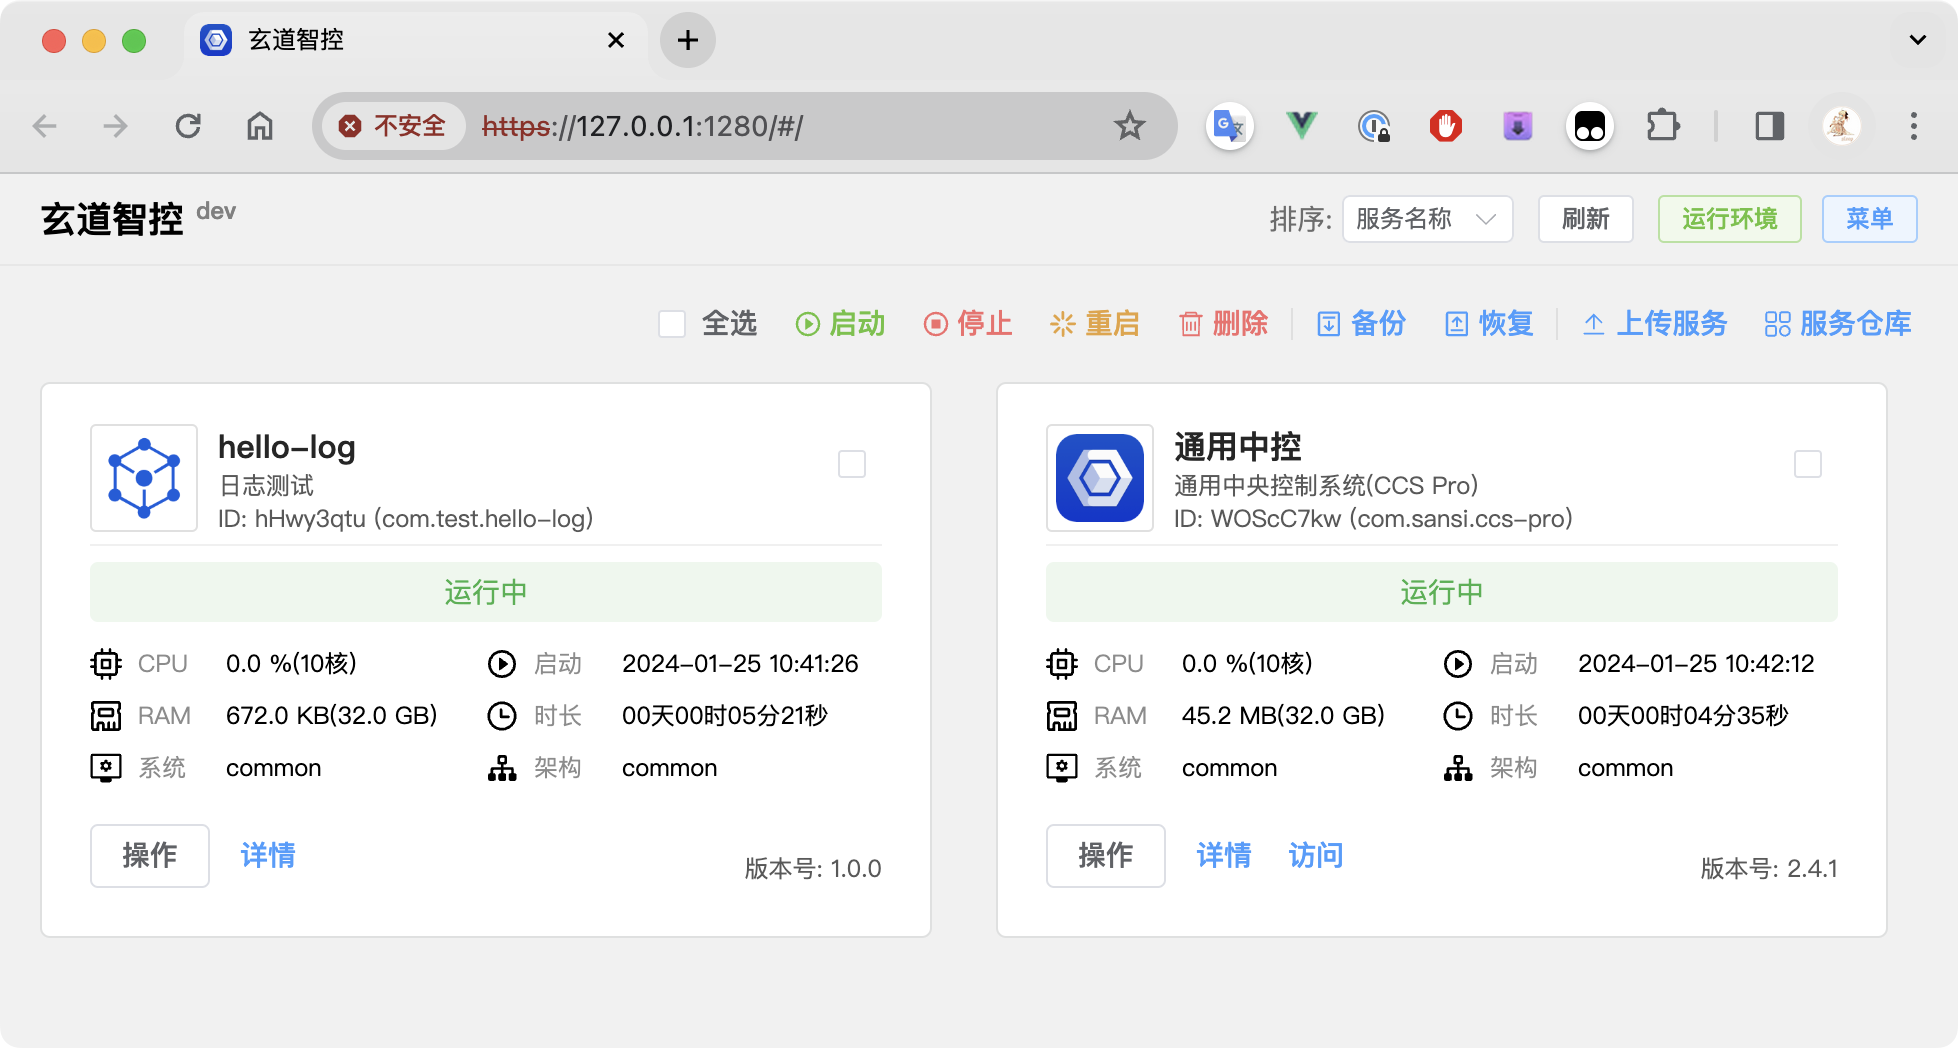
# Logs Not Showing for All Services?
Reason for the issue: The HTTPS certificate is not secure, leading to WSS being unable to retrieve log information.
# Solution 1: Disable HTTPS, as follows
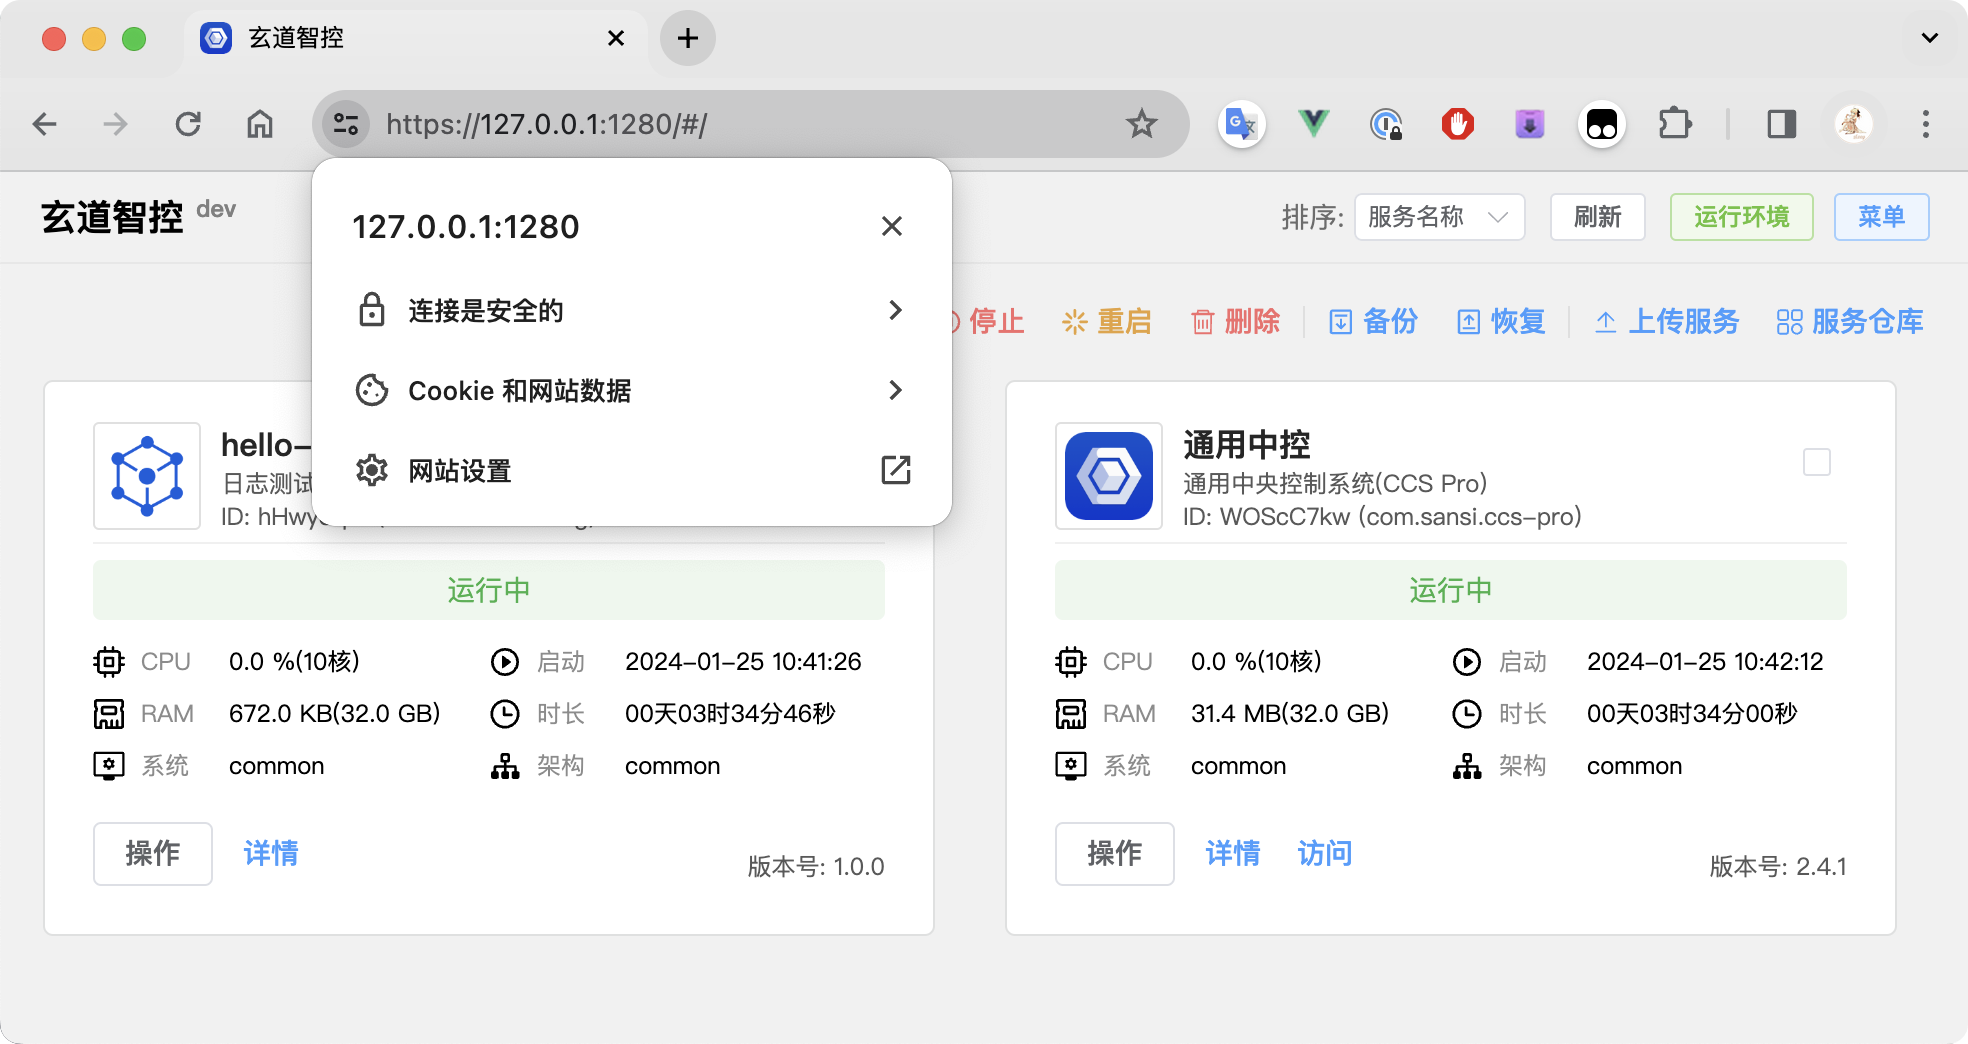
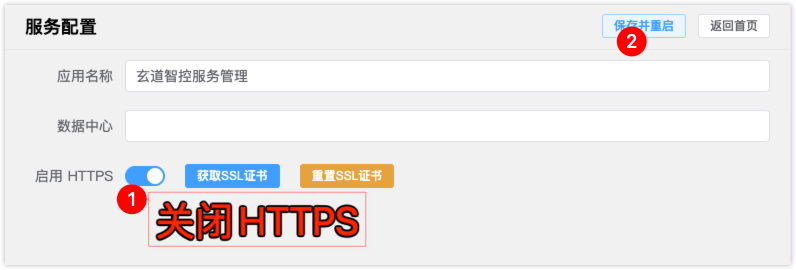
- Click the 【Menu】 button in the upper right corner, and select 【Service Settings】.
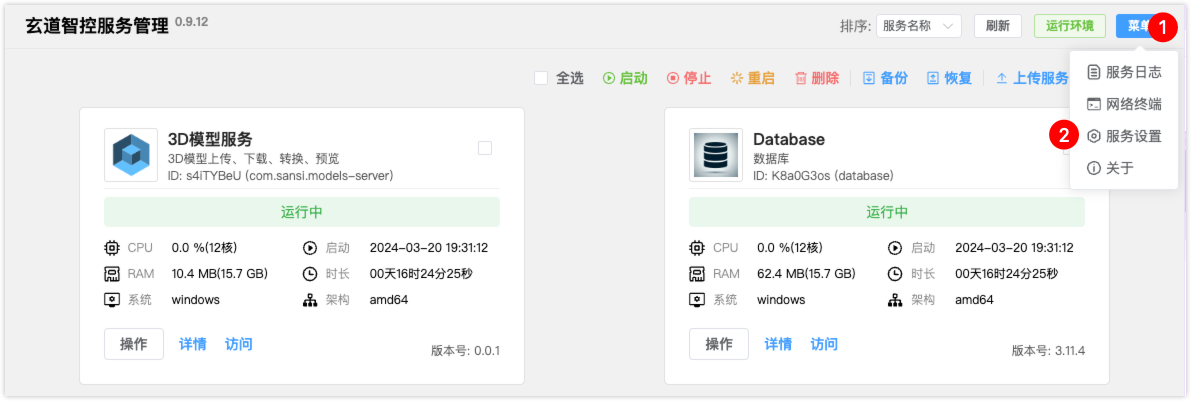
- In the pop-up page, turn off 【HTTPS】, save and restart.
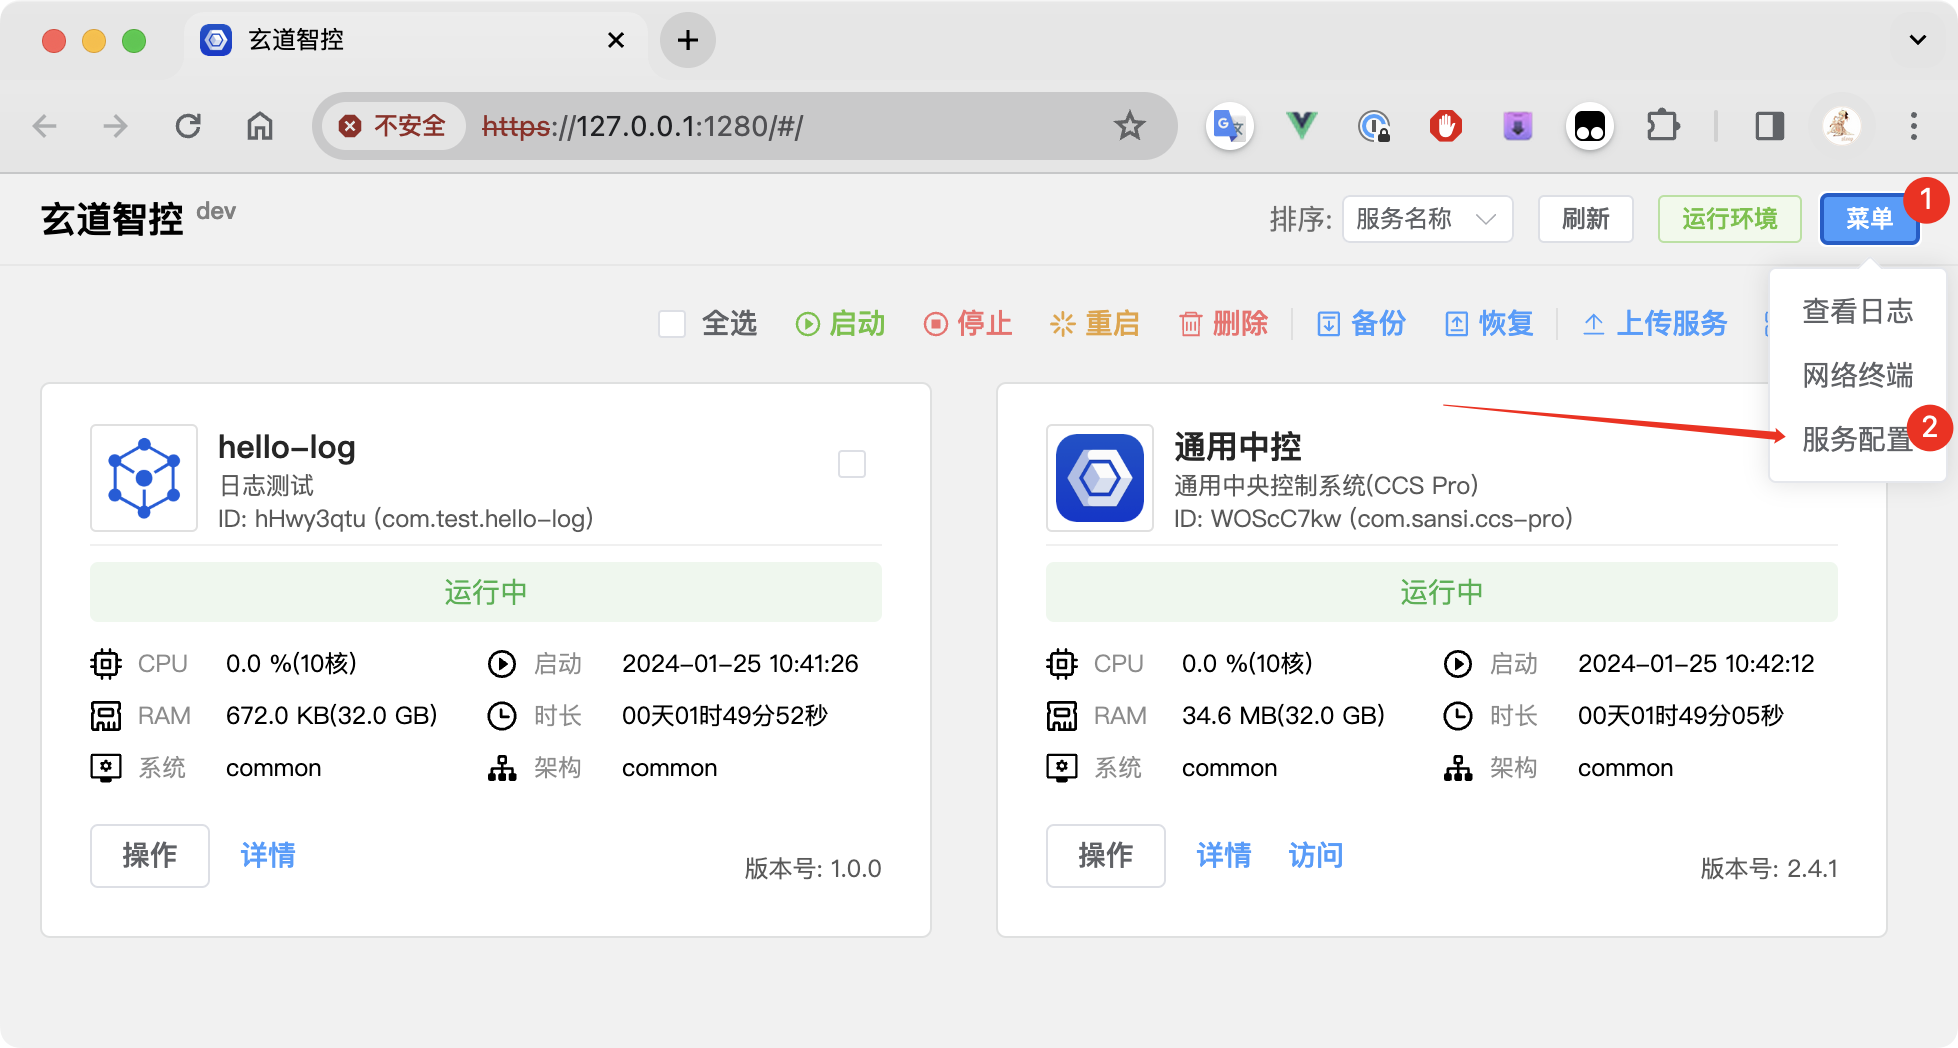
# Solution 2: Import HTTPS Certificate
# Install HTTPS Certificate
# ⚠Note: Starting from version 0.9.4, HTTPS is supported by default. After enabling HTTPS, the access address will be https://127.0.0.1:1280.
The certificate is generated dynamically, meaning that each host will generate a certificate based on its own IP list. Therefore, to avoid errors when accessing different hosts, different certificates must be installed.
Since a self-signed certificate is used, the first access from the browser will result in an error with a warning message. At this point, click the “Advanced” button as indicated by the red arrow.
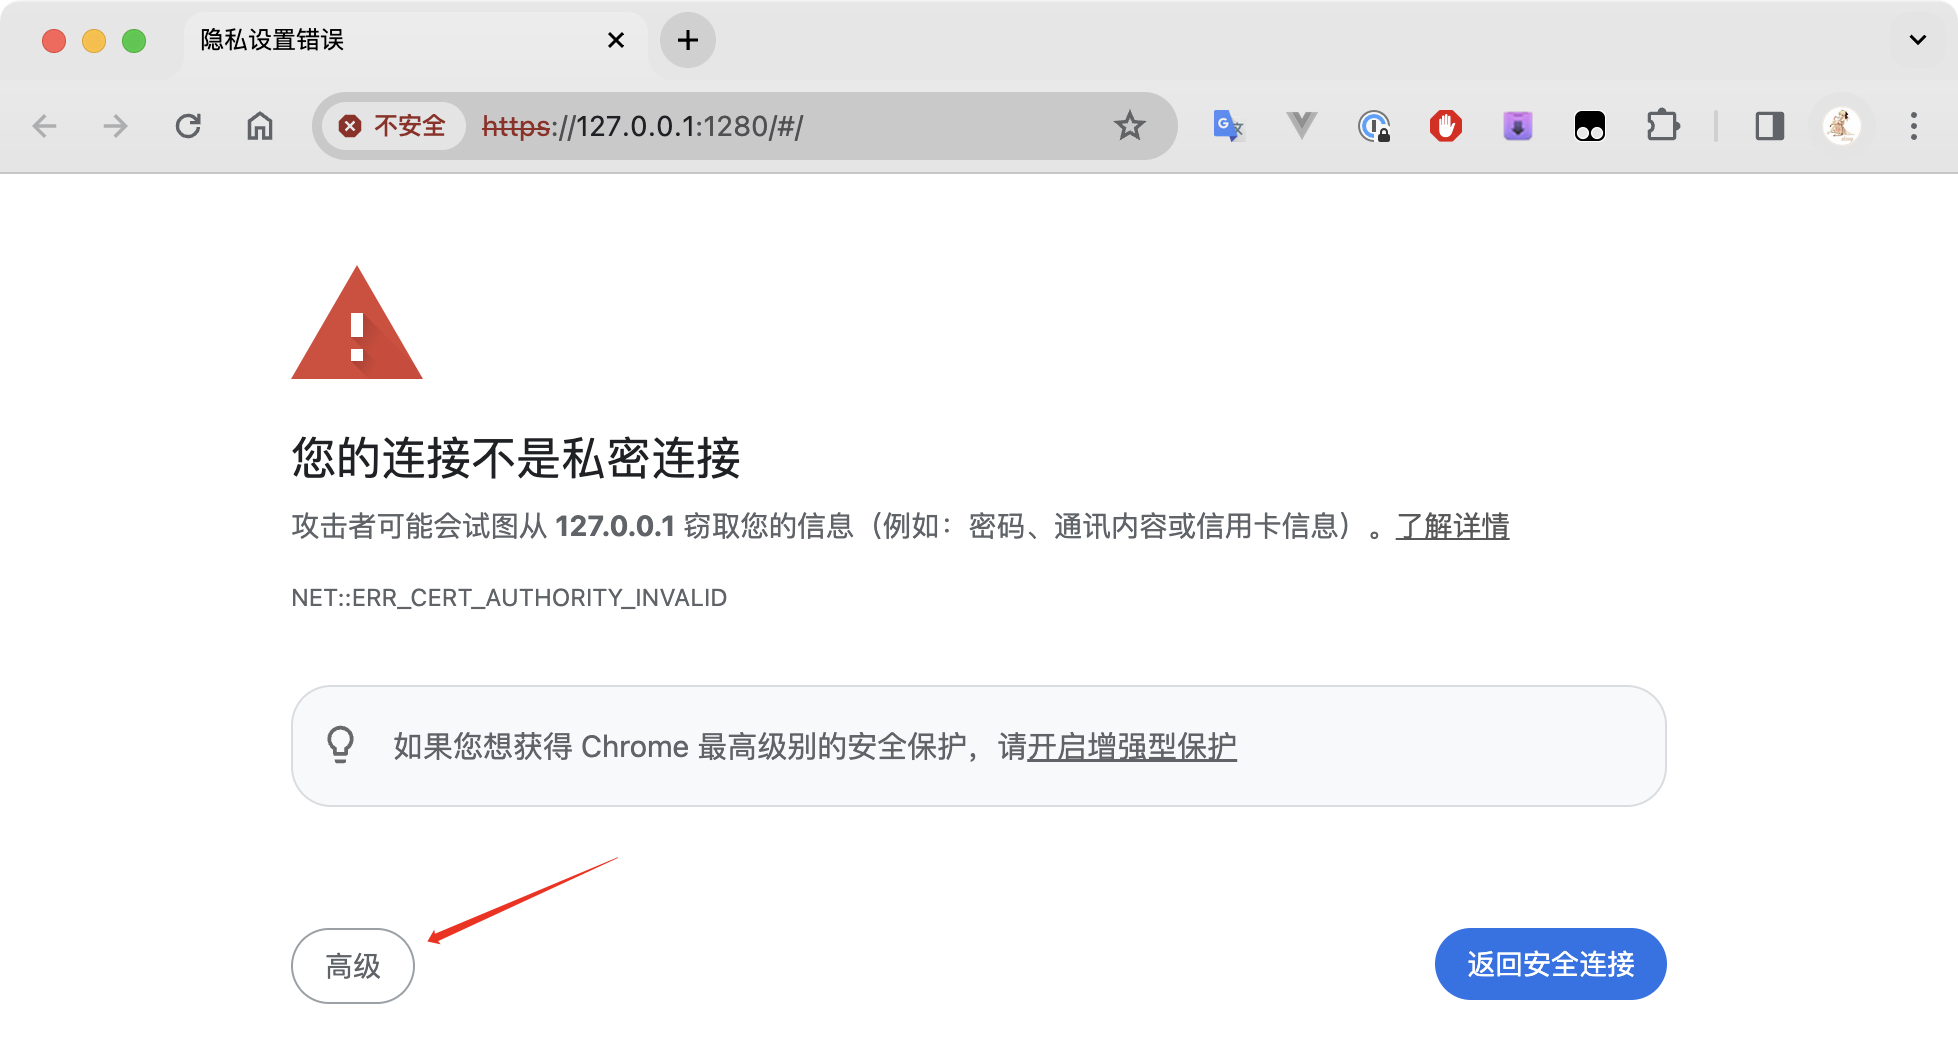
Click the link to continue to the page.
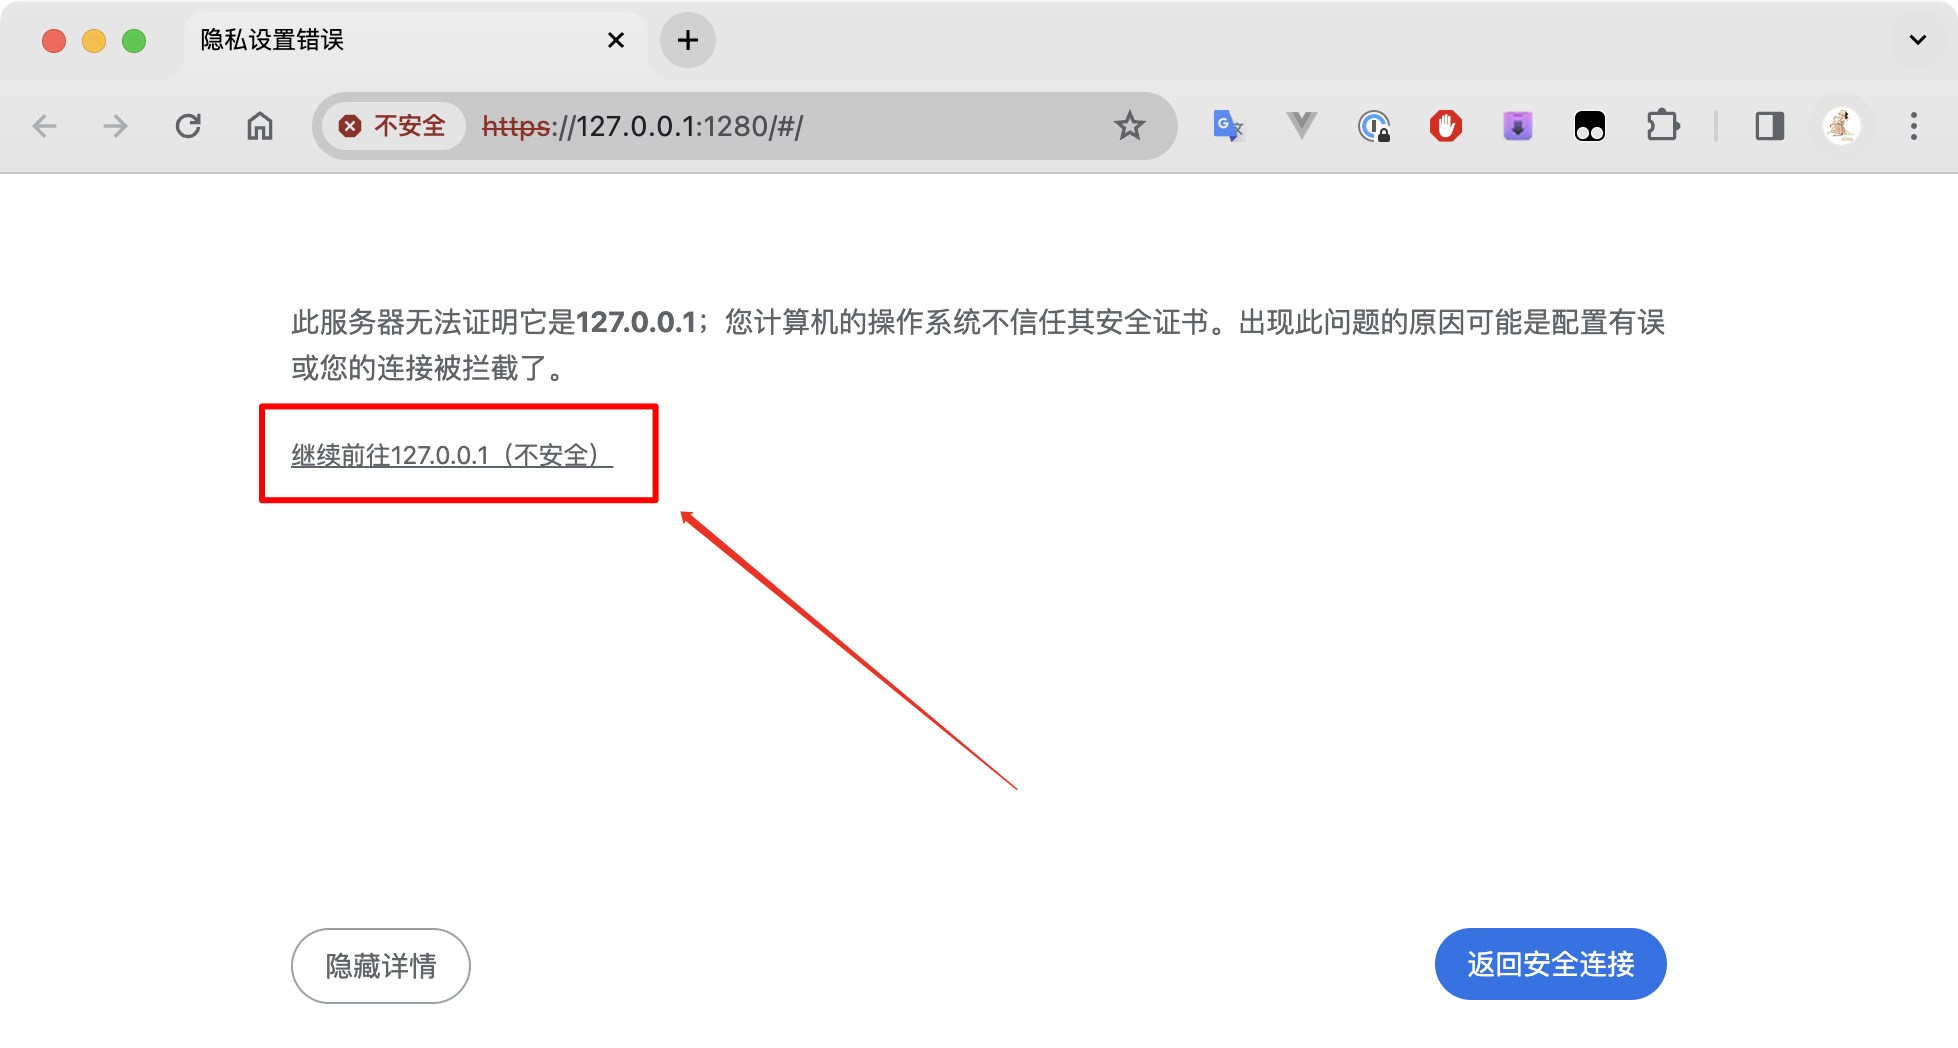
After continuing, you can see the page, but it will still have errors.
At this point, you need to obtain the certificate through the menu function. Click on the menu in the upper right corner to enter the service configuration.
Use the function to obtain the SSL certificate to get the currently used certificate.
⚠Note:Resetting the certificate will generate a brand new certificate, which will cause previously installed certificates to become invalid. In most cases, please do not reset the certificate.
If the server's IP address changes, you can use the reset function to regenerate the certificate.

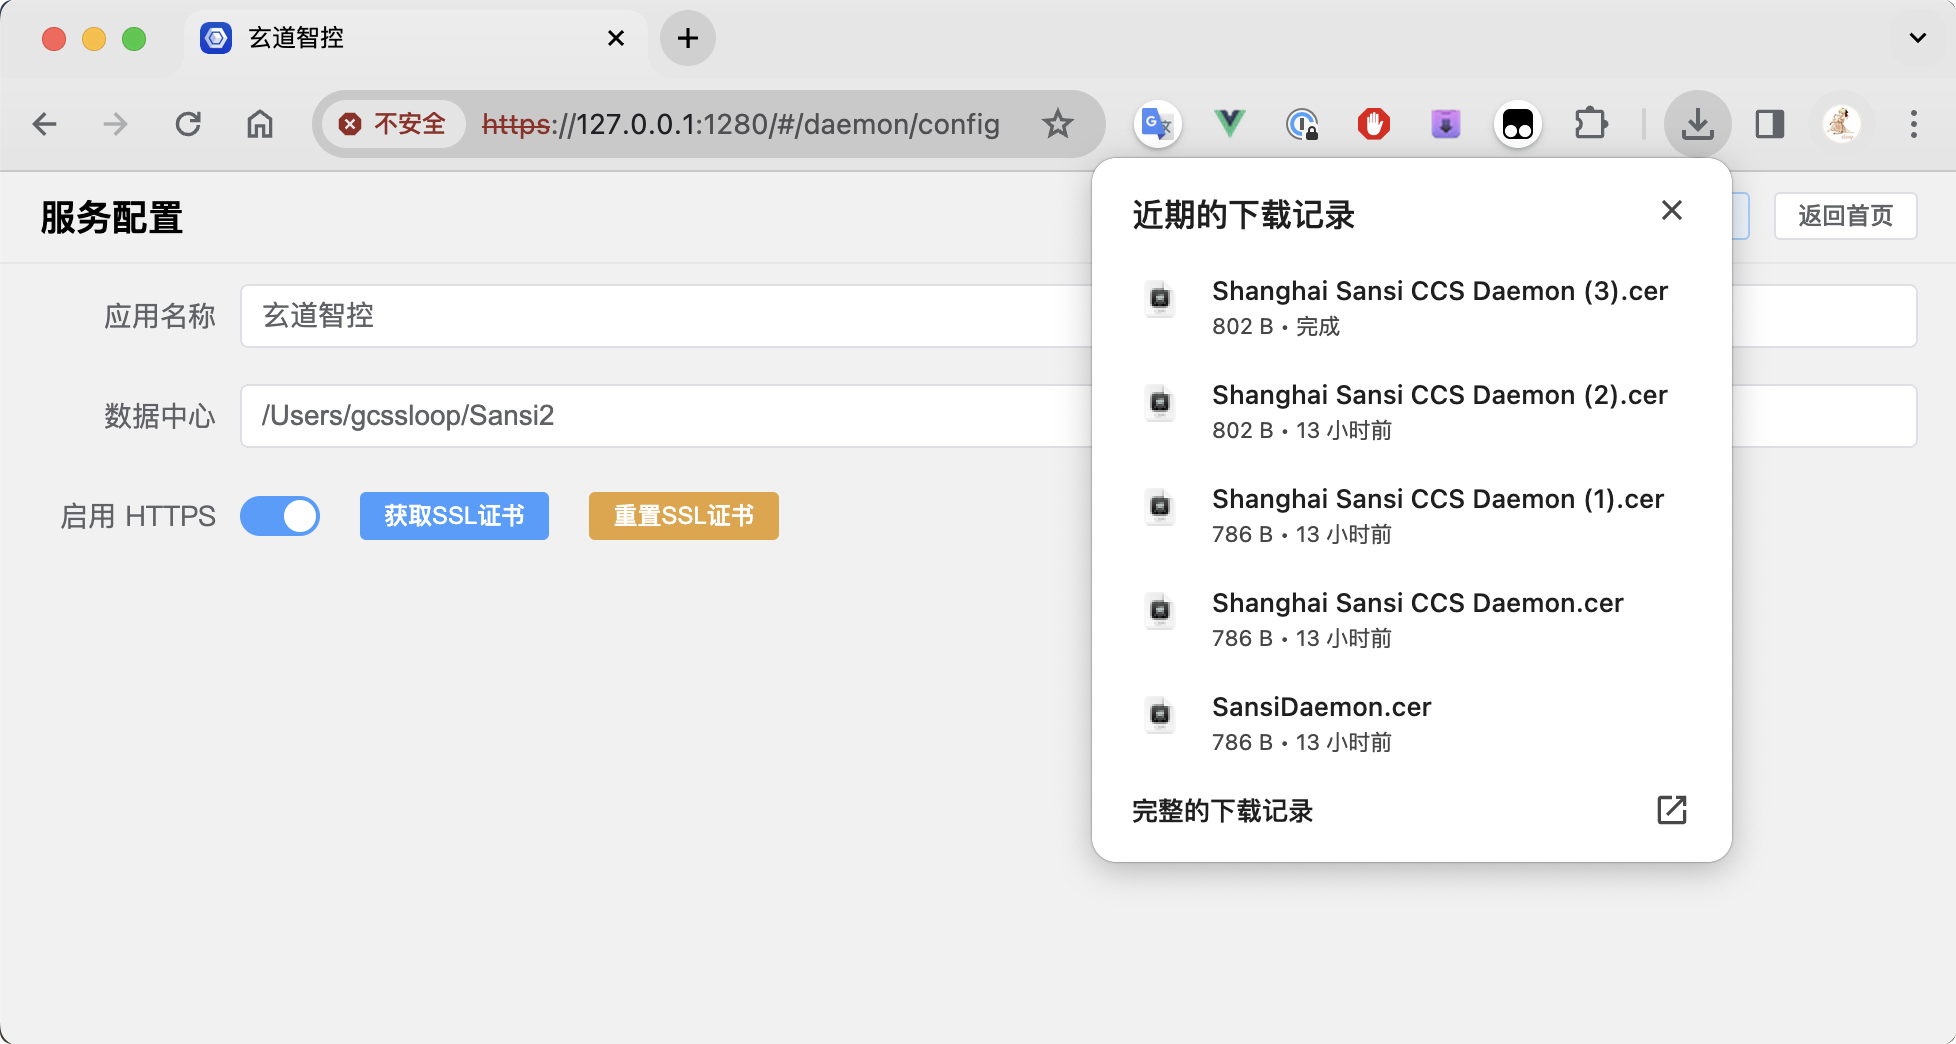
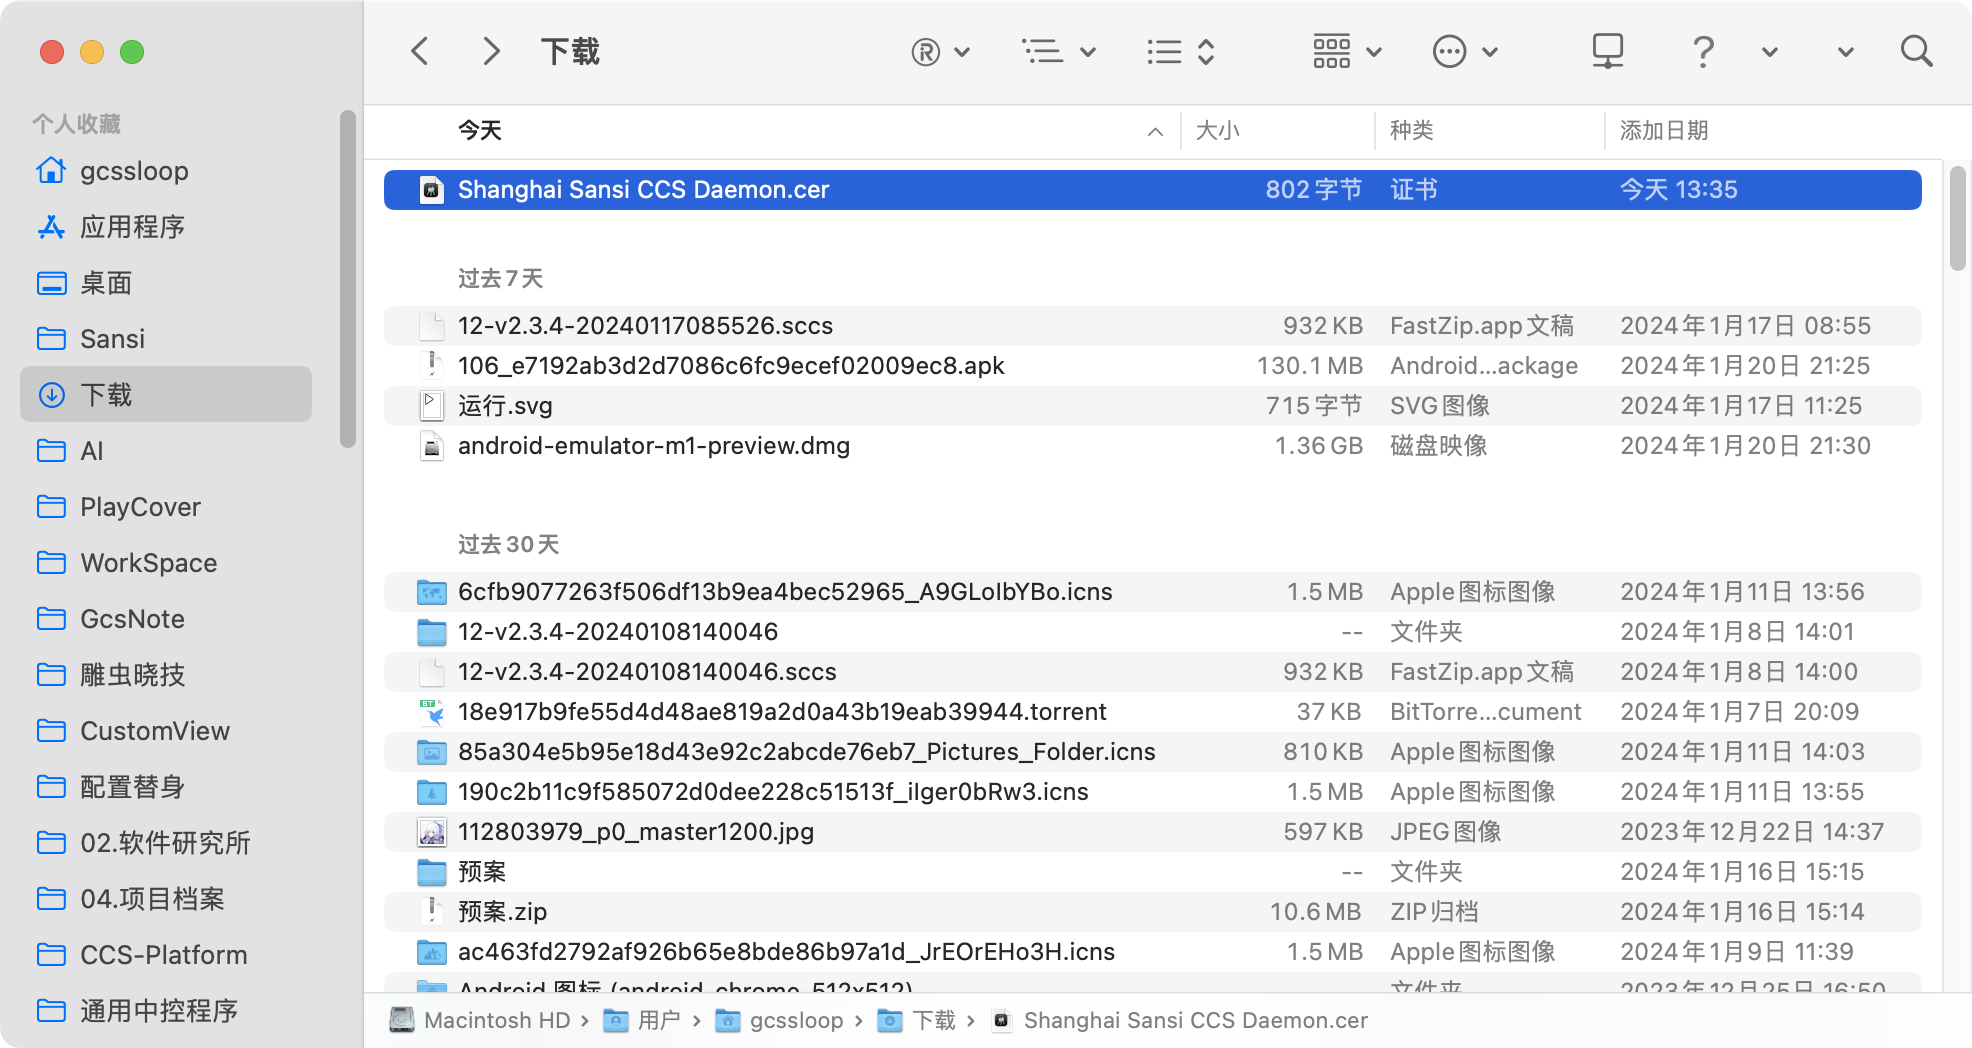
After clicking download, you will find a cer file in the browser's download directory.
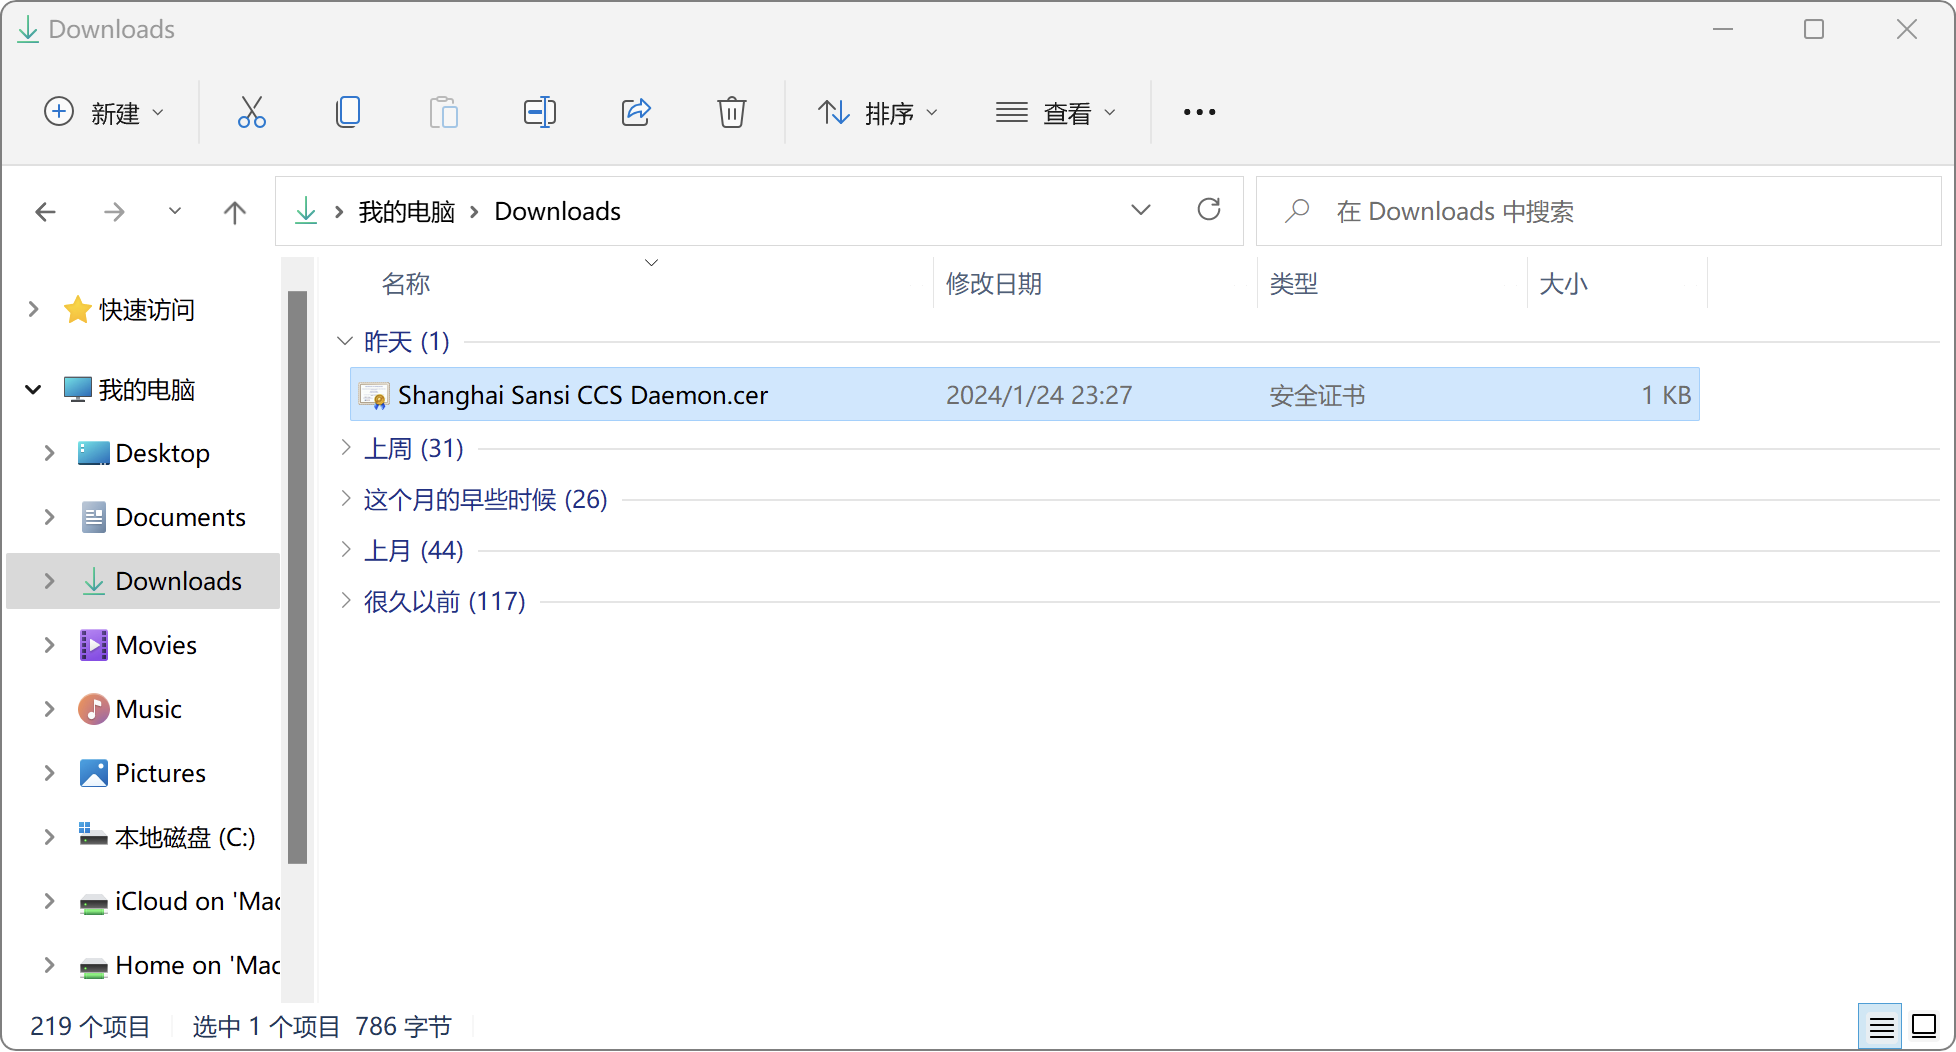
# Installing Certificate on Windows
Find the Shanghai Sansi CCS Daemon.cer file in the download directory.
Double-click it and choose the Cryptographic Service Provider extension to install.
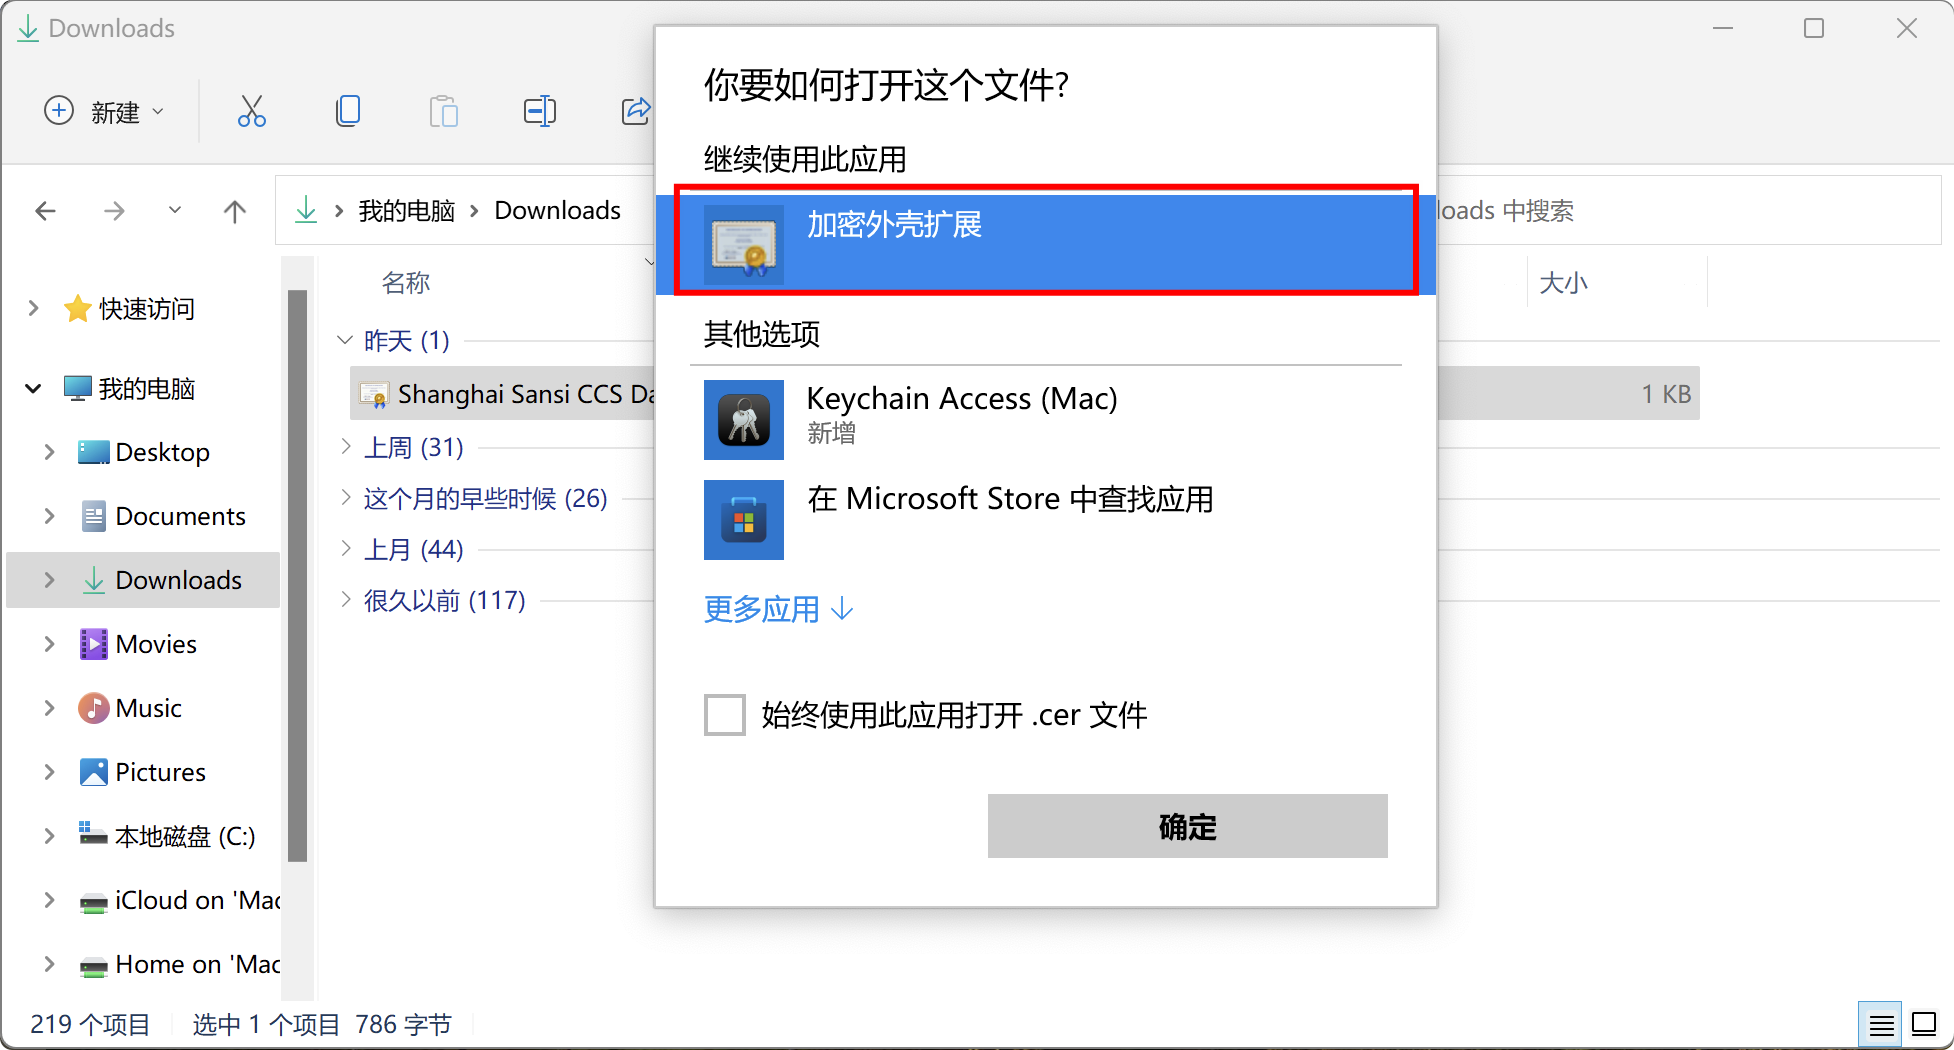
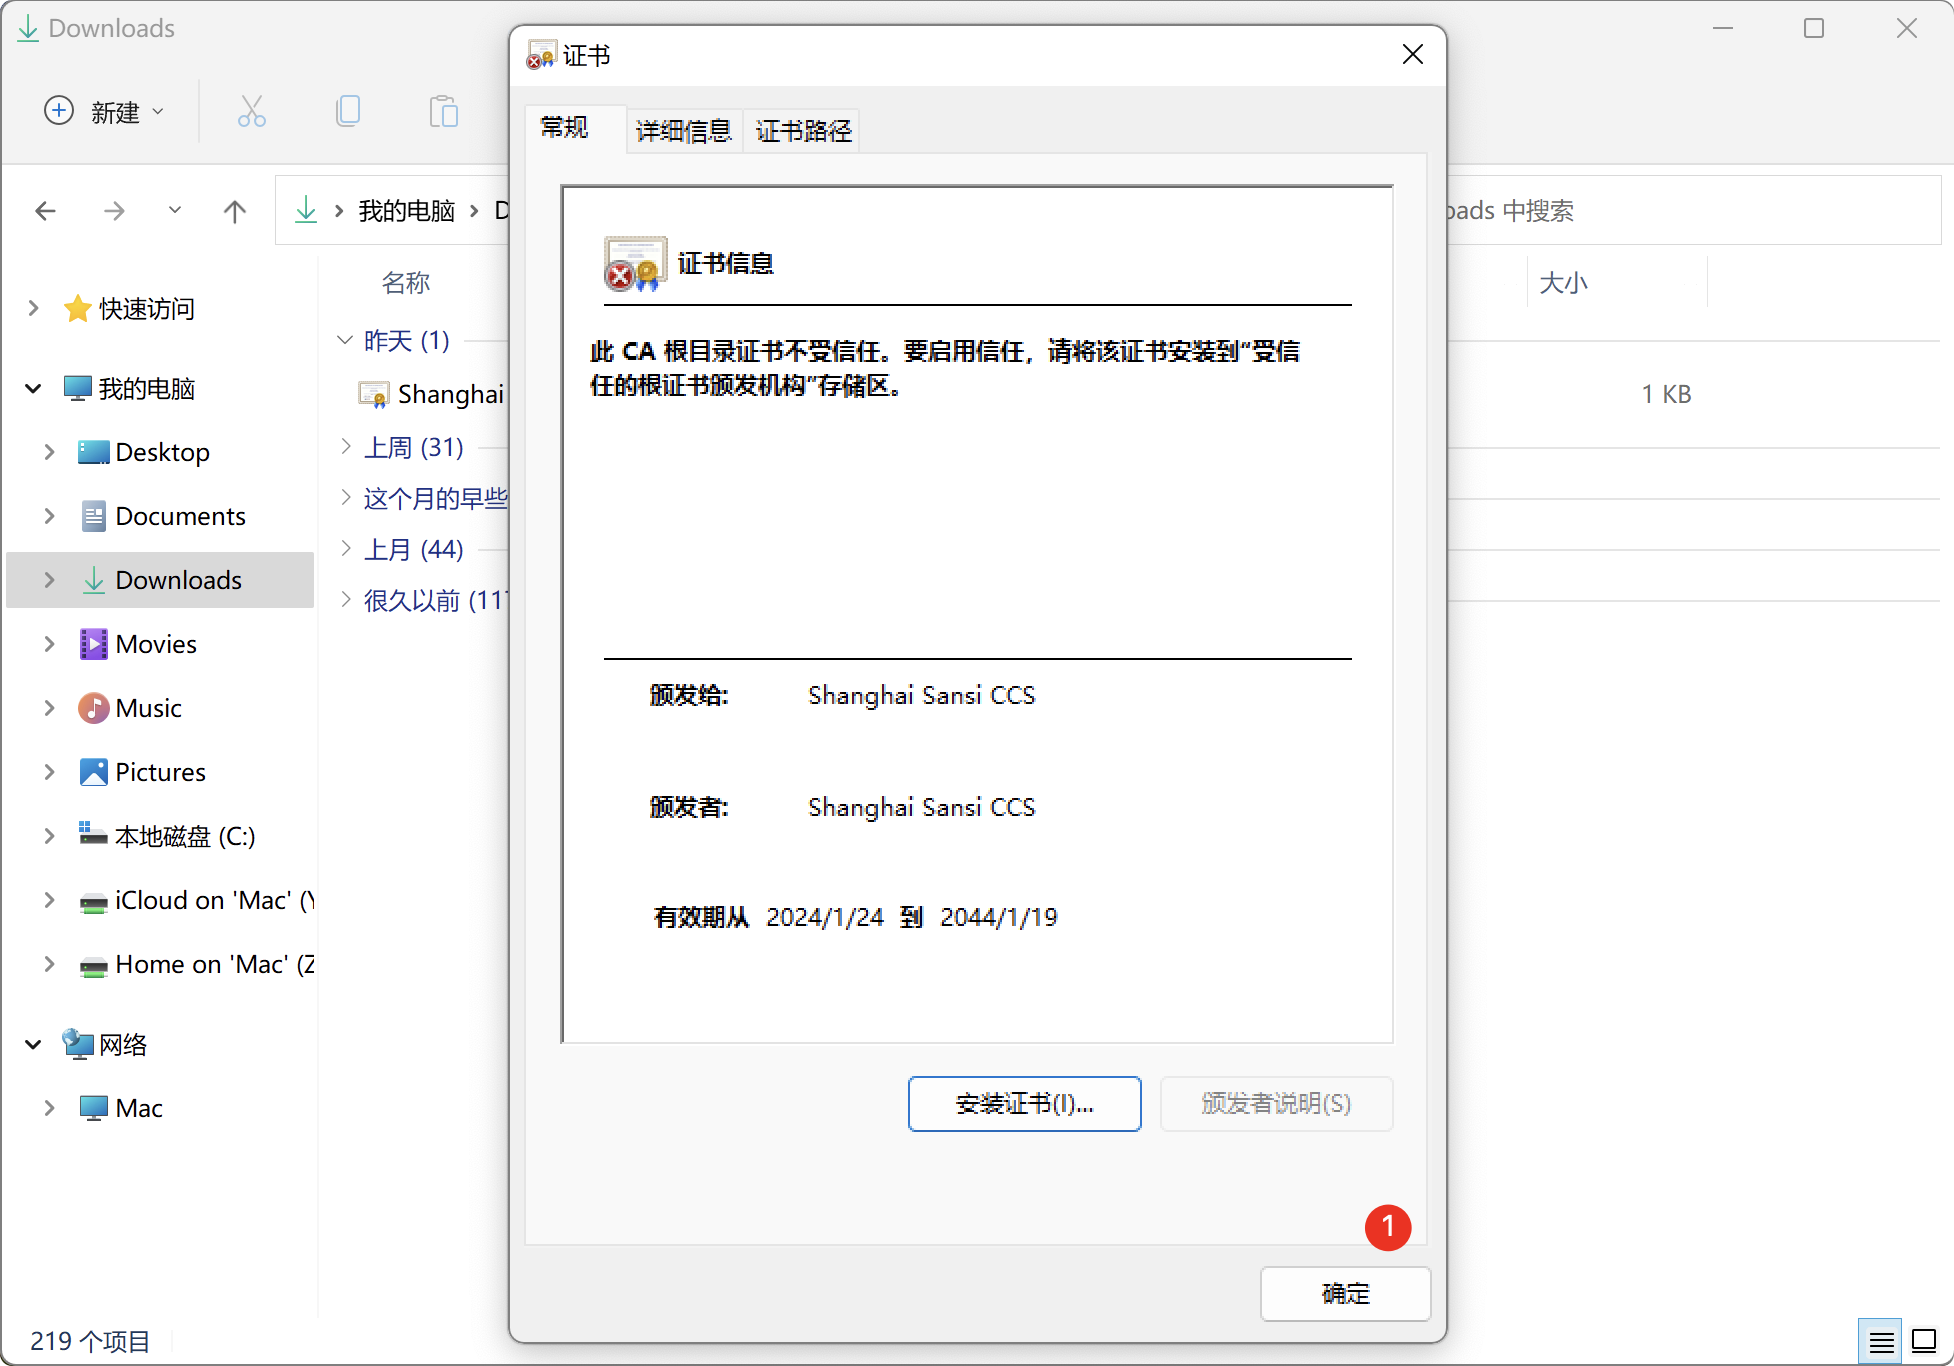
Click to install the certificate.
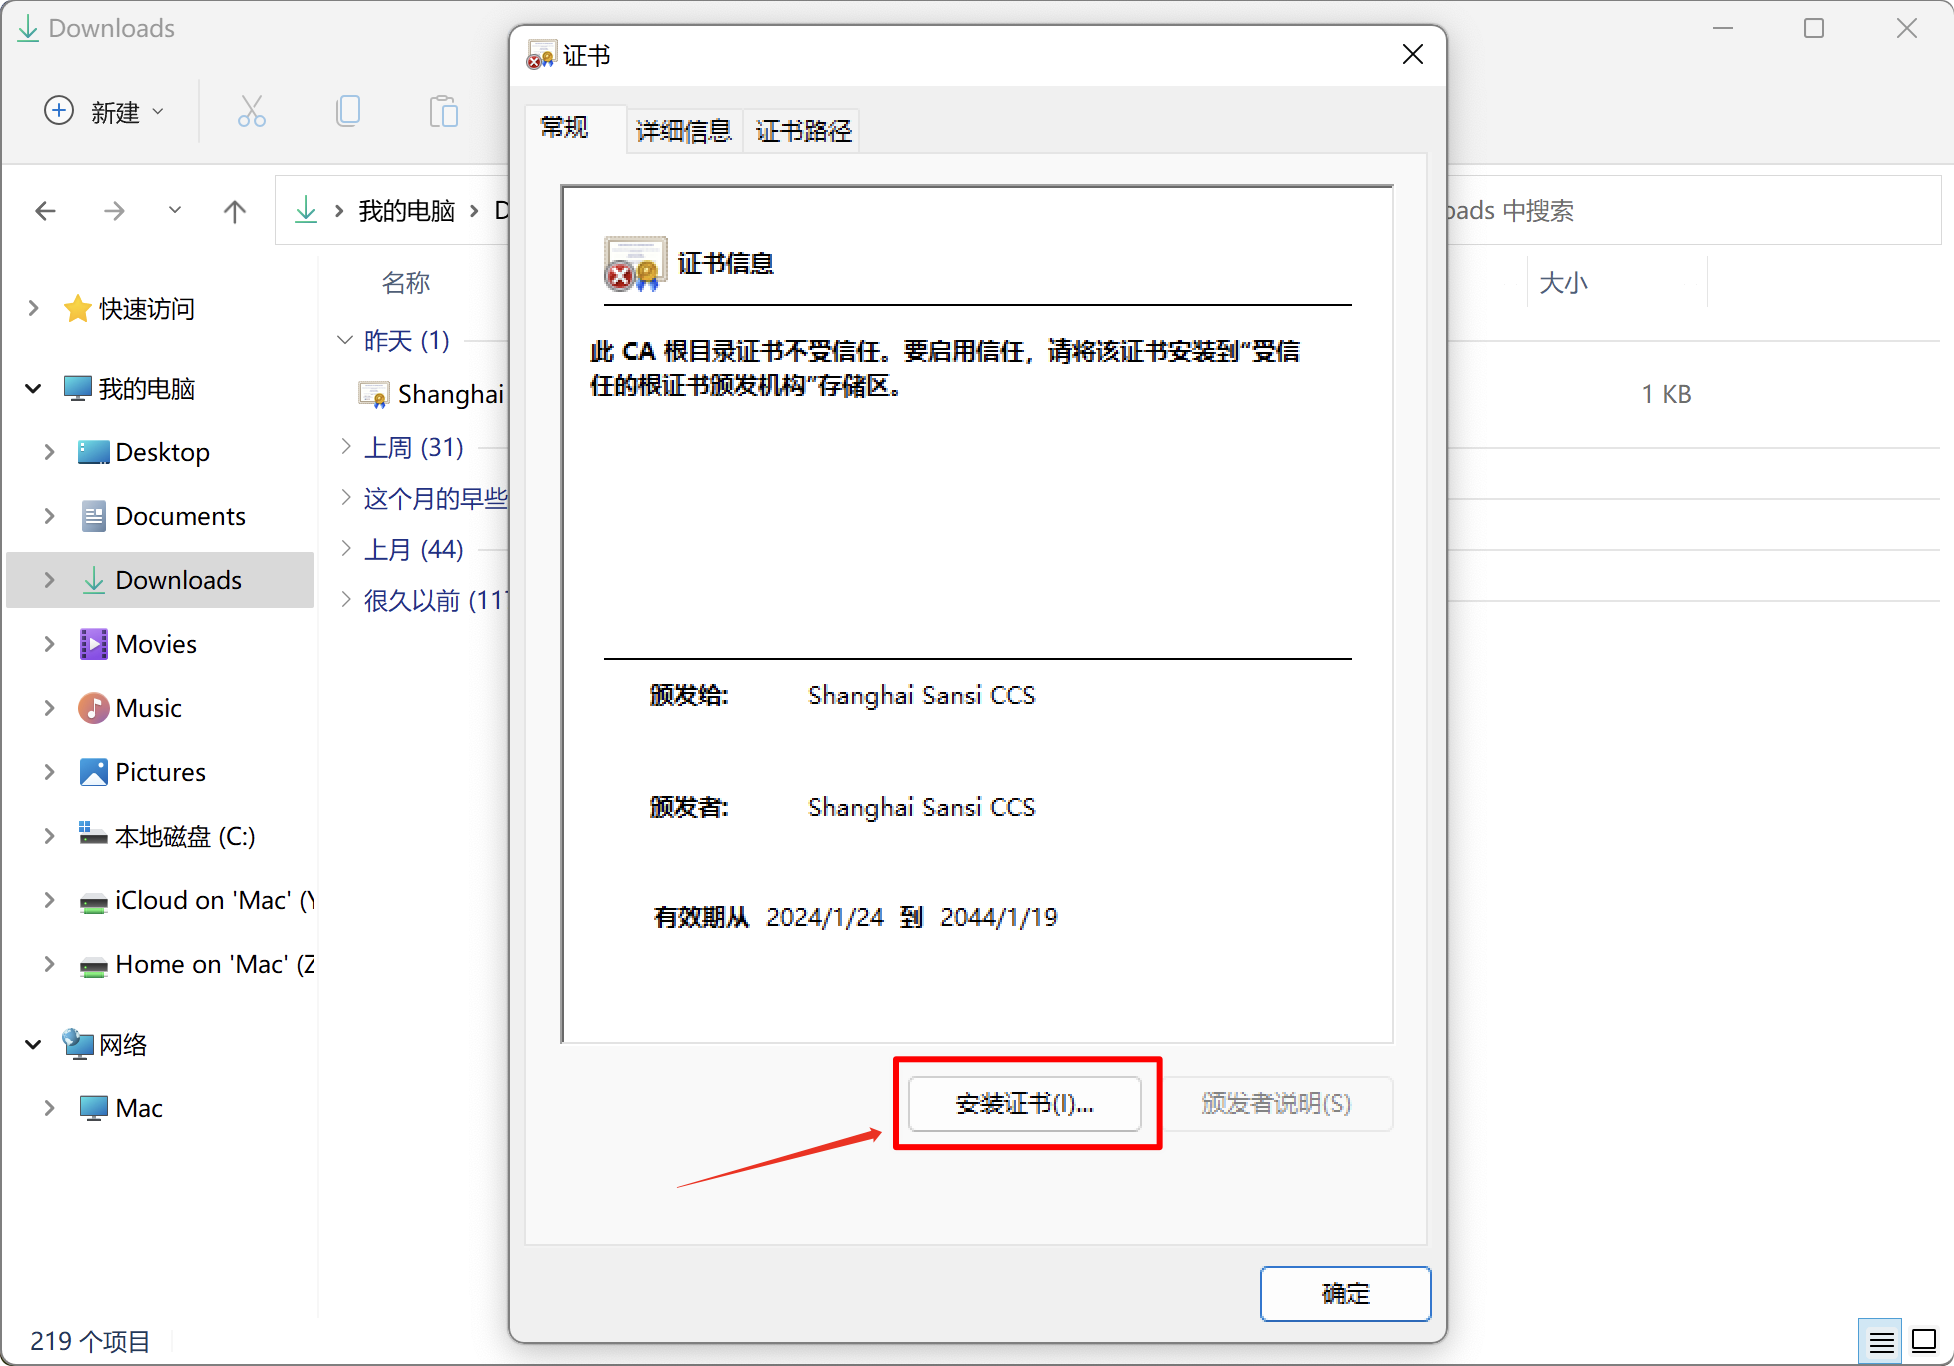
By default, install for the current user. If you need it to be shared by multiple users, please select Local Computer.
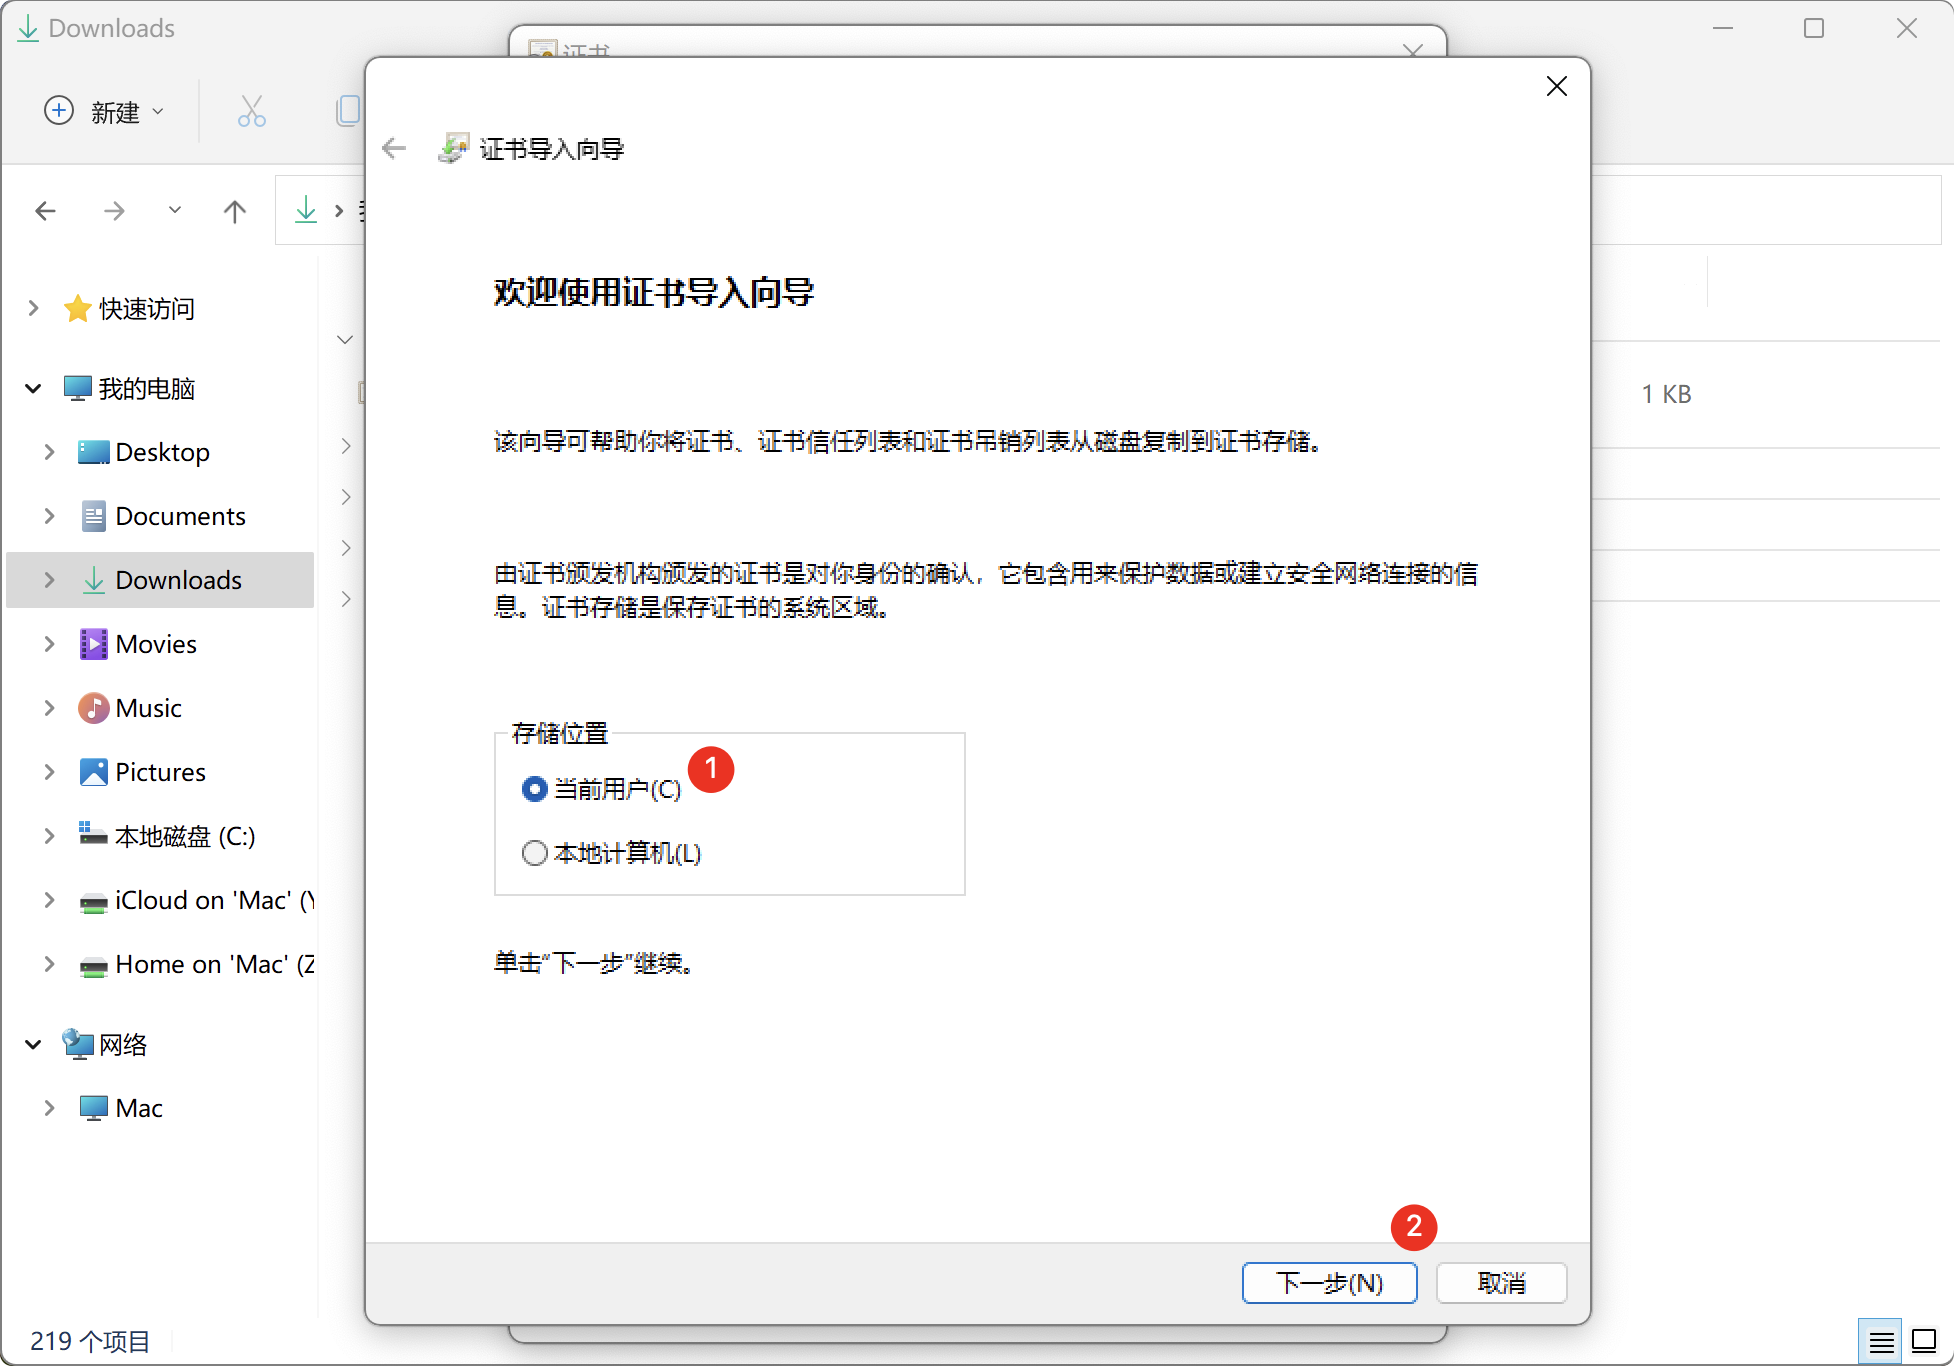
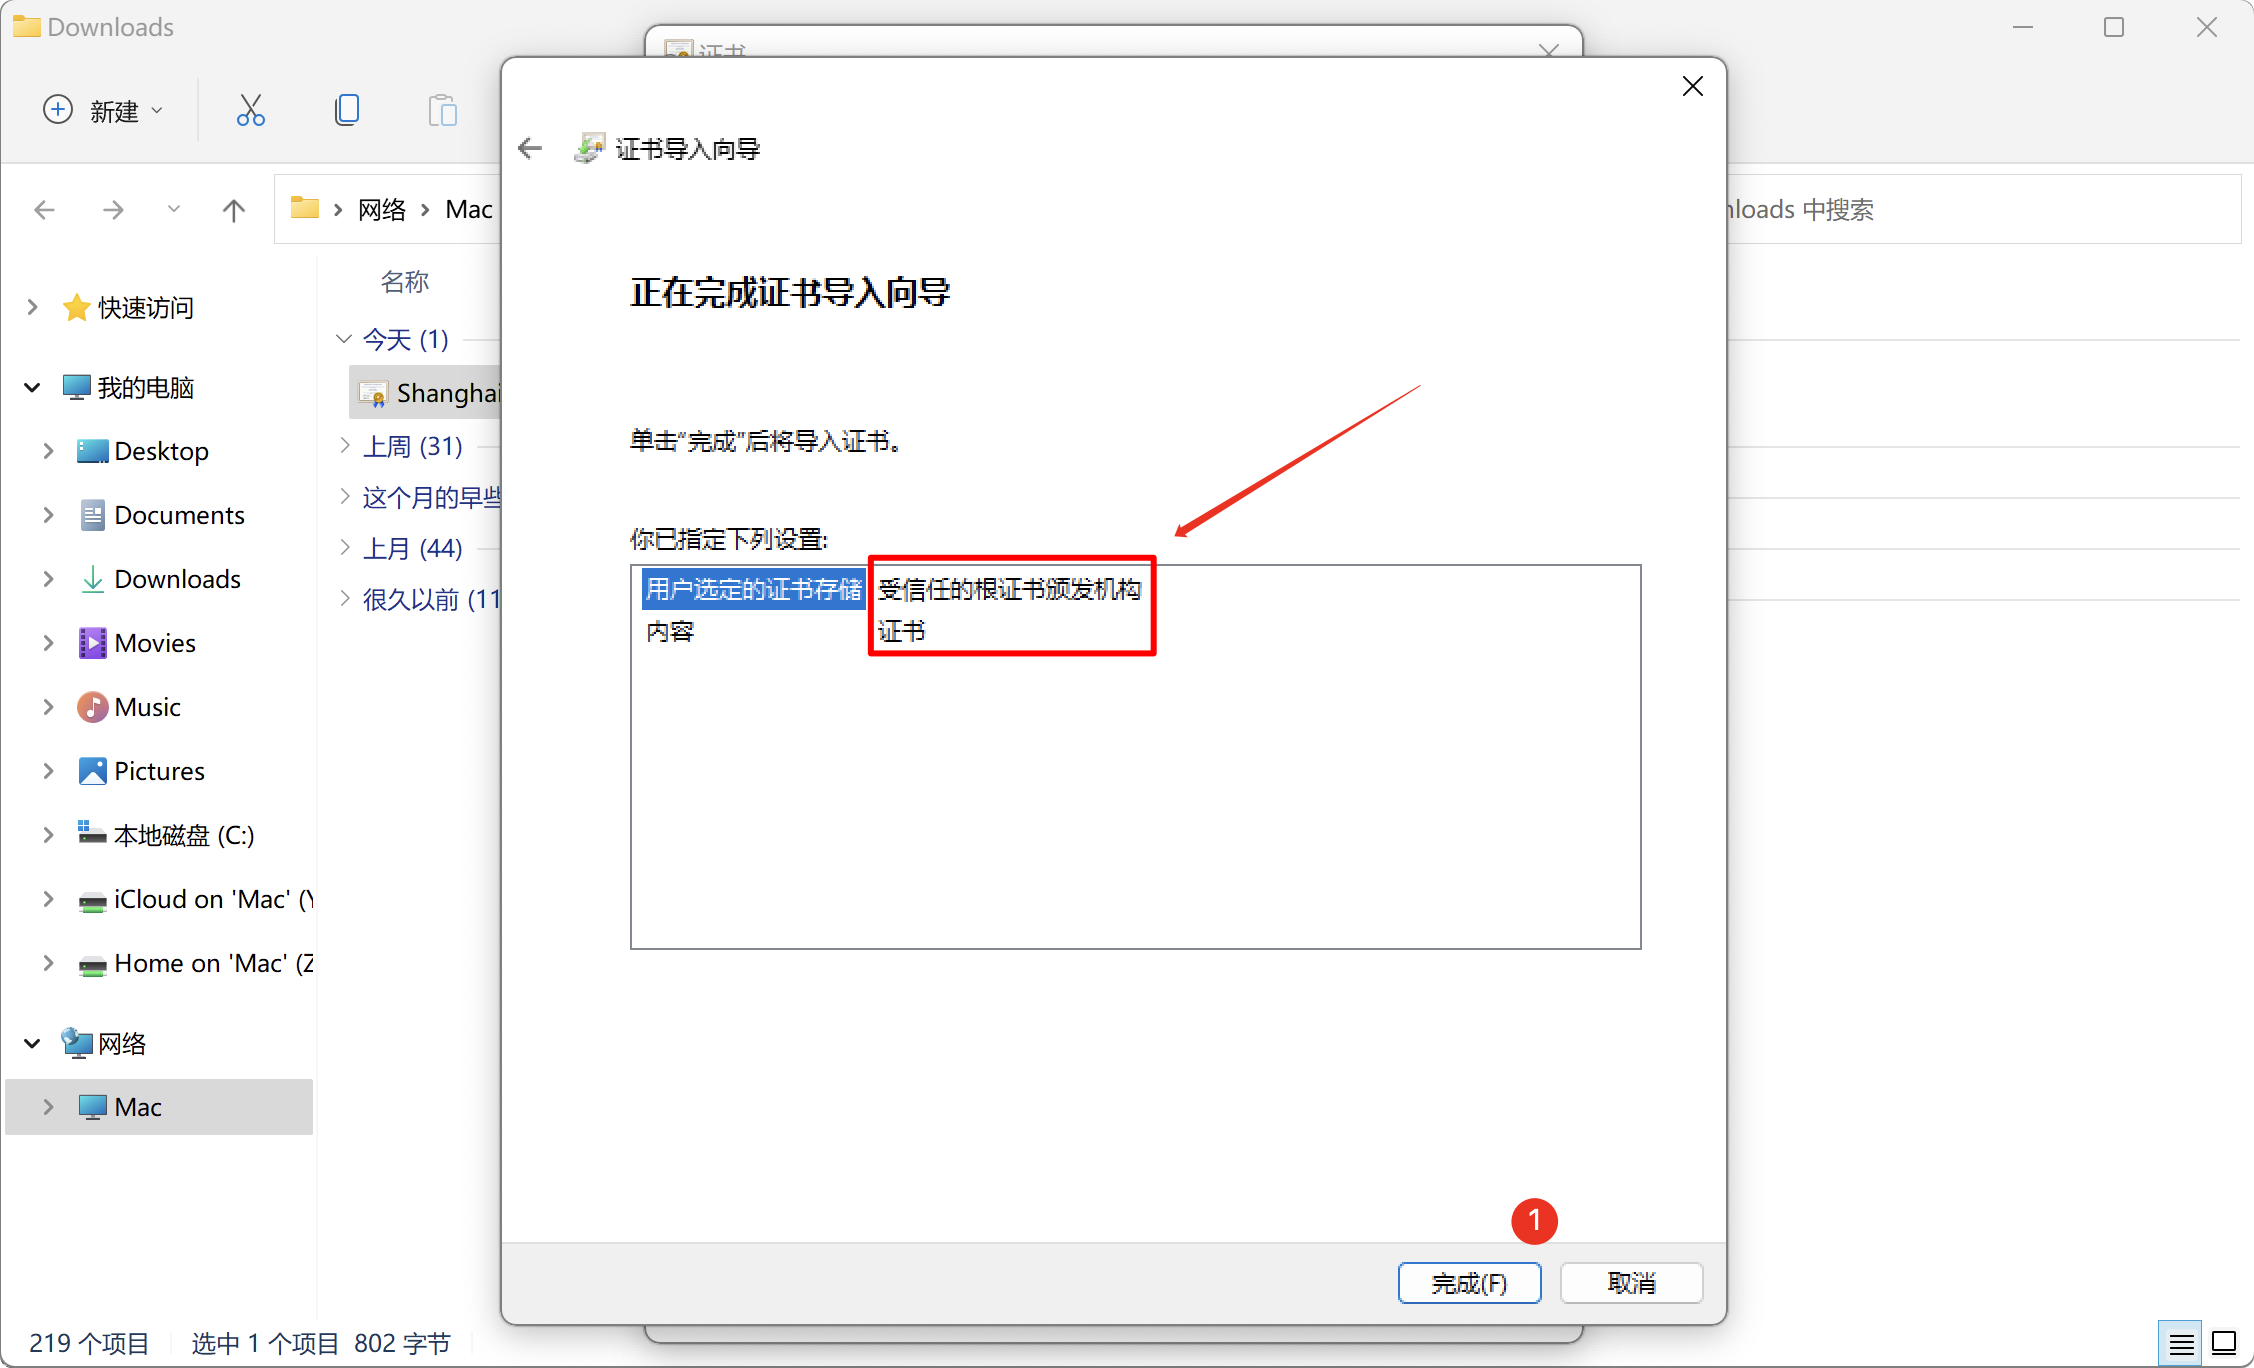
Install the certificate to the Trusted Root Certification Authorities as follows:
- Choose to place all certificates in the following store.
- Click Browse.
- Choose Trusted Root Certification Authorities.
- Click OK.
- Click Next.

After checking that the storage location is the Trusted Root Certification Authorities, click Finish.
If a warning message pops up, click the "Yes" button.

It will prompt that the import was successful.
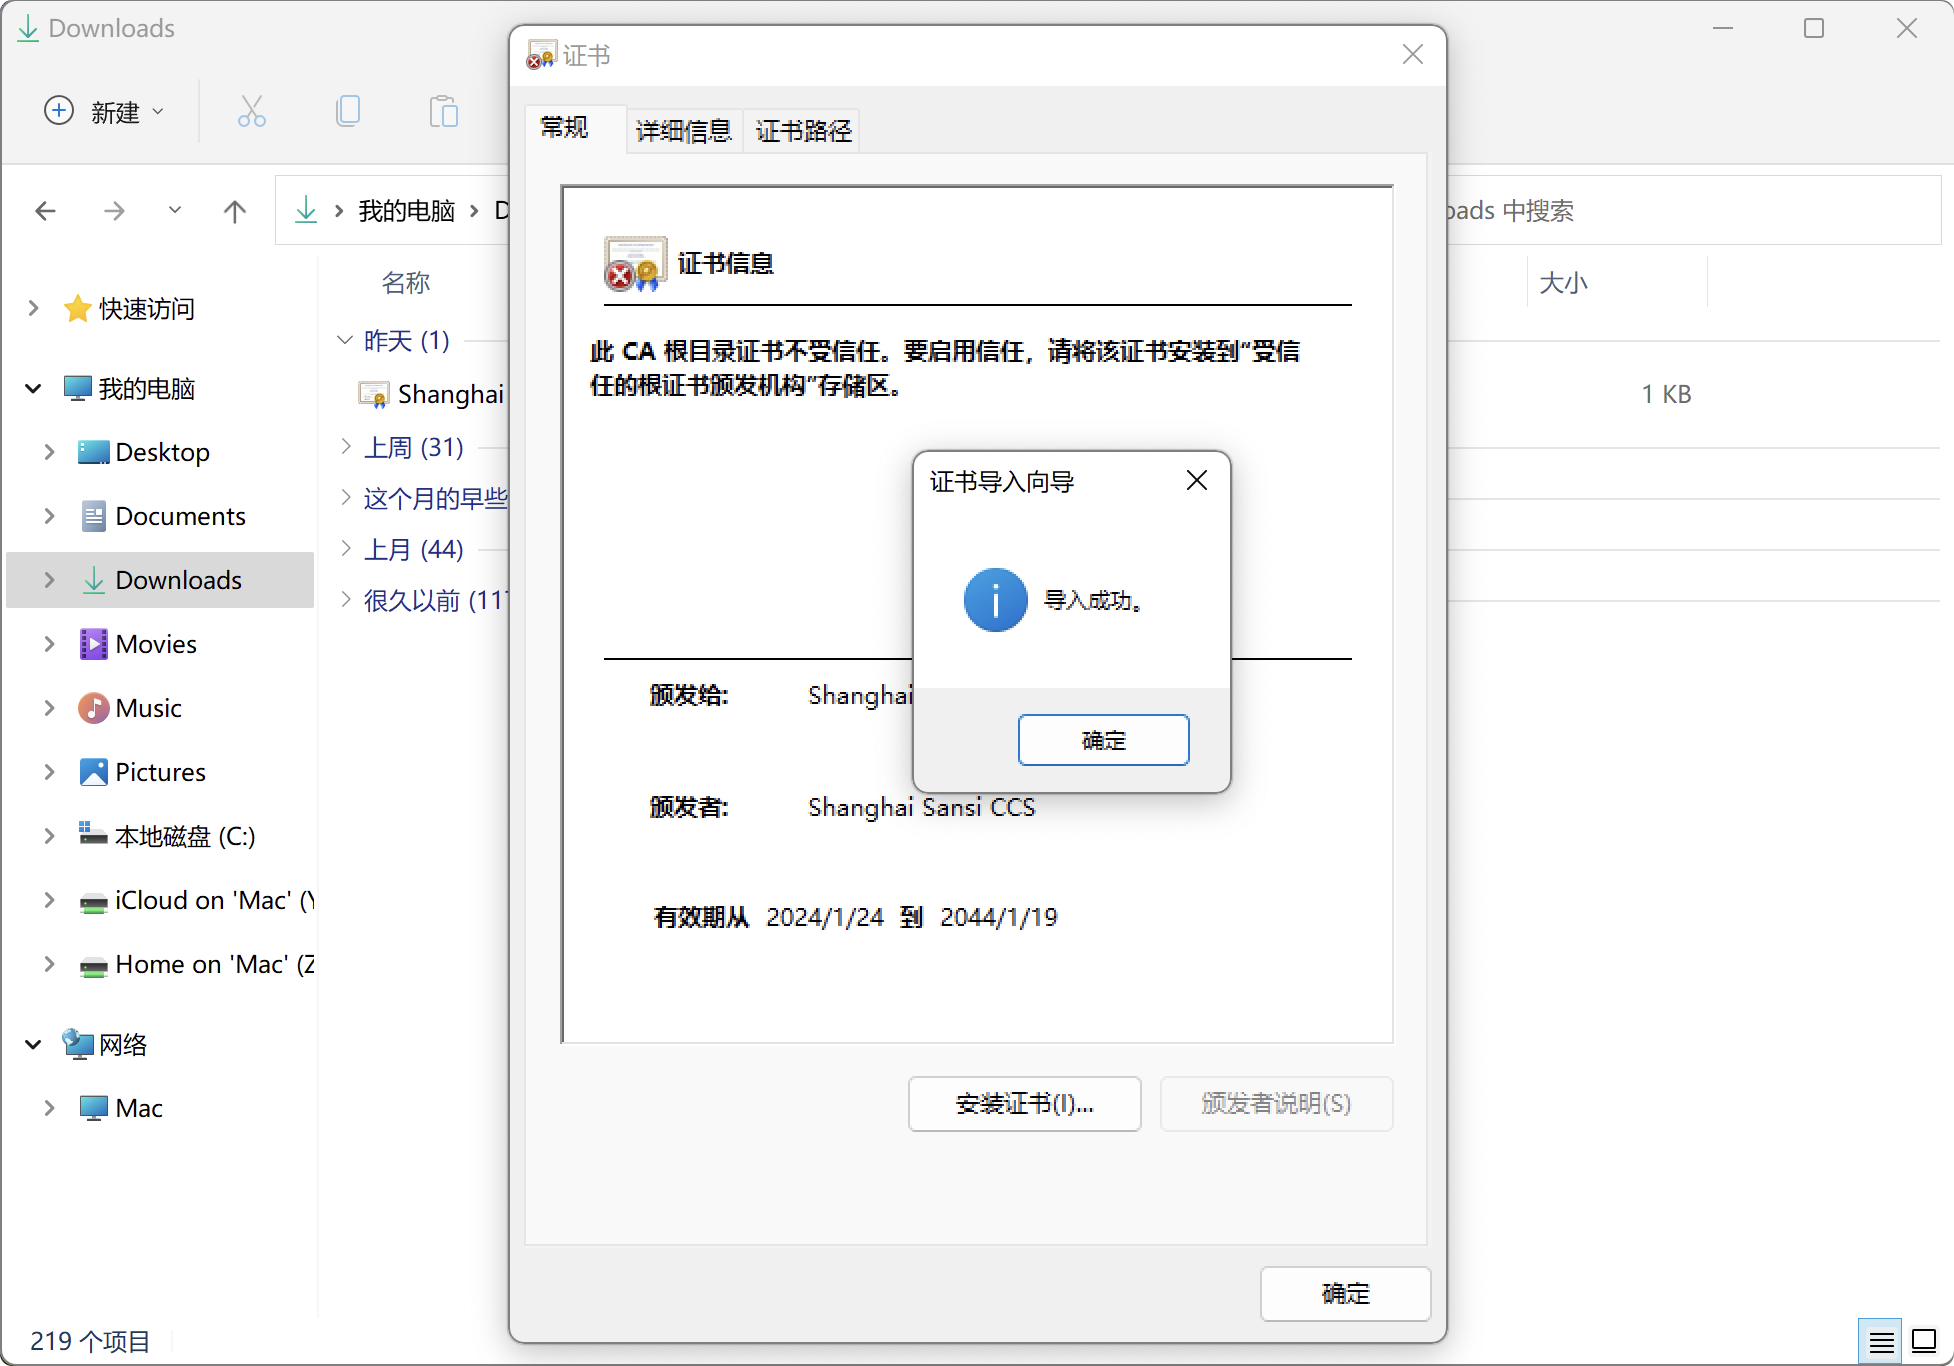
Click OK to close the certificate pop-up.
After completing the installation, close the browser. Then reopen it and enter the address again; the warning issue will no longer appear.
# Installing Certificate on Linux
Testing for related functionality on Linux has not yet been conducted; it will be added later when needed.
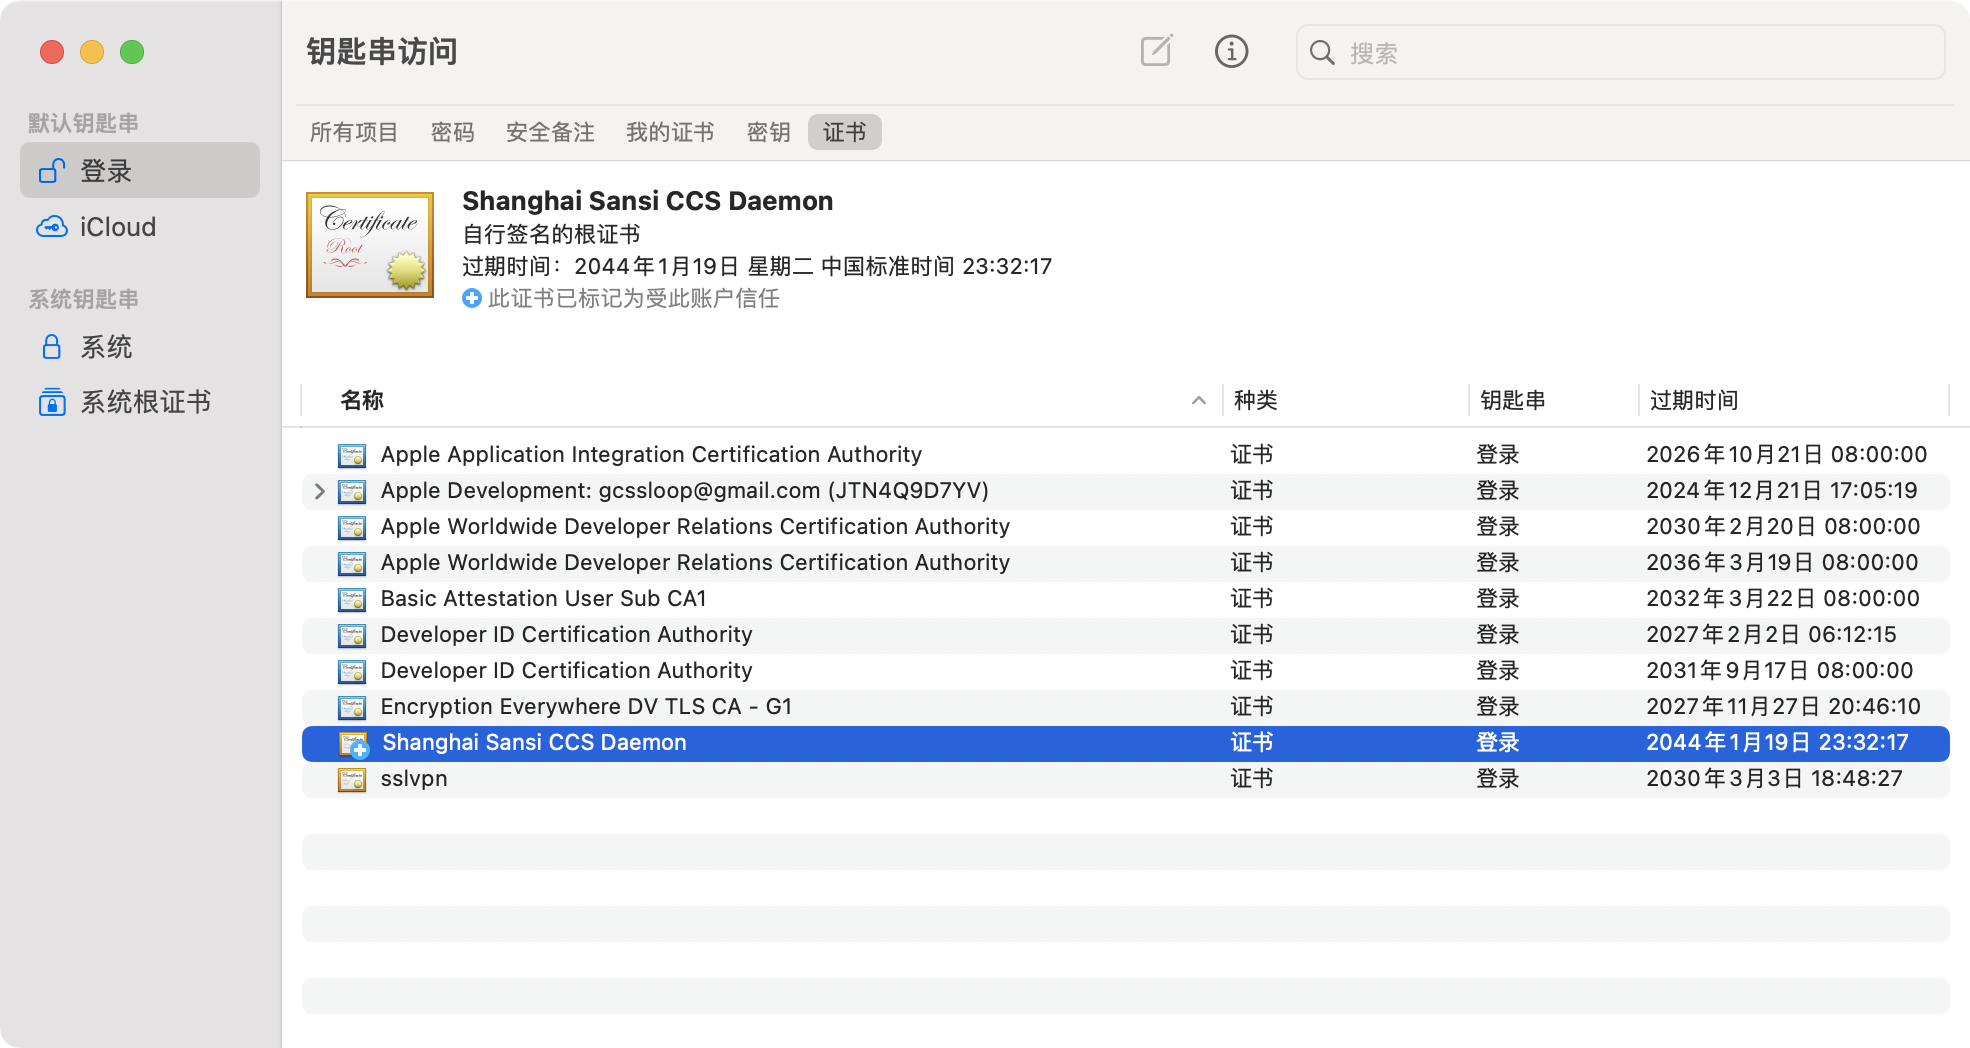
# Installing Certificate on Mac
Find the downloaded certificate in Finder and double-click to install it.
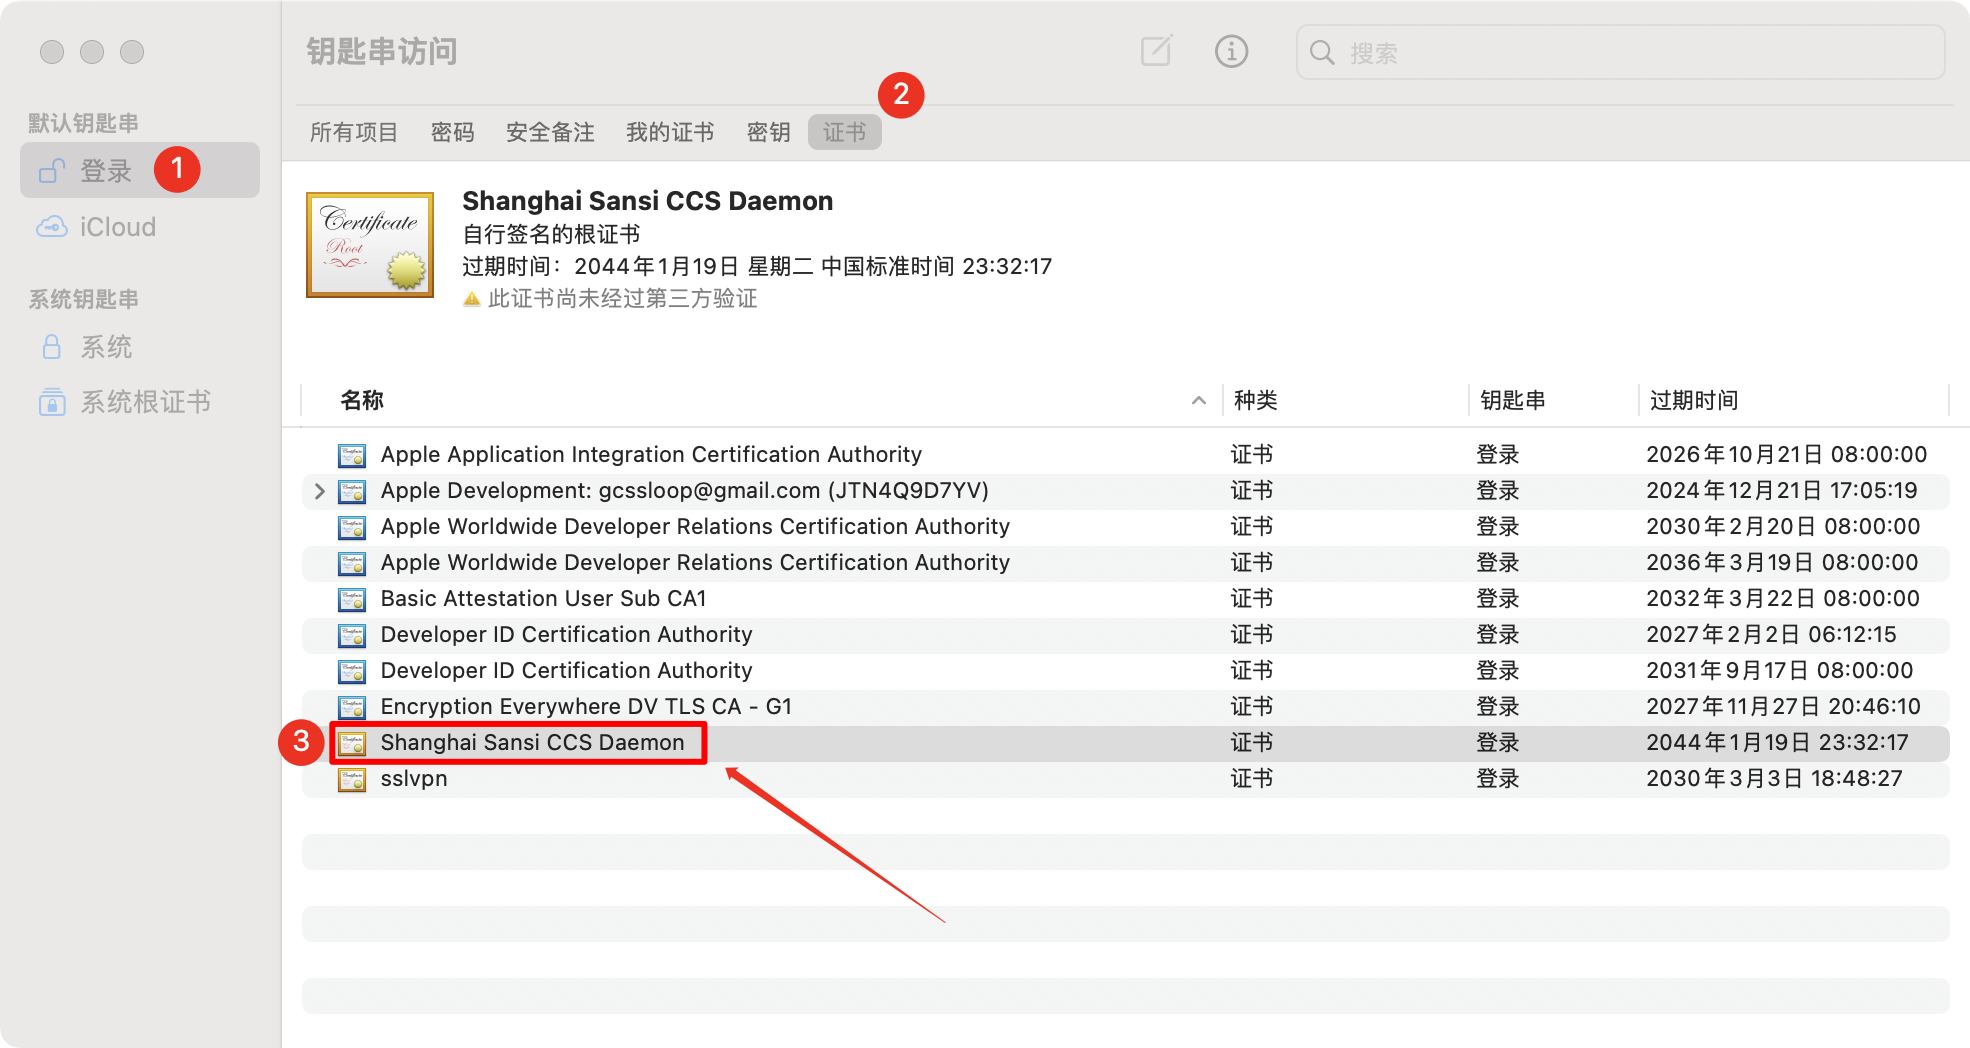
Open the Keychain App.
- Find Login.
- Find Certificates.
- Locate the "Shanghai Sansi CCS Daemon" certificate file.
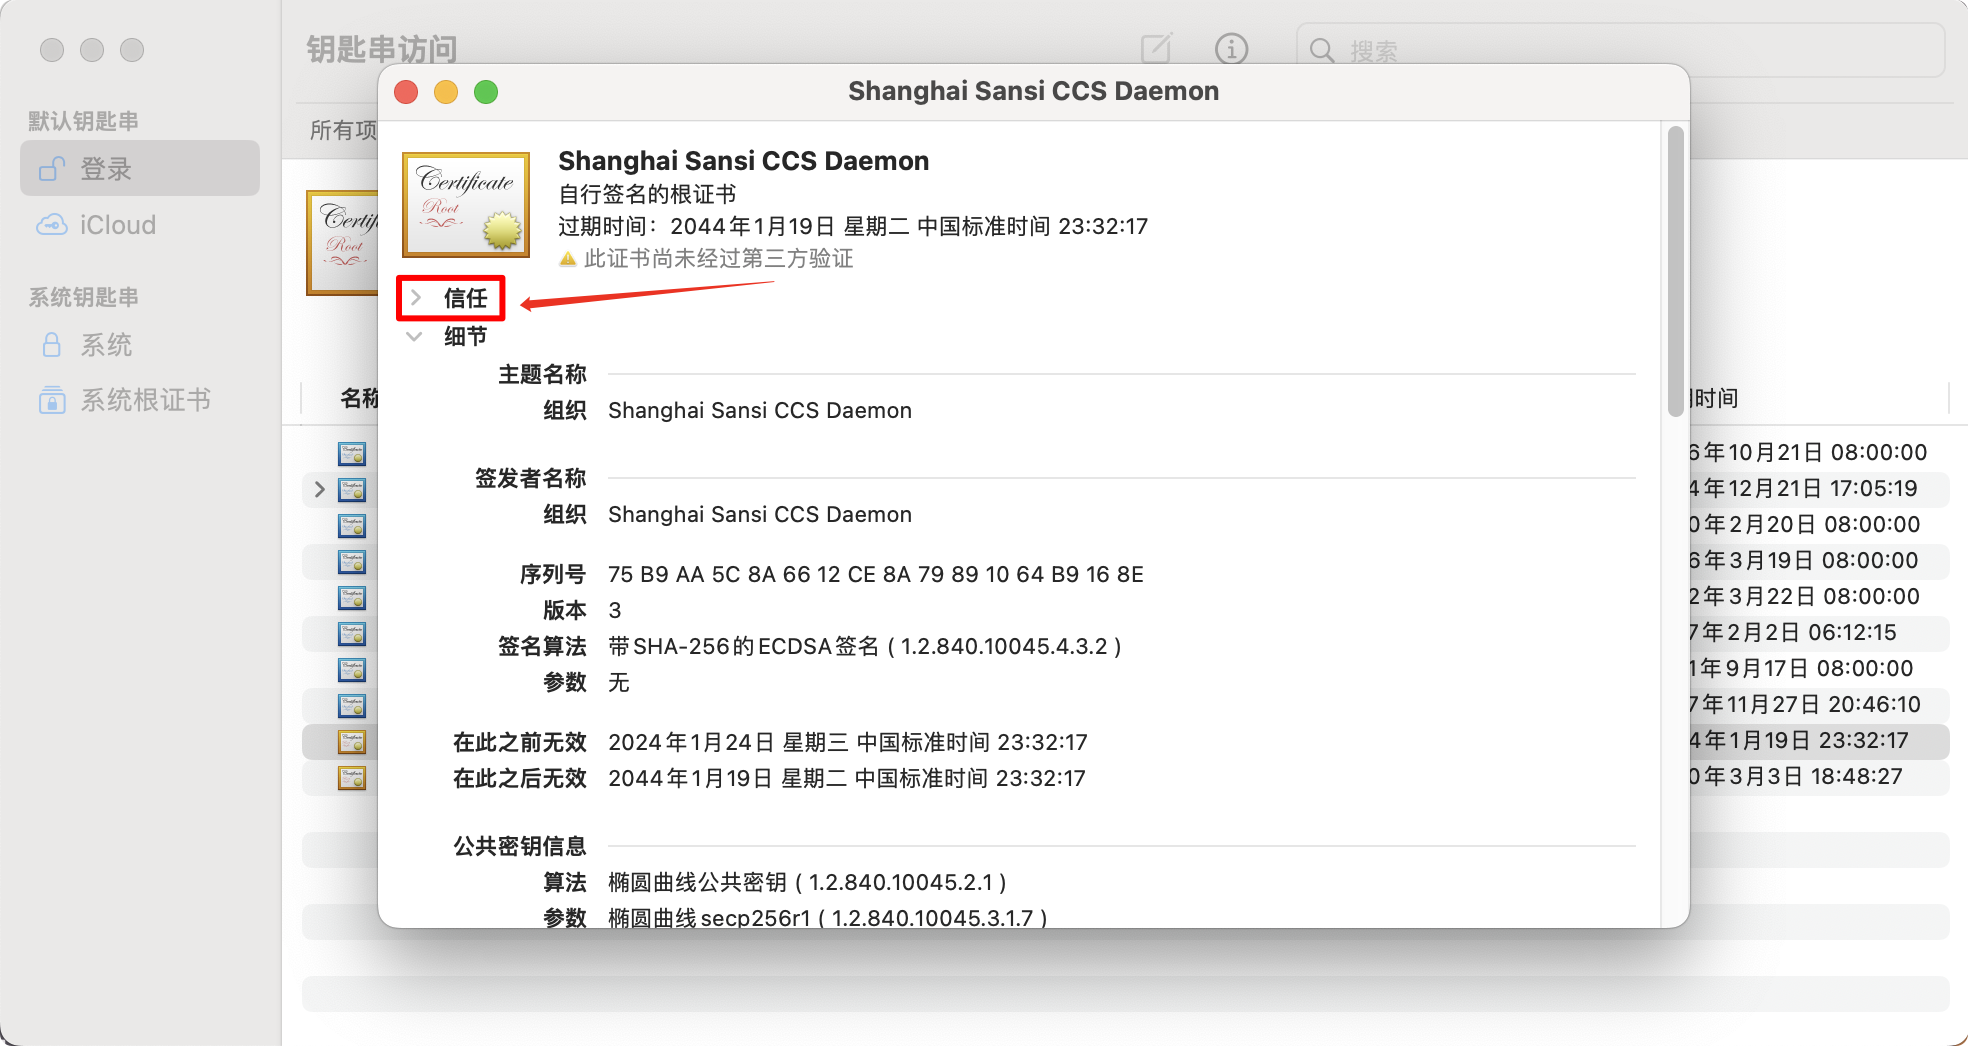
Double-click the certificate file to open it, then click to expand Trust.
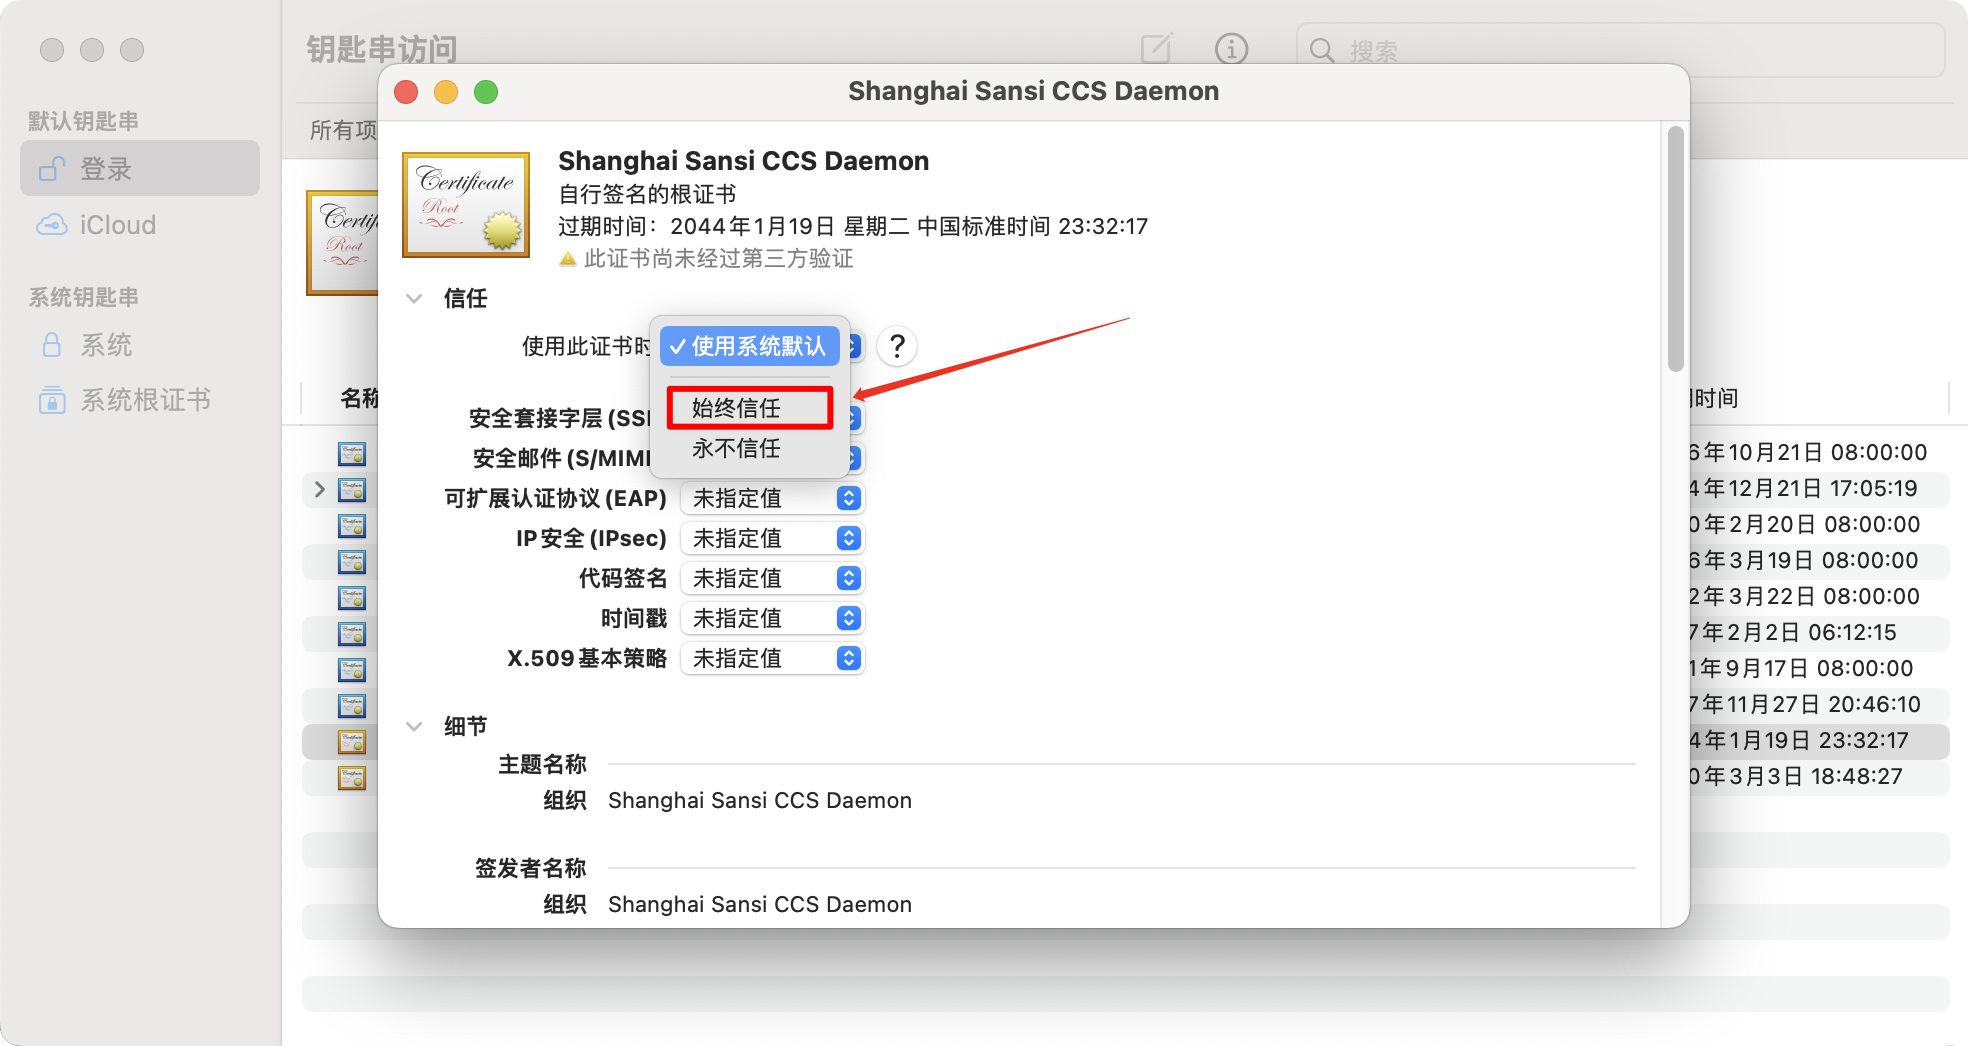
Select "Always Trust" and then close the window.
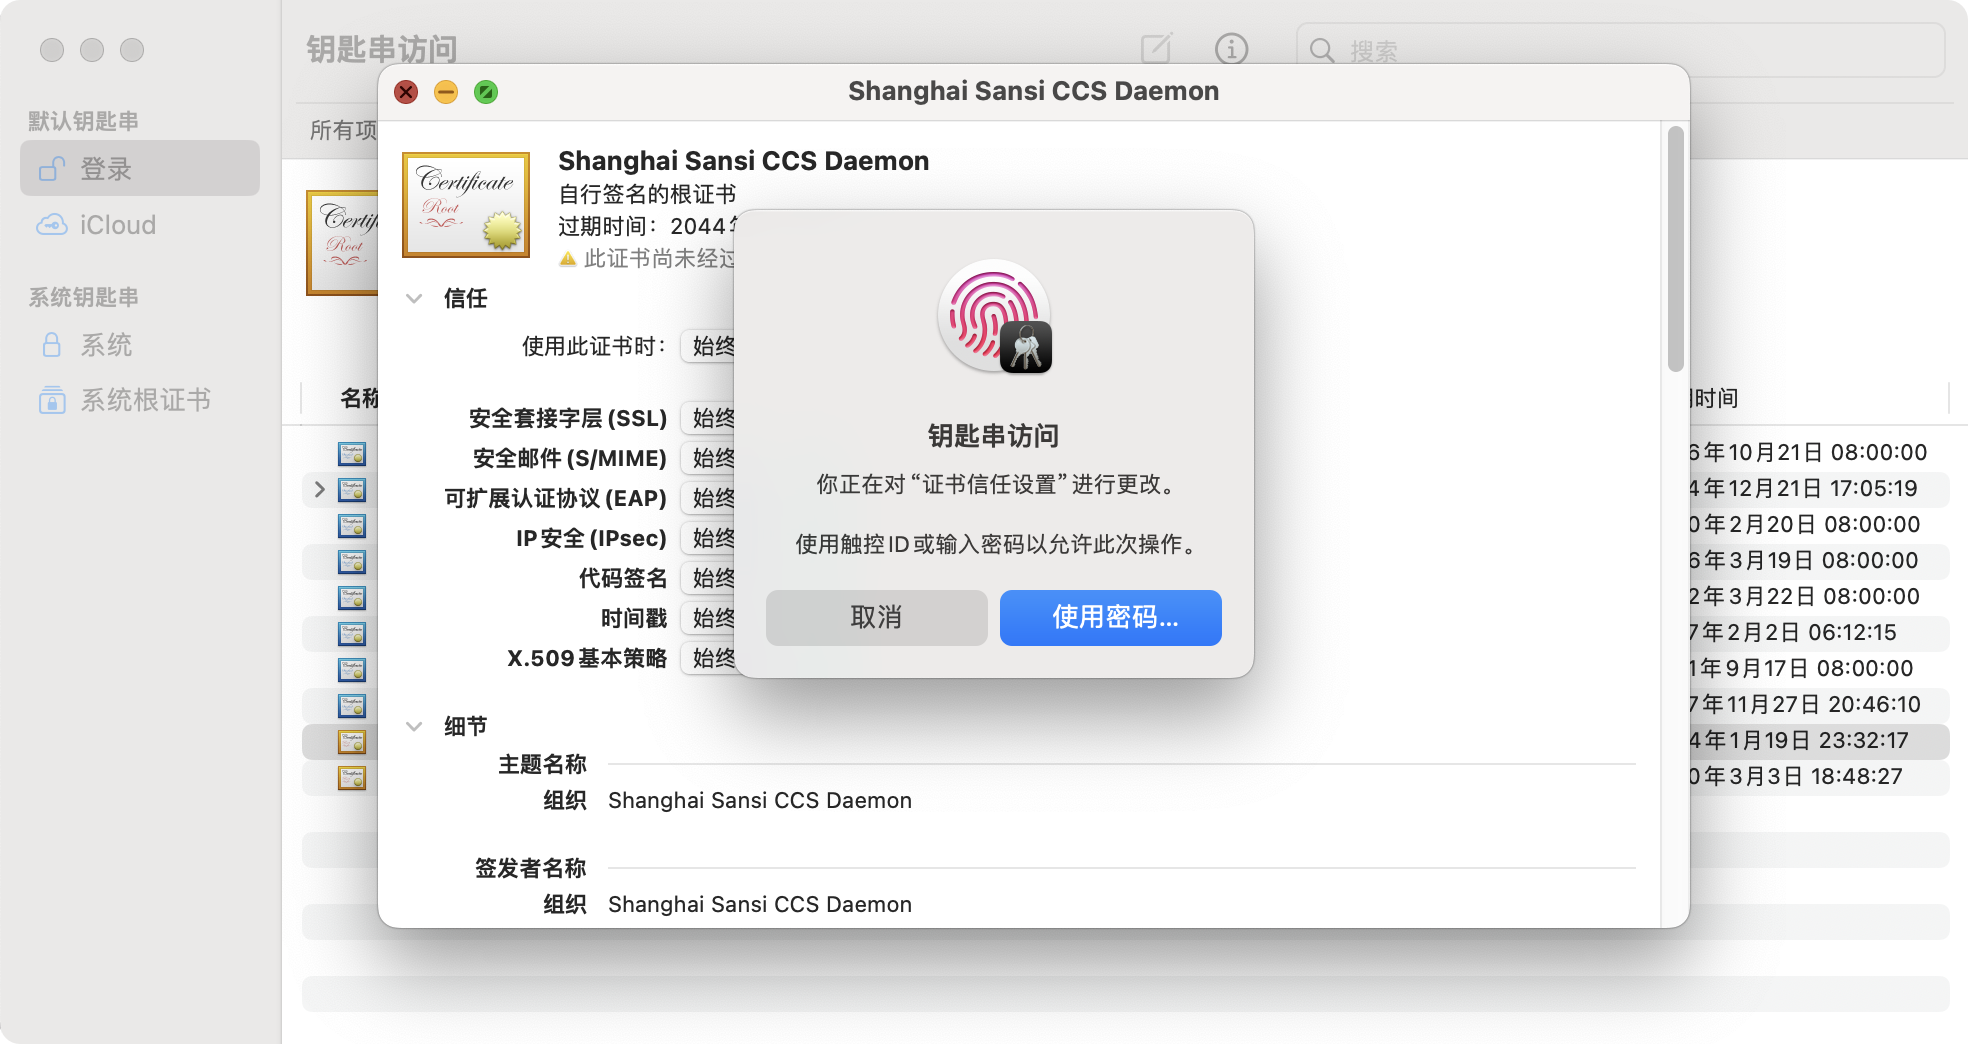
Authenticate using fingerprint or password.
If you see a plus sign above the certificate, it indicates that the setting was successful.
After closing the browser and re-entering, the warning message will no longer appear.